PIX4Dmapper allows the user to manually edit their Camera Model according to their setup. This article explains in detail the process.
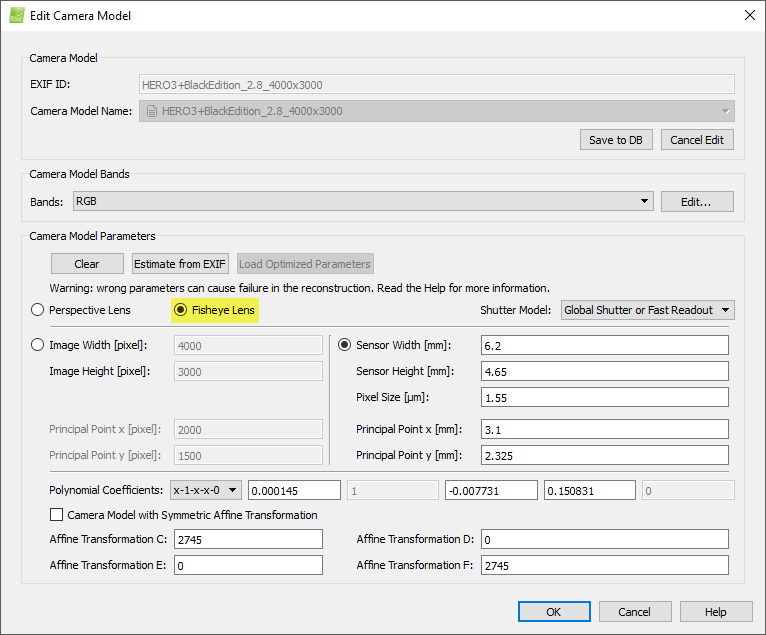
The Edit Camera Model window is used to define or edit the camera model.
The camera model can be set to perspective or fisheye lens. 
There are 3 sections:
- Camera Model: Displays the current EXIF ID and the associated camera model.
- Camera Model Bands: Displays the configuration band selected for the camera model.
- Camera Model Parameters: Describes the camera parameters for the selected camera model.
and 3 action buttons:
- OK: Confirms/applies the changes:
- Uses the camera model selected in the Camera Model section if saved into the camera model database.
- Uses the camera model name and parameters displayed in the Camera Model Parameters section if selected while editing or creating a new camera model. The currently displayed camera parameters are not saved into the camera model database but they are saved only in the project .p4d file.
- Cancel: Does not save the changes.
- Help: Opens the PIX4Dmapper help.

The following items are displayed:
- EXIF ID: Displays the current EXIF ID (CameraModel_ FocalLength_ResolutionWidthxResolutionHeight) of the camera. No user intervention is possible.
- Camera Model Name: Displays the currently selected camera model. The corresponding drop-down list allows the user to select another known camera model with the same image width and height.
Beside on the left of the selected camera model name, an icon appears that describes the source of the camera model:
 : Camera model taken from the internal camera model database.
 : Camera model taken from the internal camera model database with some user-edited values.
 : Camera model taken from the user camera model database.
![]() : Camera model taken from the image EXIF data when the camera model does not exist in the internal or the user database and there is valid information in the EXIF data.
: Camera model taken from the image EXIF data when the camera model does not exist in the internal or the user database and there is valid information in the EXIF data. : Camera model taken from the .p4d file when a .p4d file is created and its camera model does not exist in the internal or the user camera database.
- The internal camera database cannot be edited, modified or deleted.
- The user camera database can be:
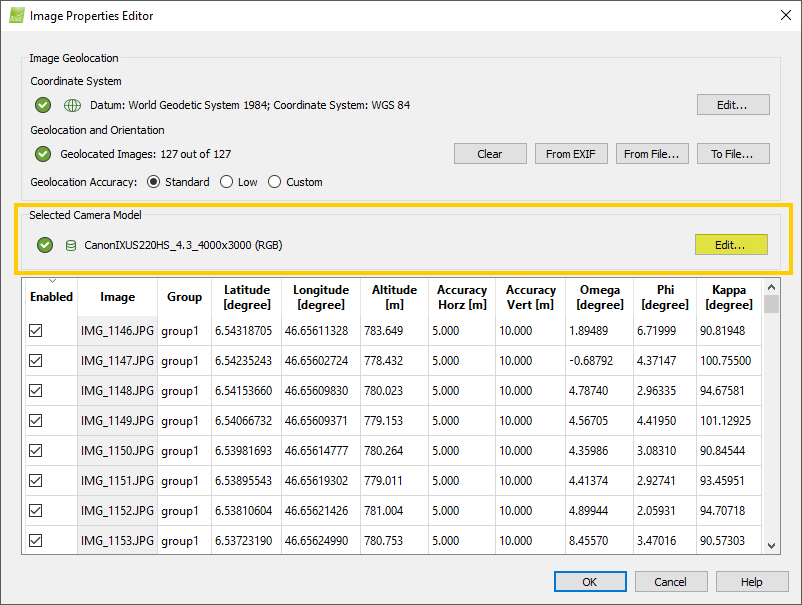
- Edited Menu Project > Image Properties Editor... > Selected Camera Model > Edit Camera Model.
- Cleared, imported or exported from Help > Settings..., under the tab Camera database.
Click the drop-down list to display the available camera models. The drop-down list only displays camera models with the same image width and height as the one detected in the EXIF ID. The drop-down list displays camera models using perspective lenses if Perspective Lens (Camera Model Parameters section) is selected and it displays camera models using fisheye lenses if Fisheye Lens (Camera Model Parameters section) is selected.
The following buttons are displayed:
- Edit: Edit the Camera Model Bands and/or the Camera Model Parameters for the selected camera model. To edit the camera parameters: How to use the Editing Camera Model Options.
- New: Create a new camera model. To create a new camera model: How to use the Editing Camera Model Options.
- Restore: It is displayed only for camera models that exist in the internal camera database and have been edited by the user and stored in the user camera database. It removes the camera model from the
 user database and restores the parameters from the
  internal database.
 - Save to DB: Visible when clicking on Edit or New. Save the camera model in the user camera model database.
- When editing
 , and saving to DB, it changes to
- When editing
 , and saving to DB, it creates
- When editing
 , and saving to DB, it creates
- When editing
 , and saving to DB, it creates
- When editing
 or
or  or
or  or
or  , and clicking in OK without saving to DB, it creates
- When creating new and Saving to DB, it creates

- When creating new and clicking in OK without saving to DB, it creates

- Cancel edit: Visible when clicking on Edit or New. Cancel the editing or creating of a new camera model.

The section contains 2 items:
- Bands: Displays the band configuration selected for the project. If the band configuration is in the EXIF, and it is one of the bands listed below, it is selected automatically. It allows the user to change the band configuration when more bands have been added to the camera model.
- Edit...: Opens the Edit Camera Model Band Configurations pop-up:

Allows to add/edit/remove Band configurations.Access: It is enabled if Edit or New has been selected in the Camera Model section.
There is one section:
- Band configurations table:

Each row displays information for one band configuration:
- Default: Displays which band configuration is selected by default when using the selected Camera Model.
- Bands Number: Number of bands for the Camera Model.
- Name: Name of the band configuration, double click on the cell to edit the name.
and the action buttons:
- Add..: Opens the pop-up band configuration window to add a new band configuration.

By default the values of the RGB band configuration appear:
Each row displays information for one band and by double-clicking on them, it is possible to edit the value:
- Enabled: Displays if the band is enabled or not for the selected band configuration.
- Name: Name of the band for the band configuration.
- Central Wave Length [mm]: Representative (most influential) wavelength for the band.
- Band Width [mm]: Width of the distribution related to the central wavelength of the band.
- Weight: How much value PIX4Dmapper gives to the selected band compared to other bands of the band configuration. These values only affect step 1. Initial Processing. The sum of all weights should be 1.
And the action buttons:
- Add...: Adds one more band. The number of bands should match the number of channels present in the image.
- Remove: Deletes the selected row.
- OK: Saves the new band configuration.
- Cancel: Does not save the band configuration.
- Help: Opens the PIX4Dmapper help.
- Edit...: Opens the Edit Band Configuration pop-up. It edits an existing band configuration:

By default the values of the RGB band configuration appear:
Each row displays information for one band and by double-clicking on them, it is possible to edit the value:
- Enabled: Displays if the band is enabled or not for the selected Band configuration.
- Name: Name of the band for the Band configuration.
- Central Wave Length [mm]: Representative (most influential) wavelength for the band.
- Band Width [mm]: Width of the distribution related to the central wavelength of the band.
- Weight: How much value PIX4Dmapper gives to the selected band compare to other bands of the band configuration. These values only affect step 1. Initial Processing. All the weights should sum to 1.
And the action buttons:
- Add...: Add one more band. The number of bands should match the number of channels present in the image.
- Remove: Deletes the selected row.
- OK: Saves the new band configuration.
- Cancel: Does not save the band configuration.
- Help: Opens the PIX4Dmapper help.
- Remove: Deletes the selected band from the Band configurations table.
- OK: Confirms/applies the changes.
- Cancel: Does not save the changes.
- Help: Opens the PIX4Dmapper help.
Example: Examples of band configurations:- RGB: For images with 3 bands. The first band corresponds to Red, the second band corresponds to Green, and the third band corresponds to Blue.
- Blue, Green, NIR: For images with 3 bands. The first band corresponds to Blue, the second band corresponds to Green, and the third band corresponds to Near Infrared.
- NIR, Green, Blue: For images with 3 bands. The first band corresponds to Near Infrared, the second band corresponds to Green, and the third band corresponds to Blue.
- NIR, Red, Green: For images with 3 bands. The first band corresponds to Near Infrared (or Infrared), the second band corresponds to Red, and the third band corresponds to Green.
- Red edge, Green, Blue: For images with 3 bands. The first band corresponds to Red edge, the second band corresponds to Green, and the third band corresponds to Blue.
- Red, Green, NIR: For images with 3 bands. The first band corresponds to Red, the second band corresponds to Green, and the third band corresponds to Near Infrared.
- Band configurations table:
The Camera Model Parameters section includes all camera parameters and is enabled for editing if the Edit or New button has been clicked in the Camera Model section. It displays the camera parameters of the selected Camera Model Name in the Camera Model section.
The Camera Model Parameters section has 3 action buttons (enabled if Edit or New has been clicked in the Camera Model section):
- Clear: It clears all the fields except image width (pixel) and height (pixel).
- Estimate from EXIF: Estimates the parameters from the EXIF data if enough information about the camera model is found there.
- Load Optimized Parameters: Enabled once at least step 1 has been completed, it changes the camera initial values to the optimized values.
It also has the Shutter Model dropdown list with the following options:
Global Shutter or Fast Readout
To be used if the camera has a global shutter: all light information is read at the same time for the whole sensor.
This option models the rolling shutter (the image is scanned line by line) of some cameras such as the GoPro or the standard DJI cameras. This can be enabled if the camera's shutter is a rolling shutter and, the flight plan is linear (grid mission, building facade, etc.). For more information about how Pix4D models the rolling shutter effect: scientific white paper.
The parameters can be defined or edited for a:
- Perspective lens: When the camera model uses a perspective lens.
- Fisheye lens: When the camera model uses a fisheye lens (ultra wide angle lens).
- Spherical camera: Only available when the camera detected is spherical or the height of the image is two times the width. Spherical images are unidisorted by the camera manufacturer and the Image Properites Editor does not present any camera model parameters. For step by step instructions about how to process Spherical images: How to process images of a spherical camera.

To edit values in pixels, select the radio button on the left of the Image width [pixels] text box. To edit values in millimeters, select the radio button on the left of the Sensor width [mm] text box.
The x image coordinate of the principal point in pixels. The principal point is located around the center of the image. The coordinate system has its origin as displayed here:

The y image coordinate of the principal point in pixels. The principal point is located around the center of the image. The coordinate system has its origin as displayed here:

The sensor width in millimeters. If the sensor width is estimated from the EXIF and no information is in the image EXIF data, the sensor width is set to 36[mm].
The sensor height in millimeters. If the sensor height is estimated from the EXIF and no information is in the image EXIF data, the sensor width is set to 36 [mm] and the sensor height is computed in such a way that the ratio sensor width / sensor height in millimeters equals the ratio image width / image height in pixels.
The size of the pixel is read from the EXIF data if the information is available. If there is no information related to the pixel size, then it is calculated in order to correspond to 36 x 24 mm sensor size.
The x image coordinate of the principal point in millimeters. The principal point is located around the center of the sensor. The coordinate system has its origin as displayed here:

The y image coordinate of the principal point in millimeters. The principal point is located around the center of the sensor. The coordinate system has its origin as displayed here:

4 different type of polynomials can be selected from a drop-down list, where 1,2 or 3 values are already pre-defined and cannot be changed:
- 0-1-x-x-0
- x-1-x-x-0
- 0-1-x-x-x: recommended
- x-1-x-x-x: ignores an area around the image center. This is useful when the center is blurry or contains a lot of noise