Related articles:
| Organization management - overview | Team Access Control on resources | Team Access Control on licenses |
Access:
- A PIX4Dcloud Teams or PIX4Dcloud Enterprise license is required.
- Log in at https://account.pix4d.com/home.
- This functionality is only available for PIX4Dcloud Teams and PIX4Dcloud Enterprise customers. Please contact Sales for more information.
IN THIS ARTICLE
Overview of Team Access Control on License
Granting Access to a License
Checking Seat Usage on a License
Releasing an Occupied Seat
Processing Datasets with Team Access Control
Visualizing datasets via Share to PIX4Dcloud
Team Access Control to API credentials
Revoking Access to a License
Overview of Team Access Control on License
In terms of Team Access Control in Organizational management, a Member is understood as a person who does not have an Organizational role. Their access level is limited to specific resources (folder, site, or dataset) to which they are invited within the Organization.
Information:
- This functionality is only available for PIX4Dcloud Teams and PIX4Dcloud Enterprise customers.
- To occupy a seat in a license, the user must first be invited directly to the Organization (Owner, Manager, Editor, Reader, or Member) or to a PIX4Dcloud resource (Member role).
Access to licenses is determined by the user’s role within the Organization: Owner, Manager, Editor, Reader, or Member.
-
Owners, Managers, and Editors at the Organization level automatically have permission to occupy a seat on all licenses available in the Organization.
- Readers and Members may be eligible for a license if access is granted by a role of Owner or Manager at the Organization level.
-
Seat allocation is limited to desktop software and mobile apps.
-
Cloud products do not have seat allocation; the right to access the dataset with appropriate permissions in a Cloud product is associated with the role in the resource in question.
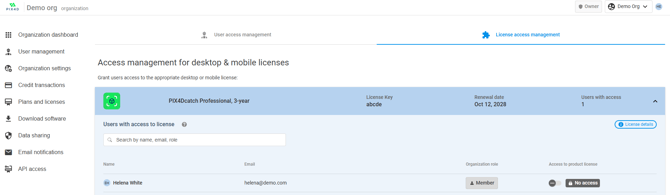
Granting Access to a License
Only the Owner and Manager at Organization-level can grant access to a desktop license:
-
Log in to PIX4D Account.
-
Select the relevant Organization and click Dashboard.
-
Navigate to User management > License access management.
-
For the desired license, expand the License details by clicking v.
-
This lists all users who have accepted the invitation to the Organization.
-
-
Enable access for the required user.
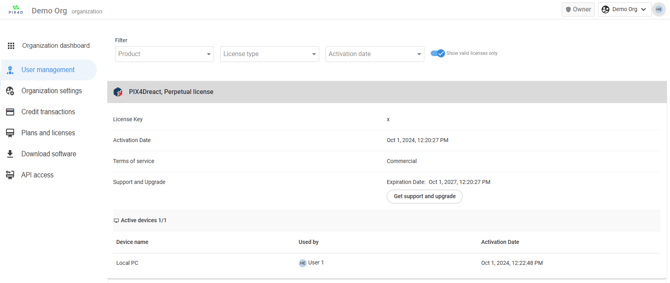
Checking Seat Usage on a License
Seat usage verification can only be performed for desktop licenses.
To check the number of occupied seats:
-
Log in to PIX4D Account.
-
Select the Organization and open the Dashboard.
-
Go to Plans and licenses > Licenses.
-
Locate the desired license and review the Active devices information.
To verify which user is occupying a seat:
-
Log in to PIX4D Account.
-
Select the Organization and open the Dashboard.
-
Go to Plans and licenses > Licenses.
-
Under the desired license, check Active devices > Used by information.
Releasing an Occupied Seat
Information: It is possible to release the seat of the PIX4D desktop licenses by logging out.
To release an occupied seat on a desktop license or app, follow these steps:
-
PIX4Dmatic: Under the user icon, go to Account > Device Manager > Reclaim seat under the user icon.
-
Device deactivation is available from version 1.67.0.
-
-
PIX4Dsurvey: Under the user icon, Device Manager > ⋮ > Reclaim seat.
-
PIX4Dcatch: Under Account settings, select the Organization and click Release.
-
If the application is inactive, the seat is automatically released every 12 hours.
-
-
PIX4Dfields / PIX4Dreact: Remote deactivation is not supported. Users must log out after use to release the seat.
-
PIX4Dmapper:
-
In the software, click the user icon in the top-right corner and select Log out, or
-
On the Organization portal: Plans and licenses > Licenses > PIX4Dmapper > Active devices > Deactivate device. For more information, Remote device deactivation - PIX4Dmapper.
-
Processing Datasets with PIX4Dcloud
From PIX4Dcatch:
-
If the PIX4Dcloud and PIX4Dcatch licenses are under different Organizations, select the correct Organization in the Upload Project wizard under Account and Organization.
-
Under Upload Location, select the folder or site for dataset processing. The user’s role must be higher than Editor in that resource. For more information, FAQ - Organization management.
-
If the PIX4Dcloud license is in a different Organization than the PIX4Dcatch license, you can define where the PIX4Dcloud license is located from PIX4Dcatch by following these steps: Selecting a different organization from PIX4Dcloud license from PIX4Dcatch.
- Only users with the following roles can process datasets: Owner, Manager or Editor role at Organization-level, and Member-Editor or Member_Manager role on a Folder or Site.
-
From PIX4Dmatic:
-
After creating a project and selecting processing options, go to File > PIX4Dcloud > Processing in PIX4Dcloud….
-
Define the upload location, ensuring the user’s role in the target folder or site is higher than Editor. For more information, Process in PIX4Dcloud - PIX4Dmatic.
- Only users with the following roles can process datasets: Owner, Manager or Editor role at Organization-level, and Member-Editor or Member_Manager role on a Folder or Site.
From PIX4Dmapper:
- After creating a project and selecting processing options, go to Project > Upload Project Files ...
- Note that it's not possible to define an upload location from PIX4Dmapper, so the dataset is processed directly in the PIX4Dcloud root. Only Owner, Manager, or Editors roles at the Organization level have access, not Readers or Members.
Information: Please note that the processing workflow for uploading datasets from PIX4Dmapper to PIX4Dcloud will undergo significant changes soon. For more information, Decommission Notice: PIX4Dmapper Legacy Processing Pipeline in Cloud Products.
Visualizing Datasets via Share to PIX4Dcloud
Datasets can also be shared and visualized directly in PIX4Dcloud. The user must be an Owner, Manager, or Editor role at the Organization-level, or Member_Manager or Member_Editor in the target resource (folder or site).
-
PIX4Dmatic: Go to File > PIX4Dcloud > Share to PIX4Dcloud…, then select the inputs, outputs, and the upload location.
-
PIX4Dsurvey: Go to File > Share to PIX4Dcloud…, select the layers, outputs, and upload location, then click Share.
-
PIX4Dfields: In the top-right corner, click Export > Share, select the layers and upload location, then click Upload.
-
PIX4Dreact: In the top-right corner, click Export > Share, select the layers and upload location, then click Upload.
Team Access Control to API credentials
Not all organization members can generate API credentials. The following organization roles have permission to generate new client_id/client_secret pairs:
- Owner
- Manager
- Editor
The following roles cannot generate API credentials:
- Organization Reader
- Member, with Manager, Editor, or Reader access to a subset of resources in the organization.
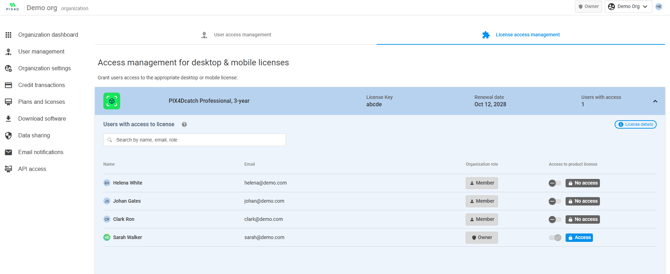
Revoking Access to a License
Only the Owner and Manager at Organization-level can revoke access to a desktop license.
To revoke access to a desktop license or app, follow these steps:
-
Log in to PIX4D Account.
-
Select the Organization and open the Dashboard.
-
Navigate to User management > License access management.
-
For the desired license, expand the license information by clicking v.
-
This displays all users who have accepted the invitation to the Organization.
-
-
Disable access for the user whose permissions should be revoked.