IN THIS ARTICLE
Licenses: This article is valid for all PIX4Dcloud licenses.
Roles:
- Owners, Managers, Editors and Reader can view datasets in PIX4Dcloud.
- Only Owners, Managers, and Editors can make permanent changes to a dataset, such as saving annotations or importing files.
2D/3D Viewer
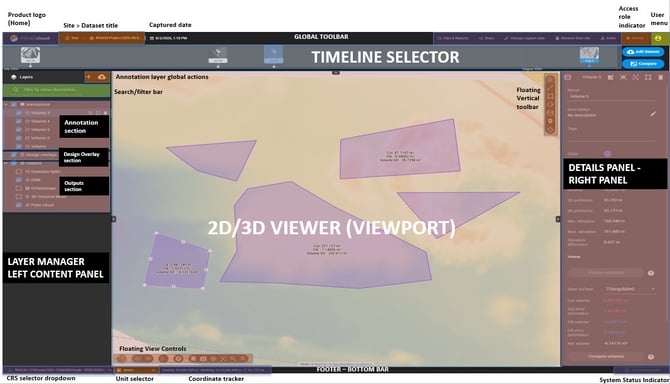
The 2D/3D viewer displays the outputs generated after processing a dataset or outputs manually uploaded by the user.
The viewer also provides access to the vertical toolbar, which allows users to create and modify annotations, perform measurements, and control how the dataset is displayed in the 2D and 3D views
Vertical toolbar
The vertical toolbar provides tools to interact with the map or model, create annotations, and perform measurements.
 Select and Modify: The Select and Modify tool allows users to:
-
- Pan the map or model.
- Select and modify elements in the 2D/3D view.
- Visualize element details in the Details panel.
 Measure a distance or elevation: The Measure a distance or elevation tool allows users to draw a polyline annotation and extract measurements from it. An elevation profile can also be generated from a distance measurement. For More information, seeHow to generate an elevation profile. To measure a distance:
-
- Click
 .
. - In the 2D/3D view, left-click on the map/model to draw points of the polyline.
- Right-click or left-click twice to draw the last node.
- Click
 Measure an area: It allows users to draw a polygon annotation and extract measurements from it. To measure an area
-
- Click
 .
. - In the 2D/3D view, left-click on the map/model to draw points of the polygon.
- Right-click or left-click twice to draw the last vertex of the polygon.
- Click
 Measure a radius: The Measure a radius tool allows users to draw a circle and extract measurements from it. To measure a radius:
- Click .
- In the 2D/3D view, right-click on a point that will define the center of the circle.
- Move the mouse and right-click on a second point to define the radius of the circular area that needs to be covered.
- Click
 Measure a volume: The Measure a volume tool allows users to draw a base surface and create a volume annotation from it. For more information, see How to calculate volumes on the Cloud. To measure a volume:
- Click
 .
. - In the 2D/3D view, left-click on the map/model to draw the points of the base surface of the volume. Right-click or left-click twice to draw the last vertex of the surface. More information in How to calculate volumes on the Cloud.
- Click
 Add a marker: The Add a marker tool allows users to add a point-like marker annotation and extract measurements from it. To add a marker:
- Click
 .
. - In the 2D/3D view, left-click on the map/model to add the markers.
- Click
 Inspect: It allows users to add an inspection to the project.
More information in: What is the Virtual Inspector?
The measurement unit displayed in the 2D/3D view is the unit selected in the account settings or in the unit selector at the bottom of the viewer.
For more information, see PIX4Dcloud - FAQ.
For information about the coordinate system used for annotations, see Georeferencing of datasets, outputs and annotations.
Once a measurement is created, it can be accessed under the Annotation layer in the Layer Manager Content Panel.
View Controls
The view controls allow users to switch between 2D and 3D visualization modes, customize the viewer, save a default view, take screenshots, and control the map or model position and zoom.
- Map background switcher: The 2D/3D viewer switcher allows users to switch between the 2D and 3D views.
 2D/3D viewer switcher.
- The 2D view shows the annotations in 2D and the 2D outputs.
- The 3D view shows the annotations in 3D and the 3D outputs.
In 2D, the basemap selector allows switching between the Streets and Satellite Maps of Mapbox.
 North indicator: Indicates the position of the North when outputs are rotated in the 2D/3D view.
 Viewer settings
- In 2D and 3D, it allows to define:
- The visualization of the labels (measurements and names) on the annotations.
- Only in 3D, it allows to define:
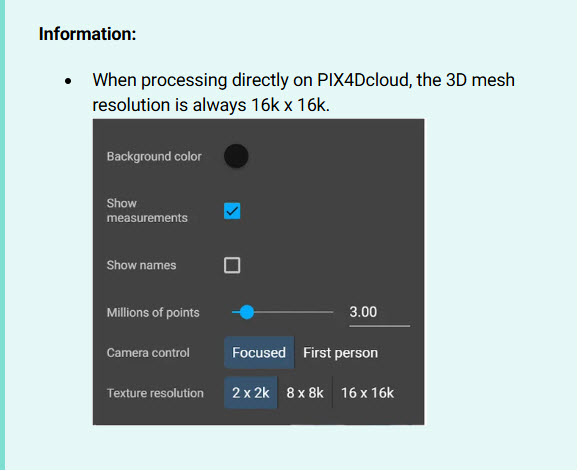
- Camera control: Select between Focused and First person modes. For more information, see First person camera control view on PIX4Dcloud.
- Background color.
- Number of points: Define the number of millions of points displayed in the model.
- 3D Ambient occlusion: Improve the visualization of some 3D layers, such as DXF, IFC, and point clouds.
- Texture resolution: Select between 2K × 2K, 8K × 8K (default), and 16K × 16K textures for the textured mesh.
- In 2D and 3D, it allows to define:
-
-
 Save view as default view: The Save view as default view command allows users to save the current view as the default view for the project.
- In 2D:
- It allows one to define a default 2D view that will persist every time the 2D view of the project is opened by the owner or shared with stakeholders.
- In 3D:
- It allows one to define a default 3D view that will persist every time the 3D view of the project is opened by the owner or shared with stakeholders
- In 2D:
 Take a screenshot: The Take a screenshot command captures a JPG screenshot of the active view at the current zoom level without the user interface.
- In 2D, the screenshot contains:
- The selected 2D layers with the selected basemap,
- The active annotations with their labels, if displayed.
- In 3D, the screenshot contains:
- The selected 3D layers with the selected background color,
- The active annotations with their labels, if shown.
- In 2D, the screenshot contains:
 Snap mode: The Snap mode allows users to snap annotations to the edges of design overlay files in the 3D editor.
  Show my current position: (only available in 2D)The Show my current position command is available only in the 2D view and displays the user's current position. When location access has not yet been granted, the web browser asks the user for permission to track their location.
  Center Map: The Center Map command centers the map or model on a central point of view.
  Zoom In: It allows to zoom into the map/model.
 Zoom Out: It allows to zoom out of the map/model.