This article is intended to describe the functionalities available on the dashboard to organize, visualize and manage the user's assets and projects.
The dashboard is accessible by:
- Going to this link.
- Clicking
 or the logo icon in the top left corner, when in the 2D/3D view.
Note: The dashboard is available under a valid license and after
logging in.
IN THIS ARTICLE
Assets list
Asset controls
Project controls
Allowance
Other controls
Assets list
At the top left, click  to visualize the assets list. Click again to hide it, when the assets are open. The assets tab shows the user assets and the demo assets.
Demo assets: Under the assets, click on the Demo to access a list of different projects. These datasets and the assets are available for all the users.
The assets list can be filtered in different ways.
- At the top of the list, use the filter by name search bar to look for a specific asset name and identify its position on the map.
- At the top of the list, enable the option Show visible assets only to enable the map filter. When the map filter is enabled, the assets list is filled with the assets that are included at the zoom level of the map. Disable the same option to visualize all the assets in the list, regardless of the zoom level of the map.
Asset controls
Different actions can be performed on an asset from the assets list.
In the assets list, next to the asset, click  and select:
- New Project to add a new project.
- Edit to modify the asset properties. Location, asset name and description can be changed. The asset type cannot be changed after the asset has been created.
- Delete to remove the asset and its projects from the user's account.
Project controls
In the assets list, an asset can be expanded by clicking on it to visualize all the projects that belong to that asset. Alternatively, click on the asset icon from the map view to expand all the projects in the asset.
Click on the project in the list in order to open it.
Each project in the assets list shows:
- The date of the creation of the project in the Pix4Dinspect app. The date does not coincide with the image acquisition date.
- The status of the project. More information in What is the status of my project.
In the assets list, next to the project, click and select:
- Create alternative project: this option is useful if the project is not constructed well due to the quality of the input images. In that case, you can create an alternative project with a new dataset and reprocess it. Within 15 days of uploading the project, you can re-upload the two times.
- Project information: provides information about the project.
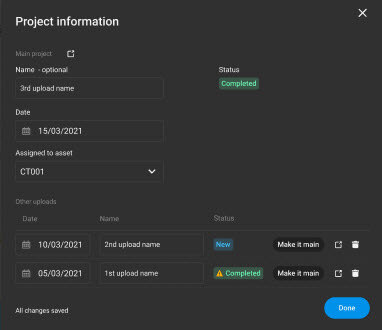
- Main Project Name: allows the user to set the name of the project
- Date: allow the user to select the project date
- Assign to asset: allows the user to reassign a project to another available asset
- Other uploads: the list of the reuploaded projects is listed. Make it main option will assign the selected project as the main project. When you click on the project name under the asset, the project set as Main will open among the three projects.
- Delete to remove the project from the asset and from the user's account.
Allowance
At the top right, click ![]() to view the total projects allowance of the account. The allowance is divided into two categories:
to view the total projects allowance of the account. The allowance is divided into two categories:
- Projects,
- Tower inventory.
Note: If you purchase 10 Projects and 10 Telecom Projects, the Allowance will be 20 Projects and 10 Tower inventory.
If you purchase 10 Projects and zero Telecom Projects, the allowance will be 10 Projects and Zero Tower inventory.
If you purchase zero Projects and 10 Telecom Projects, the allowance will be 10 Projects and 10 Tower inventory.
If you purchase 10 Projects and zero Telecom Projects, the allowance will be 10 Projects and Zero Tower inventory.
If you purchase zero Projects and 10 Telecom Projects, the allowance will be 10 Projects and 10 Tower inventory.
The color surrounding the project allowance icon shows the status of the remaining projects.
- Green circle: More than 5 projects remaining
- Yellow circle: less than 5 projects remaining
- Red circle: zero projects remaining
Other controls
Add new asset, add new project
On the top right, click  to add a new asset or a new project.
Map visualization
At the bottom right, click on the map box to change the base map of the dashboard.
Change the zoom level of the map of the dashboard by clicking the dedicated zoom buttons.