IN THIS ARTICLE
Why do I need field boundaries and obstacles?
Import field boundaries and obstacles
Automatically marking field boundaries and obstacles
Manually drawing field boundaries and obstacles
Copy/convert field boundaries and obstacles
Save Magic Tool detections to boundaries and obstacles
Trim layers with field boundaries
Edit field boundaries and obstacles
Delete field boundaries and obstacles
Visibility of field boundaries and obstacles
Why do I need field boundaries and obstacles?
Field boundaries serve the purpose of:
- Trimming layers and creating holes enables focused analysis of a specific area within a defined region. By dividing and cropping the Orthomosaic and Indices with boundaries, users can concentrate their analysis on a targeted section, resulting in increased efficiency and precision in their work.
- Delimitating the region of interest when downloading Satellite data, using Magic Tool, or creating a Targeted Operation. Note that it is mandatory to have a boundary to use any of these features.
Obstacles are needed when creating targeted operation maps to mark poles, trees, and areas that farm machinery should avoid.
Import field boundaries and obstacles
Different file formats can be imported into PIX4Dfields, including Shapefiles, KML, GeoJSON, and more.
- Click Boundaries on the left sidebar above the layer list to enter the boundaries mode.
- To import a field boundary, click Import shape on the Boundaries menu on the right-hand side.

- Select whether to import the shape as a Boundary or Obstacle.
- To read the name of each boundary/obstacle, the column should be called "name".
- Navigate to the folder containing the file and select it.
- Click Open.
- To trim a layer with your boundary: Click Use to trim in the open edit dialogue of the boundary on the map or click trim on the selected boundary list item on the right board.

- In the TRIM LAYERS menu, select the desired layers and click Trim to do so.
Automatically marking field boundaries and obstacles
PIX4Dfields 2.10 introduces AI-assisted boundary and obstacle detection, providing an intuitive interface for selecting, refining, and buffering agricultural field boundaries, obstacles, and area annotations using simple mouse clicks. For more information: AI boundary, obstacle and area annotation selection - PIX4Dfields.
Manually drawing field boundaries and obstacles
Click the Boundaries layer on the left board above the layer list to enter the boundaries mode.
- To draw a field boundary or obstacle, click the Draw boundary icon in the left corner of the map.
- Select Boundary or Obstacle.

- Left-click to start drawing.
- When drawing and the third vertex is created, a toolbox appears:


- Click the Add Holes icon when creating a boundary to take out any unwanted objects inside your field boundaries.
- Draw the hole inside the Boundary and click the Checkmark. The area designated as a hole will be visually indicated as a solid pink shape on the map.
- Click the Add Sub Polygon icon when drawing boundaries and obstacles to create a sub polygon.
- Name your newly created file.

- To trim: To trim immediately, the boundary can be used directly from the edit dialog. Clicking Use to trim will automatically save the boundary and enter Trim Layers mode.
OR
To trim later, first save the boundary manually. Then select it from the list on the right panel and click the Trim button to enter Trim Layers mode.
Save Magic Tool detections as boundaries and obstacles
In the final step of the Magic tool, it is possible to convert the detections to Boundaries or Obstacles:


Copy or convert field boundaries and obstacles
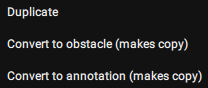
To copy or convert:
- Select the boundary or obstacle to duplicate or convert in the list on the Boundaries menu and click the Copy icon.
- Choose Duplicate, Convert to Obstacle or annotation:
- A new field boundary is duplicated and appears automatically in edit mode. The original file remains unchanged.
Trim layers with field boundaries
The trim function allows users to crop the Orthomosaic into smaller, more manageable areas. This feature is essential for concentrating analysis on specific fields, enhancing both focus and precision in data interpretation. To trim layers with an imported file or custom-drawn field boundary:
- To trim a layer, double-click the desired boundary in the list on the right panel to open the edit dialog, then click Use to trim. Alternatively, select the boundary from the list and click the Trim button.
- The Trim layers menu opens. Select the desired layers to trim and click Trim.
Edit field boundaries and obstacles
To edit boundaries and obstacles:
- Double-click the desired boundary or obstacle from the list on the right board. Or click the edit icon.

Editing icon
- Click the edit geometry button in the opened edit dialogue.
- Drag the white dots to modify the field boundary.
- Click the "plus" sign to create more corners (dots) and vertices.
- To remove a vertex, drag its dot onto any other vertex dot. When a red halo appears around the selected vertex, release the mouse button to delete it.
- Click the check mark to accept the edited boundary’s geometry or click the X to cancel and leave the boundary unchanged.
- Save the edited boundary with the Save button.
Delete field boundaries and obstacles
To delete field boundaries or obstacles:
To delete a file, click the trash bin icon next to it in the list on the right panel. Alternatively, double-click the file to open the edit dialog, then click the trash bin icon within the dialog to delete the selected boundary or obstacle.
Visibility of field boundaries and obstacles
Boundary or obstacle visibility can be toggled on or off even when the layer is not selected. Click the eye icon next to the boundary layer item in the left sidebar to change its visibility.