How to download the results from PIX4Dcloud
This article explains how to download the results of a project in PIX4Dcloud.
IN THIS ARTICLE
Video: The following video tutorial explains step-by-step how to download outputs from a PIX4Dcloud project.
After processing on PIX4Dcloud, the results can be downloaded singularly or as project folders.
To download results:
- Open an already created dataset.
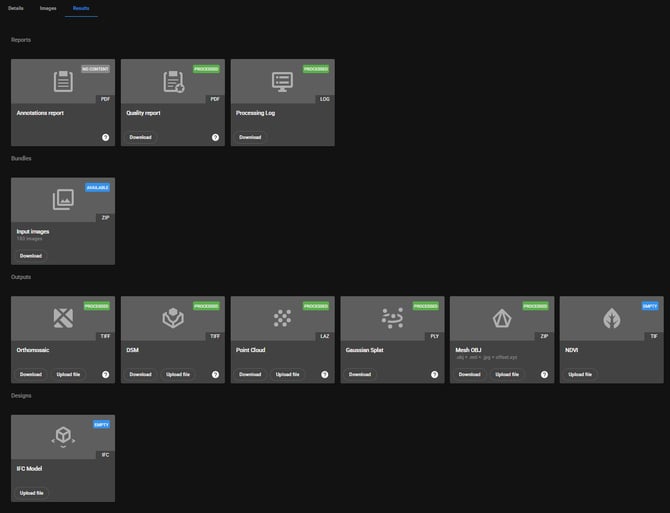
- Go to Files & Reports > Results to display the list of downloadable items.
- Click Download on the desired output.
- If asked, specify the format to export the output locally.
- The requested output starts downloading.

- The processing template that has been chosen/applied by default. For more information: What are the templates and processing options applied to PIX4Dcloud.
- The selected outputs and formats in the Processing Options, if the project has been uploaded from PIX4Dmapper.
- Gaussian Splat is only available when processing from PIX4Dcatch.
Type of outputs
Available downloadable files can be the following.
Orthomosaic
(transparent or opaque)
GeoTIFF
GeoTIFF bundle (.tif+.prj+.tfw)
DTM (**)
GeoTIFF
DSM
GeoTIFF
NDVI
GeoTIFF
Reflectance maps (*)
GeoTIFF (of each band)
GeoTIFF bundle (all bands)
Point Cloud
LAZ or LAS
Mesh
- OBJ: ZIP (Zipped folder containing the .obj, .mtl, .jpg mesh files together with the offset.xyz file to georeference the mesh in third-party software)
- FBX (*)
PLY (The file includes centered coordinates. The offset.xyz included in the 3Dmesh download can be used for a correct georeferentation of the file)
Contour lines (**)
ZIP (.shp, .dxf, .pdf)
(*) Only available if the project has been uploaded to PIX4Dcloud for processing.
(**) Only available if the project has been created in PIX4Dmapper and uploaded to PIX4Dcloud for processing.
Important: When using a share link, the download of outputs is not possible.
Download reports
In the Reports section, available reports show the label PROCESSED.
Quality report / Processing log
Processing log
LOG
Annotations report
To download a report:
- Click Download on the desired report.
- If asked, specify the format to export the output locally.
- The requested report starts downloading.
Download input images
In the Bundles section, available results show the label PROCESSED or AVAILABLE.
Input images
ZIP (Zipped folder containing the input images)
To download the input files:
- Click Download on the Input Images. A notification will appear indicating that the .zip file is being generated. As soon as the .zip file is ready for download, an email will be sent to the license account's email address.
- Open the email and click Download your Input Zip.
- Unzip the file and save the folder in the desired directory.
