IN THIS ARTICLE
How to access Targeted Operations
[1] Layer creation
[2] Fill grid cells
[3] Choose annotations
[4] Choose a unit
[5] Grid creation
Operation menu
Export operation
Try PIX4Dfields now
How to access Targeted Operations
Access the tool by clicking the Operation icon located next to the ![]() Magic icon.
Magic icon.
If there is no Orthomosaic available, Targeted Operations cannot be run. Please import satellite imagery to be used as base layer for the operation.

[1] Layer creation
It is possible to start from a clean grid, use annotations (i.e. Magic tool detections), or create a Zonation based on an index layer.
- Select Do not pre-fill grid cells to start from a clean grid to draw operation areas manually.
- Select Use existing annotations to pre-fill grid cells option if there are annotations to be used as operation areas, it is still possible to edit them manually later.
- Select Zonation (pre-fill grid with an index layer) to create zones based on an index or DSM layer, it is still possible to edit them manually later.
- Select Use Magic tool to create an application map based on Magic Tool detections.

[2] Fill grid cells
The base map layer needs to be selected, over this layer, the grid will be created to draw operation areas on top.

- Select the Boundaries that the Operation will have, at least one boundary has to be selected. The boundary defines the area to be applied.
- Select the Obstacles (Trees, poles, etc.), that will be present in the mission, if any.
Obstacles will be recognized as non-passable areas for spray drones and tractors. Areas within the field boundary without any rate assigned will be no-application areas. However, machinery will be able to pass through.
[3] Choose annotations
Select the layer that has annotations to be used as Operation areas.
In other types of operations, this step is not present.

[4] Choose a unit
The unit can be determined in this step and can also be changed later on the Operation menu. To change the unit system (Metric/Imperial), go to ![]() Settings on the home screen. For more information: Home screen.
Settings on the home screen. For more information: Home screen.
[5] Grid creation
The Targeted Operation map is based on a grid. The definition of the grid is based on the following aspects:
- Cell size: Select a cell size that roughly represents the structures that need to be differentiated on the map. When planning a herbicide spot spraying mission, the cell size could match the implements section or working width.
- Rotation: With the rotation slider, the orientation of the grid can be changed. It is recommended to use the same orientation as the crop row or the main driving direction.
- Horizontal offset: The grid can be shifted horizontally if needed. The mouse wheel can be used to fine-tune each value in smaller steps.
- Vertical offset: The grid can be shifted vertically if needed. The mouse wheel can be used to fine-tune each value in smaller steps.
Once finished setting the appropriate values, click Preview and Create Operations layer.
- Results can be reverted by clicking the revert button on the top-right side.
If creating a zonation, please visit the dedicated article: How to create a targeted zonation map - PIX4Dfields
Operation menu
The operation menu appears on the right after finishing creating the operations layer.

Under the Visual tab, you can change the visualization of the base layer
Under the Operation tab, it's possible to:
- Set the rate units by clicking on the
 Settings icon.
 - Set the rate for each zone.
- The X box refers to cells without an assigned zone. They can be filled with a specific zone color or a new zone.
- Create new zones by clicking the
 , you can create up to seven.
Under the Boundaries tab, it's possible to:
- Import new boundaries or obstacles by clicking Import shape.
- Clone, Zoom or Edit existing Boundary by clicking on it.
- Clone, Zoom, Edit or delete existing Obstacles by clicking on them.
Click the  to access the zonation statistics.

- The Mean index refers to the average index value of each zone.
- Deviation refers to the difference between the zone mean index (0.29) and the whole field mean index (0,28). It provides a quick idea of how the zone compares to the rest of the field, in this case, Zone 2 is 3.41% better than the Mean of the field.
- Coverage refers to the area expressed in percentage.
At the bottom of the map, the drawing tool menu is located:
- Click the
 Mouse icon to move on the map.
 - Click the
 Brush icon to generate zones on the map manually, and use the slider on the top to make the brush bigger.
 - Click the
 Fill icon to fill clicked cells with the same rate quickly.
 - Click the
 Fill single cells icon to fill the selected rate with the surrounding rate.
 - Click the
 Buffer icon to add a surrounding buffer to the selected rate.
 - Click the back arrow to undo the latest changes.
- Click Clear all to erase all annotations/ zones. You can always go back by clicking the back arrow again.
- Click the colors box to change the Grid colors.
- Click the X box while using the Brush or Fill to unassign cells.
- Click the icon to create a new zone.
- Adjust the transparency of the grid with the slider on the right-hand side.
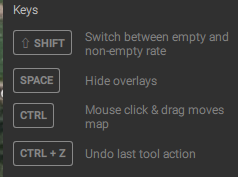
There are useful Hotkeys to improve editing speed and accuracy.
Export operation
To export the Targeted Operation map, go to Export, Operations. Follow the step-by-step in this article: How to export a targeted spraying map.
To export to a DJI Agras T-series, please visit Spot spraying and variable rate prescriptions for DJI Agras T-series with PIX4Dfields.
To export to XAG spraying drones, please visit: Targeted spraying maps for XAG drones.
Try PIX4Dfields now
Both new and existing Pix4D accounts are eligible for a 15-day free license to PIX4Dfields. The trial is activated when logging in to PIX4Dfields for the first time.
For more information: Trial, sign-up and login - PIX4Dfields.