This App Overview article explains each button, menu, and feature in PIX4Dcatch, helping you quickly understand the app layout.
IN THIS ARTICLE
Capture Screen
The Capture screen is the primary interface for starting scans.
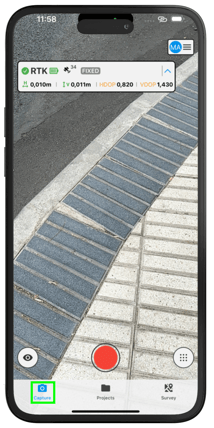
Top of the screen
-
Signal Quality Indicator
.png?width=250&height=31&name=Frame%205%20(1).png) : Displays GPS and RTK information.
: Displays GPS and RTK information.-
Integrated GPS Sensor –(default) Uses the device’s internal GPS.
-
RTK Device via Bluetooth – Select when connecting to a supported Pix4D RTK rover. For more information, visit Connecting PIX4Dcatch to a Pix4D-supported RTK device.

-
-
User Account & Settings
 : Tap the User icon to log in, manage capturing settings, and configure app preferences.
-2.png?width=214&height=428&name=Plantilla%20Iphone%20(34)-2.png)
-
-
Account Details: View the associated account email, organization role, license type, and privacy preferences.
-
Settings: Adjust image triggers and overlap, toggle AR display lines or labels, and create a new RTK profile to connect to your RTK rover with correct camera offset and NTRIP credentials. For more information visit, Settings - PIX4Dcatch.
-
Others: Access settings restrictions, the latest feature updates, help resources, and app version details.
-
Bottom of the Screen - Capture Functions

-
Capture Button
 : Tap to start taking photos. Once active, a new bar appears with three buttons and an image counter to track the progress
 -
Pause: Stop capturing temporarily.
-
Cancel: Stop and discard the current scan.
-
Save: Finish and store the project.
-
Image Counter
.png?width=23&height=25&name=Image%20count%20(1).png) : Displays the total number of photos captured.
: Displays the total number of photos captured.
-
-
Live Preview
 : Tap to see a real-time 3D view of the scan. Live data displays raw LiDAR data from the phone. Final results must be processed in PIX4Dmatic or PIX4Dcloud.

-
Tag Detection and Augmented Reality Tools
 : Tap the menu icon (bottom right) to access Tag Detection for automatic marker identification, AR Points for visualizing known points, and PIX4Dcloud AR for project visualization in the physical environment.
-
- Tag Detection: Enables autotags during capture. For more information, Using Autotags in PIX4Dcatch.
- AR Points: Displays GCPs or known points from Point Collections using Augmented Reality. For more information visit, Augmented Reality (AR) Points in PIX4Dcatch.
- PIX4Dcloud AR: Allows visualization of Augmented Reality. For more information visit, Using PIX4Dcloud AR to View Projects in Augmented Reality.
- Detailed Annotations: Allows creating annotations during the capture. For more information visit, Detailed Annotations.
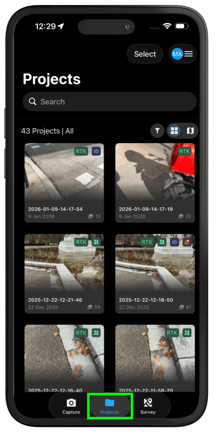
Projects Tab
The Projects tab stores and organizes all captured data for easy searching, filtering, and management. This view tracks the status of every scan and serves as the main hub for uploading or exporting files.
-
- Search Projects
 : Find projects using keywords.
 - Filter Options
 : View projects by Captured, Processing, Processed, or All.
 - Project Count : Displays the total number of projects stored.
- Map view
 : Displays the project on a map view.
.jpg?width=212&height=424&name=Plantilla%20Iphone%20(19).jpg)
- Live Location
 : Shows the user's live location on the map.
 - View All Projects
.png?width=21&height=21&name=Button%20(8).png) : Tap the Center Map Icon to zoom out and fit all project pins on one screen.
: Tap the Center Map Icon to zoom out and fit all project pins on one screen. - Locate Me Icon
.png?width=21&height=21&name=Button%20(7).png) : Tap the Location Map Icon to center the map directly on the user’s current location.
: Tap the Location Map Icon to center the map directly on the user’s current location. -
Project Icon
-1.png?width=25&height=25&name=Button%20(6)-1.png) : Tap a Project Icon to view a pop-up with the project’s image, status, name, date, and photo count. It also displays icons for RTK/GPS, Autotags, and Annotations.
: Tap a Project Icon to view a pop-up with the project’s image, status, name, date, and photo count. It also displays icons for RTK/GPS, Autotags, and Annotations.
- Live Location
- Search Projects
-
Export, Upload, and Rename Projects: Press and hold a project thumbnail to open the project menu, which allows you to export data and logs, upload to PIX4Dcloud for processing, or delete the project.
-1.png?width=213&height=426&name=Plantilla%20Iphone%20(22)-1.png)
-
-
Rename: Change the project name.
-
Upload: Upload the project to PIX4Dcloud for processing. For more information visit, Uploading the Project to PIX4Dcloud- PIX4Dcatch.
-
Export All Data (OPF): Export the complete project in OPF format for PIX4Dmatic.
-
Export Captured Point Cloud (PLY): Export the point cloud collected by LiDAR or ToF sensors (used for visualization in Live Preview, not for processing).
-
Export Point Cloud (GLTF): Available only if a GLTF point cloud was generated for autotag optimization, volume calculation, or project recovery.
-
Export Captured Mesh (OBJ): Export the captured mesh when available.
-
Export Logs: Export log files documenting internal project processes—recommended immediately after any issue to avoid logs being overwritten.
-
Delete: Permanently remove the project.
-
Survey Tab
The Survey tab enables single-point measurements, known as Ground Control Points (GCPs). This tab stores all previous collections and allows you to create new ones. On the right, toggle between a list view and a map view to see the distribution of points.

-
-
Delete Collection/ Point: Press and hold the collection to open a pop-up menu that lets you delete the collection.
-

-
New Collection: Tap the “New Collection”
 button to start a new Point Collection. For more information visit, Create a new Point Collection.