IN THIS ARTICLE
Project creation
Accessing the 2D/3D view
Analysis and measurements
Collaboration and sharing
Licenses: This article is valid for PIX4Dcloud Starter and PIX4Dcloud Pro licenses (formerly PIX4Dcloud Advanced).
Roles:
-
Only Owners, Managers, and Editors can create and process datasets in PIX4Dcloud.
- Only Owners and Managers can enable the share link in a dataset in PIX4Dcloud.
- If the share link is already enabled, then Editors can also access it within the dataset in PIX4Dcloud.
Video: The following video tutorial explains step-by-step how to process a project with images with PIX4Dcloud Pro.
Project creation
A project in PIX4Dcloud is organized as a dataset. A dataset may include images acquired with a drone or mobile device, or processed outputs generated by PIX4D or supported third-party software.
Accessing PIX4Dcloud
-
Navigate to www.cloud.pix4d.com.
-
Select Log in and enter the PIX4D account credentials.
-
The Drive, which contains all datasets and projects, is displayed.
Creating a dataset
-
From the Drive, select + New > New dataset.
-
Step 1 – Dataset creation:
-
Enter a dataset name. With PIX4Dcloud Pro, a site name can be defined to group multiple datasets from the same area of interest.
-
Select Upload and process images or Upload processed outputs.
-
If Upload processed outputs is selected, click Create to proceed directly to visualization.
-
-
-
Drag and drop image files, or select Select images to browse local storage.
-
Optionally define a region of interest.
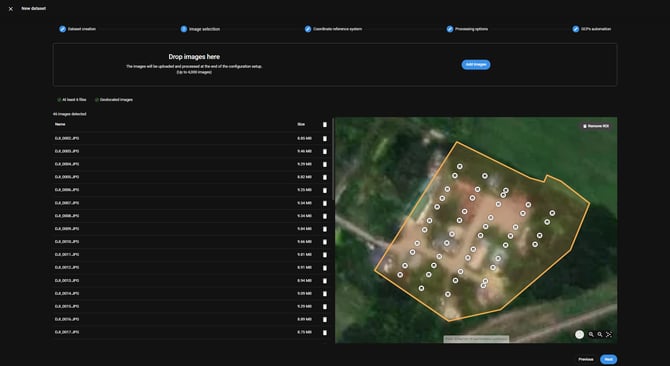
-
Select Next.
-
-
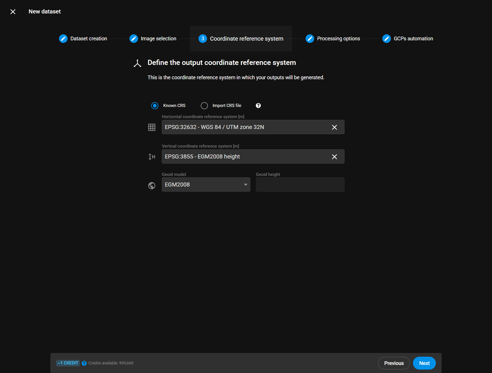
Step 3 – Coordinate Reference System (CRS):
-
Select Known CRS if the coordinate system is available in the database, then define the horizontal and vertical coordinate systems and the geoid if required.
-
To use a custom CRS, select Import CRS file and upload a PRJ file. WKT2 files from site localization are supported.
-
-
-
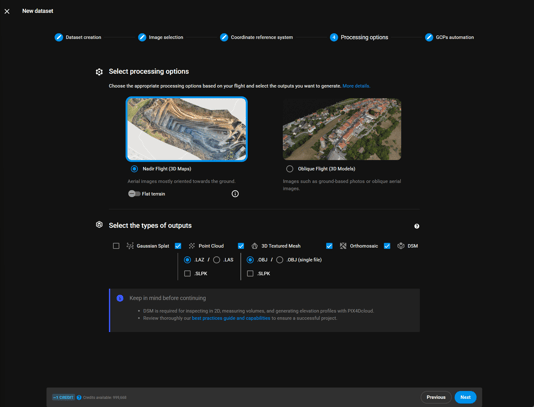
Select the processing template (nadir or oblique).
-
Select the outputs to be generated (Gaussian Splat, point cloud, mesh, orthomosaic, DSM). All outputs are selected by default.
PIX4Dcloud supports the generation of georeferenced Gaussian Splat models from drone imagery and terrestrial dataset uploads.
-
-
Step 5 – GCP automatization (PIX4Dcloud Pro only):
-
Upload a CSV file containing Ground Control Points (GCPs) and checkpoints.
-
Define the GCP coordinate system.
-
Review and edit control points in the table and on the map, then save the configuration.
-
The map displays GCPs, checkpoints, images, and the region of interest if defined.
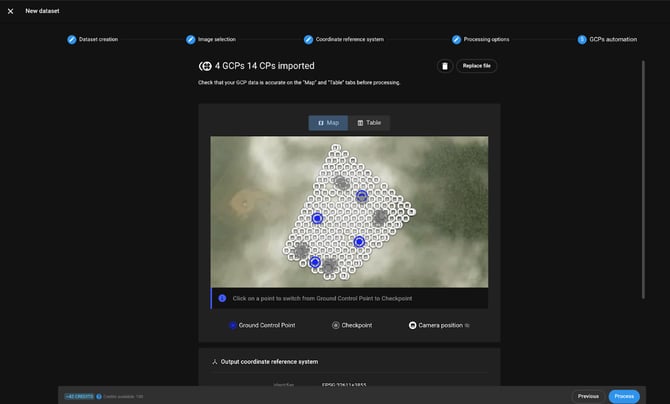
-
-
Select Process to start processing and complete dataset creation.
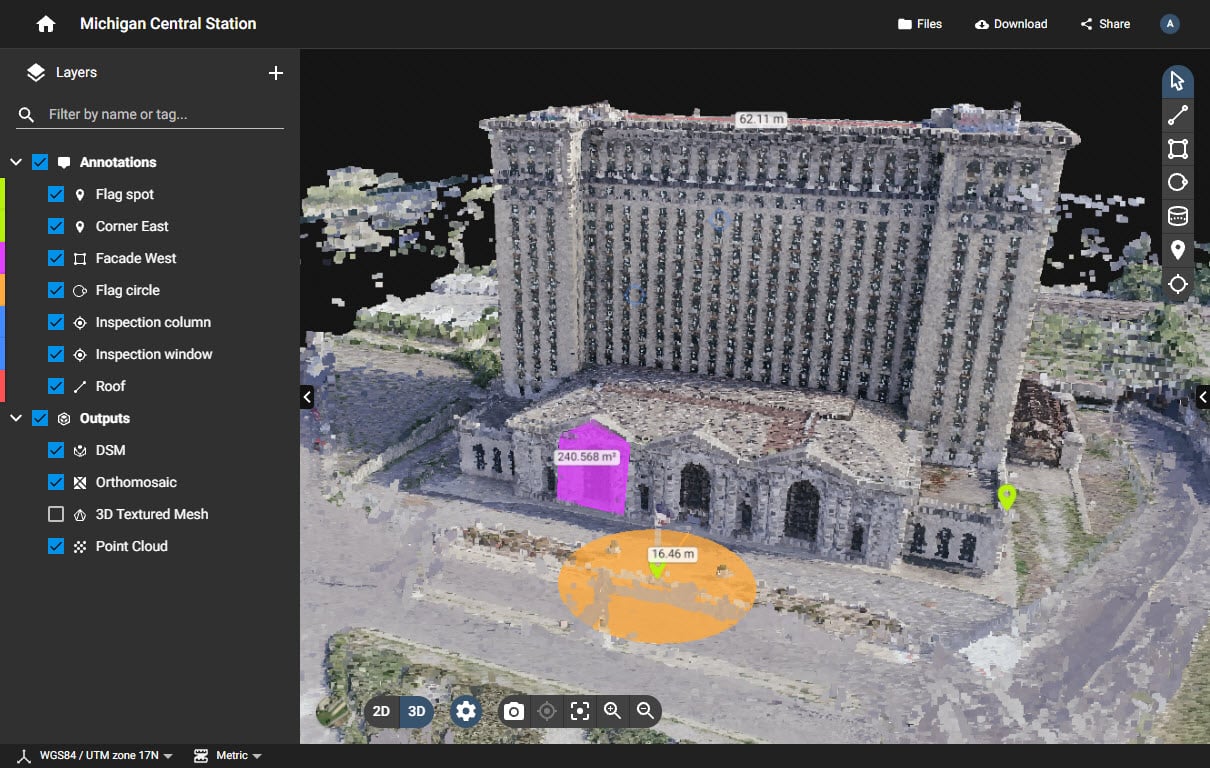
Accessing the 2D/3D view
After dataset creation, the 2D and/or 3D views are available depending on the generated or uploaded outputs.
-
Open the dataset from the Drive.
-
Use the 2D/3D switcher to navigate between views.
-
Adjust layer properties such as name, description, and tags using the side panels.
Analysis and measurements
PIX4Dcloud provides built-in tools for analyzing project data directly in the viewer. PIX4Dcloud Pro includes additional tools for advanced monitoring and comparison.
Tools available in PIX4Dcloud:
 Select and Modify: It allows users to pan the map/model, select and modify an element in the views, visualize its details in the Details panel.
 Measure a distance or elevation: It allows users to draw a (poly)line annotation and extract measurements. An elevation profile can be generated from a distance measurement. More information in: How to generate an elevation profile.
 Measure an area: It allows users to draw a polygon annotation and extract measurements from it.
 Measure a radius: It allows users to draw a circle and extract measurements from it.
 Measure a volume: It allows users to draw a base surface upon which a volume annotation is created and volume measurements can be extracted.
 Add a marker: It allows users to add a point-like marker annotation and extract measurements from it.
 Inspect: It allows users to add an inspection to the project. More information in: What is the Virtual Inspector?
Additional tools in PIX4Dcloud Pro
- Timeline for switching between datasets of the same site.
- Design Overlay for comparing as-designed and as-built data.
- 2D/3D comparison for visual time-based comparisons.
- Compare volumes over time for progress analysis.
Collaboration and sharing
PIX4Dcloud and PIX4Dcloud Pro support collaboration through secure sharing links, eliminating the need to download or transfer large files.
Sharing a dataset:
-
Open the dataset.
-
Select Share in the top-right corner.
-
Choose one of the following options:
- LINK URLs: Share a direct access link with read-only or edit permissions.
- EMBED URLs: Generate a link to embed maps or models into external webpages.
- Copy and distribute the required link.
- Disabling the sharing toggle immediately revokes access for all recipients.