IN THIS ARTICLE
Image geolocation and orientation import format
How to import an image geolocation and orientation file
How to check the order of the axes in the coordinate system definition

Import
Image geolocation and orientation import format
The image geolocation file format is a .csv or .txt file. It contains seven or nine columns per line and uses commas "," as column separators.
#imagename,coordinate1,coordinate2,z,yaw,pitch,roll
IMG_3165.JPG,46.2345612,6.5611445,539.931,38.6,3.5,8.3
IMG_3166.JPG,46.2323423,6.5623423,529.823,44.1,3.4,5.4
The formats are described in the tables below:
| Geographic coordinates, Yaw, Pitch, Roll |
| imagename, coordinate1* [decimal degrees], coordinate2* [decimal degrees], z [meter], yaw [decimal degrees], pitch [decimal degrees], roll [decimal degrees] |
IMG_3165.JPG,46.2345612,6.5611445,539.931,38.6,3.5,8.3 |
| The latitude value is between -90° and 90°. The longitude value is between -180° and 180°. |
| Geographic coordinates, Yaw, Pitch, Roll, and accuracy values |
| imagename, coordinate1* [units], coordinate2* [units], z [meter], yaw [decimal degrees], pitch [decimal degrees], roll [decimal degrees], Accuracy Horz [meter], Accuracy Vert [meter] |
IMG_3165.JPG,46.2345612,6.5611445,539.931,38.6,3.5,8.3,0.02,0.04 |
| The latitude value is between -90° and 90°. The longitude value is between -180° and 180°. |
| Projected coordinates, Yaw, Pitch, Roll |
| imagename, coordinate1* [units], coordinate2* [units], z [units], yaw [decimal degrees], pitch [decimal degrees], roll [decimal degrees] |
IMG_3165.JPG,474191.175,5091809.612,539.931,38.6,3.5,8.3 |
| Projected coordinates, Yaw, Pitch, Roll, and accuracy values |
| imagename, coordinate1* [units], coordinate2* [units], z [meter], yaw [decimal degrees], pitch [decimal degrees], roll [decimal degrees] |
IMG_3165.JPG,474191.175,5091809.612,539.931,38.6,3.5,8.3,0.02,0.04 |
| Geographic coordinates |
| imagename, coordinate1* [decimal degrees], coordinate2* [decimal degrees], z [meter] |
IMG_3165.JPG,46.2345612,6.5611445,539.931 |
| Projected coordinates |
| imagename, coordinate1* [units], coordinate2* [units], z [meter] |
IMG_3165.JPG,474191.175,5091809.612,539.931 |
| Geographic coordinates with accuracy values |
| imagename, coordinate1* [decimal degrees], coordinate2* [decimal degrees], z [meter], Accuracy Horz [meter], Accuracy Vert [meter] |
IMG_3165.JPG,46.2345612,6.5611445,539.931,0.02,0.04 |
| Projected coordinates with accuracy values |
| imagename, coordinate1* [units], coordinate2* [units], z [meter], Accuracy Horz [meter], Accuracy Vert [meter] |
IMG_3165.JPG,474191.175,5091809.612,539.931,0.02,0.04 |
How to import an image geolocation and orientation file
To import the file in PIX4Dmatic:
- Open PIX4Dmatic
- Create a new project or open an existing project
- Import the images
- Import the image geolocation and orientation file:
- Navigate to File>Import>Image geolocation and orientation or
- Select the
 Cameras tab and click on Import image geolocations and orientations...
- The import window will open

- Navigate to the .csv or .txt file and click Open
- Select the Coordinate Reference System (Horizontal and Vertical) according to your file.
- If needed select the geoid and/or the geoid height value
- Click Apply
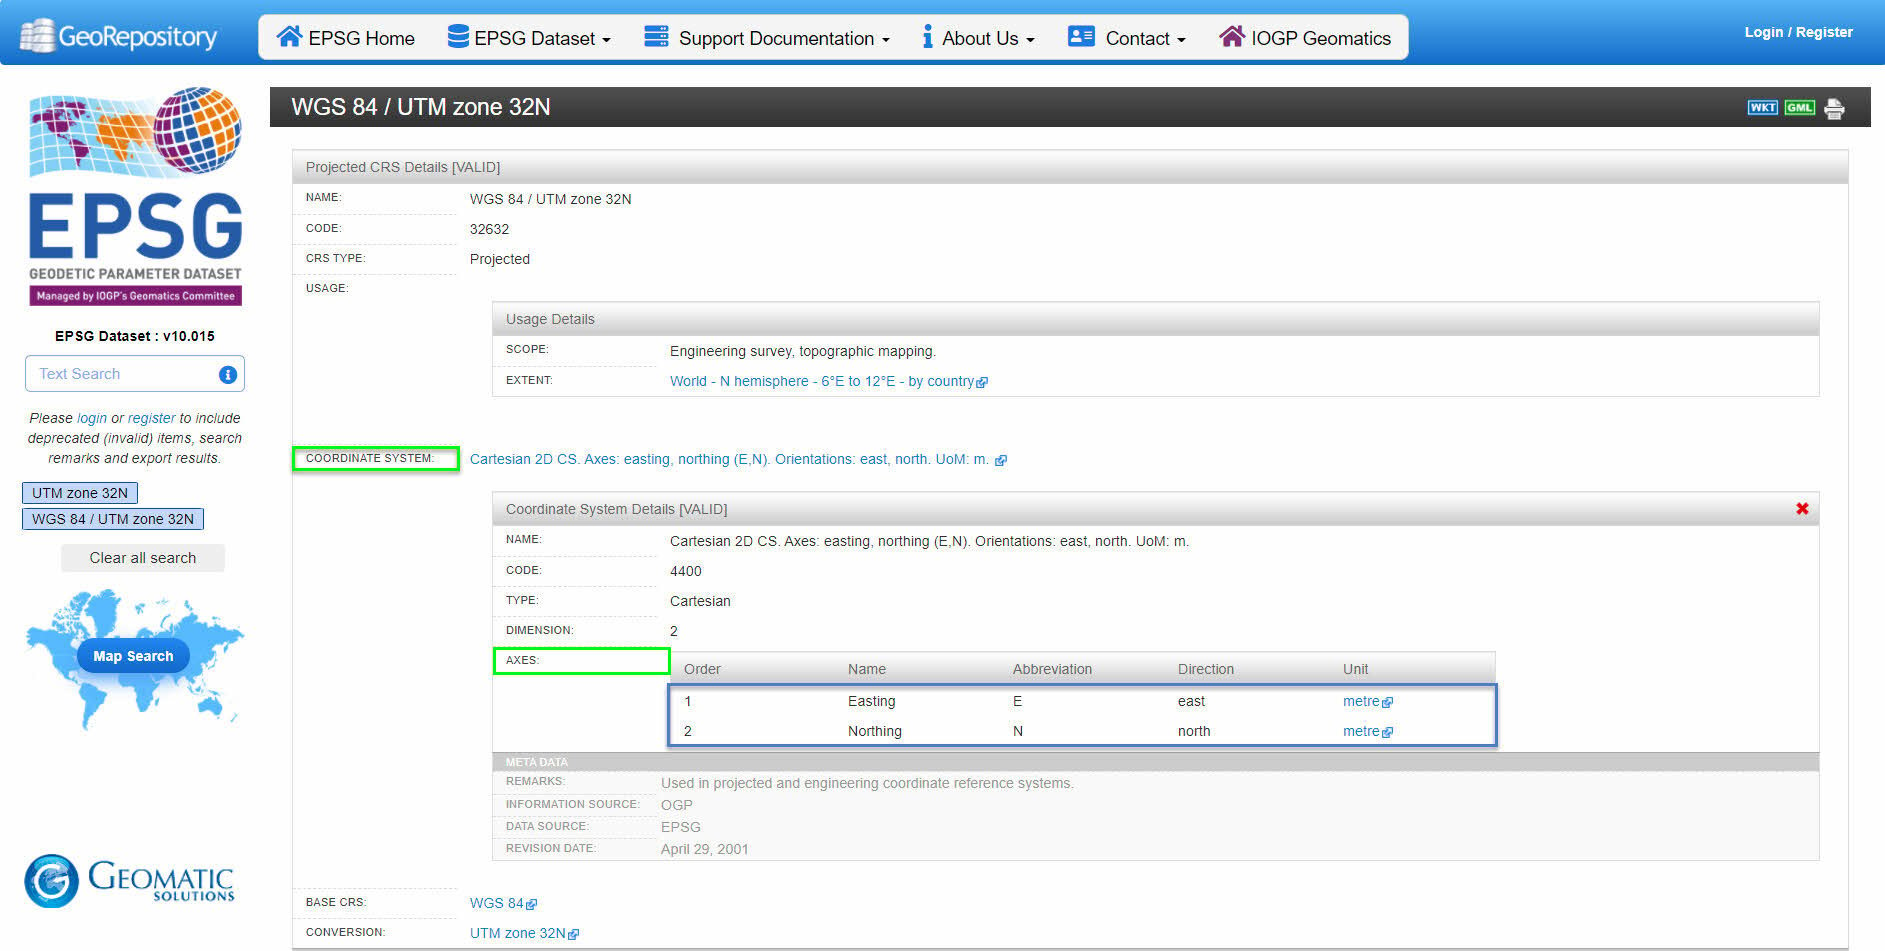
How to check the order of the axes in the coordinate system definition
To check the order of axes in the coordinate system definition:
- Open the EPSG Geodetic Parameter Registry website.
- Write the name or the EPSG code in the EPSG Dataset - Text search.
- Click GO and select the correct name in the results.
- Expand the COORDINATE SYSTEM section and check the order in the AXES subsection.
After checking the order of Axes in the coordinate system definition, modify the input file to follow the same order of coordinates.
label, Easting [meter], Northing [meter], z [meter]
Export image geolocations and orientations
To export the image geolocation and orientation file:
- Select the Cameras tab
- Click on
 >
>  Export image geolocations and orientations...
 - The export window will open

The following parameters can be set before exporting the file:
| Parameters | Description | Options |
| Camera type | Sets the type of cameras from which the geolocation and orientation will be taken. |
|
| Export CRS | Specifies the Coordinate Reference system of the exported data |
|
| Camera orientation convention | Specifies the standard used for interpreting camera orientation. |
|
| Destination | Specifies the file saving or sharing location | |
After setting the desired parameters, click on Export to export the file to the location identified in the Destination setting. The status bar will be updated with the progress of the export. After the export is complete, a .csv file will be created in the desired location for further use.