IN THIS ARTICLE
Image coordinate system
GCPs coordinate system
Project coordinate system
Arbitrary coordinate system
Site Localization Calculator
Import coordinate system
Horizontal grid corrections and transformations
Image coordinate system
PIX4Dmatic allows the image coordinate system to be manually set or edited.
To edit the image horizontal or vertical coordinate systems, click on the edit icon in the lower right corner of the screen where the Cameras tab is.
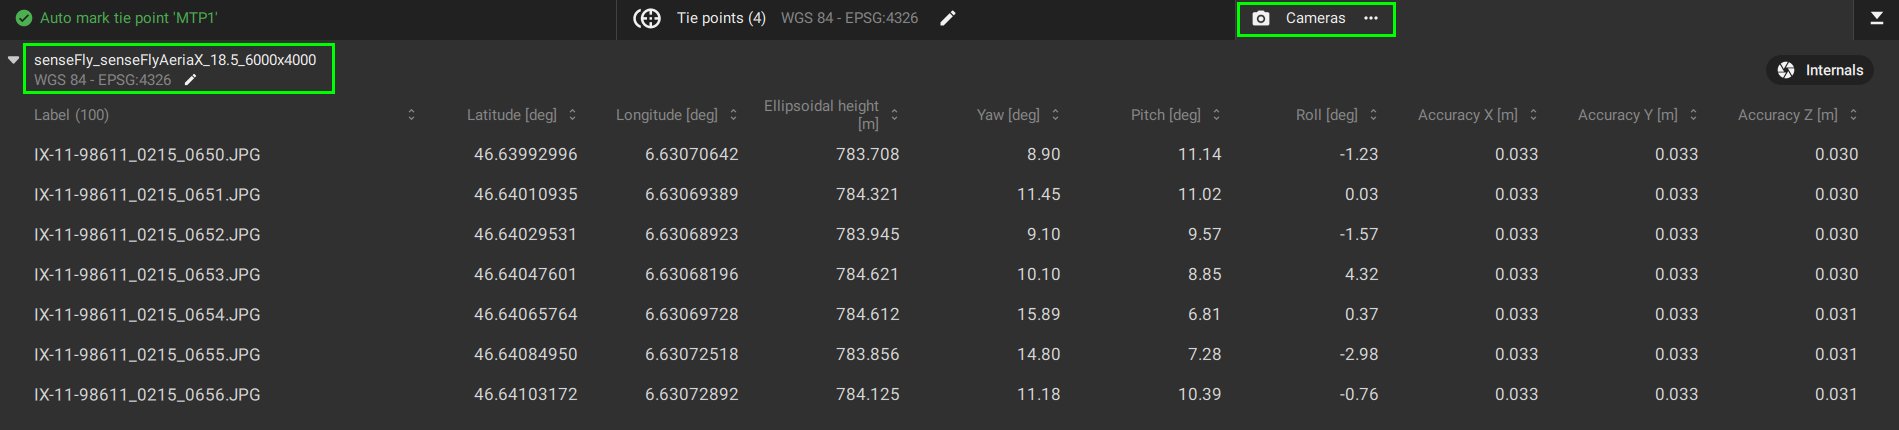
After clicking on the edit icon, the Set image coordinate reference system (CRS) dialog box will open.

Unless a camera is in the PIX4Dmatic camera database or the images have the correct XMP tags, the default image coordinate system is WGS84 (EPSG: 4326) for the horizontal and EGM96 (EPSG: 5773) for the vertical.
GCPs coordinate system
Both the horizontal coordinate system and the vertical coordinate system can be defined in the Tie Points table:

The GCP coordinate reference system (CRS) window will pop up.
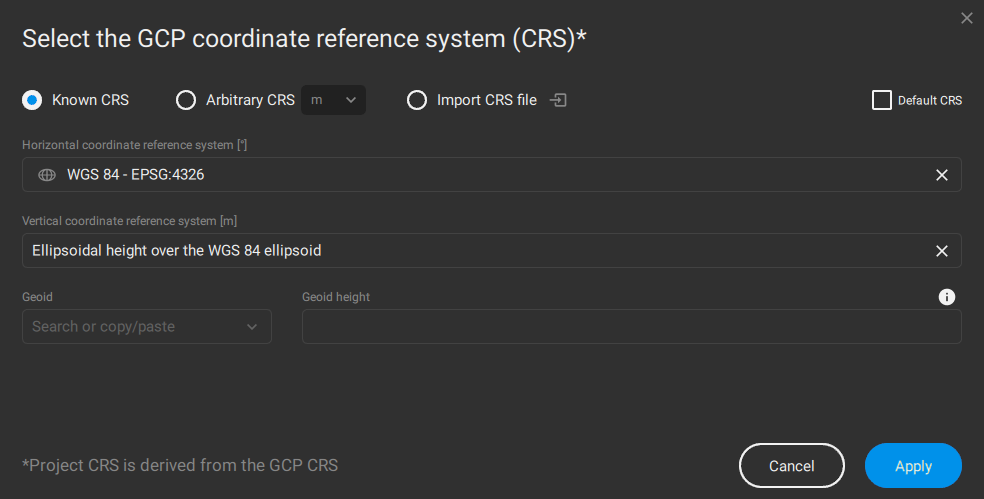
To select the horizontal coordinate reference system:
- In the Horizontal coordinate reference system dialog, search or copy-paste:
- The name or
- The EPSG code of the coordinate system.
To select the vertical coordinate reference system:
- In the Vertical coordinate reference system dialog, search or copy-paste:
- The name or
- The EPSG code of the coordinate system.
- (Optional) Geoid: If the selected vertical coordinate system supports geoids and the geoid model is available in the PIX4Dmatic database, select the geoid model in the drop-down list.
- (Optional) Geoid height: If the selected vertical coordinate system supports geoids but the geoid model is not available in the PIX4Dmatic database, enter the value of the geoid height at that location.
For more information and the list of supported geoids, please see How to use Geoids in PIX4Dmatic.
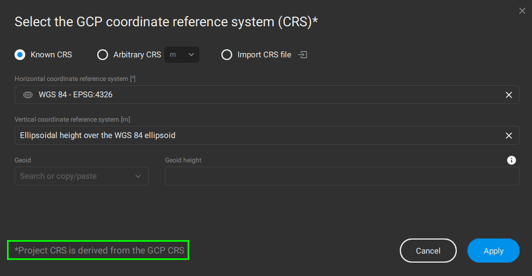
Project coordinate system
The horizontal and vertical coordinate reference systems of the project are defined based on the imported image geolocation data or the selected GCPs coordinate reference system:
The project coordinate system is always visible on the bottom bar:
- When the GCPs coordinate system is not defined, PIX4Dmatic will default the project coordinate system to the corresponding UTM zone based on the position of the image geolocation. The vertical coordinate system is set to ellipsoidal heights*.
- Horizontal: WGS 84 / UTM zone 32N - EPSG 32632.
- Vertical: WGS 84 - EPSG 7030 ellipsoid.
- When GCPs coordinate system is defined, the project coordinate system corresponds to the GCPs coordinate systems. If the GCPs coordinate system is geographic the corresponding UTM zone is used for the project coordinate system.
- Horizontal: CH1903+ / LV 95 - EPSG 2056.
- Vertical: Bessel 1841 - EPSG 7004 ellipsoid.
Arbitrary coordinate system
Arbitrary or local coordinate systems are typically used in construction sites, or mining. The origin of the system is based on arbitrary (local) points and is not aligned with any known coordinate system.
In PIX4Dmatic, Ground Control Points (GCPs) with arbitrary coordinates can be used to georeference the project in an arbitrary coordinate system.

The recommended workflow [Method - A] is to:
- Create a project and import images.
- In the Select the GCP coordinate reference system (CRS), click Arbitrary CRS and select the units.
- Import the GCPs.
- Mark GCPs on images.
- Run Calibration step.
The alternative workflow [Method - B] is to:
- Create a project and import images.
- In the Select the GCP coordinate reference system (CRS), click Arbitrary CRS and select the units.
- Run Calibration step.
- Mark at least 3 MTPs in the exact area where the GCPs appear.
- In the Tie Points table, change the type of marked MTP to GCPs and manually insert their coordinates.
- Rename the MTPs to the actual name of the GCP in the import file.
- Run the Reoptimization step.
- Import and mark additional GCPs.
- Run the Reoptimization step.
Site localization calculator
Another approach to processing an arbitrary coordinate system is to use PIX4D’s Site Localization Calculator. Available online through a PIX4D account, this tool generates a Site Localization file compatible with PIX4Dmatic. It works by transforming a local reference system from a known global coordinate system and outputs a Well Known Text (WKT) file. This file enables PIX4Dmatic, PIX4Dcloud, and PIX4Dcatch to accurately align project data within the defined local reference frame.
For more information on how to use and access the Site Localization calculator, read the following article: Site Localization Calculator
Import coordinate system
PIX4Dmatic support custom site localization files formatted in Well-Known Text (WKT), a standardized, text-based representation that includes translation, rotation, and scaling parameters.
The files support in PIX4Dmatic to import a coordinate system are the following: txt, prj, wkt, csv, and Trimble formats .dc and .cal.
For further information, read the following article: How to obtain a Site Localization file for PIX4Dmatic and PIX4Dcloud
Horizontal grid corrections and transformations
PIX4Dmatic supports the most common horizontal grid corrections and transformations.
The corrections will be used automatically based on the selected coordinate systems.