IN THIS ARTICLE
Content Panel
Settings
Navigation
Navigate in the 3D view
Navigate in the 2D view
Navigate through the images
Layout
Find images
Control panels
Content Panel
Click ![]() to open the Content Panel:
to open the Content Panel:

The content panel is dynamic and contains all the elements of the project according to the current status. All elements can be made visible/invisible by clicking on the ![]() . Additionally, some elements have different
. Additionally, some elements have different ![]() Setting options.
Setting options.
|
|
|||
| Input cameras | Input accuracies: Visually represent the accuracy values of each image position listed in the Cameras table. The size factor slider adjusts the visual scale of these accuracies, making small or large differences discernible, without affecting the actual processing values shown in the Cameras table. Changing the accuracy values in the Cameras table will affect the results of the ellipsoids | ||
| Dense point cloud |
|
||
|
Mesh |
|
||
|
Digital Surface Model DSM |
|
||
| Orthomosaic |
|
||
|
Region of Interest ROI |
|
||
|
2D Basemap |
|
||
|
Layers |
|
|
|
|
|
|
|
|
|
|
|||
Tip: If a setting or input is modified within a project, an orange dot will appear in the content panel beside any processing steps that are now outdated due to this change. This visual cue helps to quickly identify and update any steps affected by the recent modifications. The Outdated message will also appear in the Quality Report if it's exported after the modifications.

Settings
Click  to open the Settings dialog:

| Default | Range | Description | |
| Size | |||
|
Camera size |
1 | 0.01 - 5.00 | Changes the size of the camera thumbnails. |
| Tie point size | 1 | 0.10 - 2.00 | Changes the size of the tie points. |
| Marker size | 1 | 0.10 - 2.00 | Changes the size of the markers |
| Mask size | 1 | 0.10 - 2.00 | Change the size of the mask marker |
| Point size |
13
|
0.5 - 200 | Changes the size of the points in the point cloud. |
| Labels | |||
| Marker labels | On | On/Off | Enables the labels for Markers. |
| Mask labels | On | On/Off | Enables the labels for Masks. |
| Point cloud | |||
| Color by elevation |
Off
|
Min. elevation - Max. elevation | Changes the range of the elevation map in the point cloud. |
| Color by relative confidence | Off | 0 - 1.00 | Changes the range of the relative confidence map in the point cloud. |
| Color by normal | Off | On/Off | Colorization based on the X, Y, Z components of the point normals. |
| Color by GPS time | Off | On/Off | Applies a rainbow gradient to the point cloud based on the GPS time. |
| Minimum number of matches | 3 | 2 - 6 | Select the point based on the number of matches |
| Viewing options | |||
| Face orientation | Off | On/Off | Shows the face orientation of the polygons |
| Clipping box | Off | On/Off | Enables the clipping box tool. |
| Snapping window | Off | On/Off | Indicates the depth of the objects being snapped to. |
| Distortion-aware measurements | On | On/Off | Enables the Distortion-aware measurements feature. |
| Backface culling | Off | On/Off | Allows backward transparency of 3D mesh. |
| Object occlusion* | 3 | 0 - 25.0 | Display geometries above the 3D mesh. |
| View | Perspective | Perspective/ Orthographic |
Changes the view in the 3D viewer. |
| Viewport layouts | Single view | Perspective/ Orthographic |
View the scene from various angles simultaneously |
| Background | |||
| Sky background | On | On/Off | Toggles on/off the sky background. |
| Background color | Black | Black/Grey/White | Changes the background color. |
*Object occlusion:
|
Lower value
|
Higher value
|


Navigate in the 3D view
It is possible to view the sparse point cloud, dense point cloud, images, and tie points in the 3D view.
- In the menu bar, click View > Switch to 3D, or
- Click the 3D button on the screen
 , or
, or - Use shortcut 3.
To pan, rotate, and zoom the 3D view:
- Left-click to pan the 3D view.
- Hold Shift and left-click to pan the 3D view on the z-axis.
- Right-click to rotate the 3D view.
- Use the scroll wheel to zoom in and out in the 3D view.
- Use Focus on selection
 to focus on selection.
To access the predefined views, go to View on the Menu bar and click:
- View all to zoom out the scene to the whole extent.
- Focus on selection to zoom on the selected object.
- Top View to view the scene from the top. The scene is zoomed out to display the entire scene.
Navigate in the 2D view
It is possible to view the Orthomosaic and DSM in the 2D view with or without a basemap.
- In the menu bar, click View > Switch to 2D, or
- Click the 2D button on the screen
 , or
, or - Use shortcut 2.
Navigate through the images
Imported images are displayed in 3D and the Image Viewer.
- Left-click and drag to pan on the image.
- Hold Ctrl and rotate the scroll wheel to zoom in and out of the image.
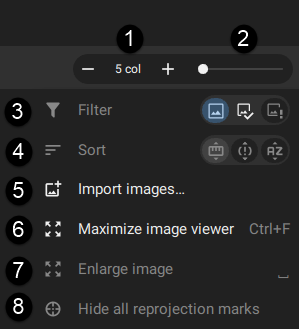
To change the general display of images:
- [1] Change the number of displayed columns.
- [2] Use the zoom slider to change the zoom level of all images, or use Alt+Scroll. Once in the full-screen mode (Ctrl+F), Ctrl+1 (minimum zoom) and Ctrl+2 (maximum zoom) are enabled.
- [3] Filter images and display All, Calibrated, or Uncalibrated images.
- [4] Sort images and display by Distance, Reprojection error or Name.
- Distance: The default option is to sort images by the distance of the image to the marked point.
- Reprojection error: After marking a point in two different images, the reprojection error is calculated. Hence, the advantage is to sort the highest errors first.
- Name: Images are sorted based on the name of the image. It helps to detect images with similar content, as the image name typically follows a chronological order and shows neighboring images.
- [5] Import images to import additional images to the current project.
- [6] Maximize image viewer to display the image viewer in full screen, or use the Ctrl+F shortcut.
- [7] Enlarge image to display an image on full screen.
- [8] Hide all reprojection marks.
 for calibrated images.
 for uncalibrated images.
Layout
The PIX4Dmatic interface layout can be customized and saved to match specific configuration preferences.

Find images
If images have been moved, deleted, or their storage path has changed, a notification will appear in the image viewer to help locate them. To reconnect the images:
- Right-click anywhere in the image viewer
- Select Find Images
- Navigate to the folder or location of the images
- Click OK
This action updates the image paths, restoring their access within the project.

Control panels
The following panels are available:
 Content: gives an overview of available inputs and results.
 Settings. Display the settings of the project.
 Processing: it allows users to change the processing options.
 Quality report: displays an overview of the project and assesses its accuracy and quality.
 History: displays a list of performed actions.
 Image viewer: displays imported images.
 Properties. Shows the properties of the element selected.
 Status center: provides information on the actions and details of processing.
 Tie points: opens the Tie points table.
 Cameras. Information related to the position, orientation, and accuracy of each image.
 Section view
 Videos & views