IN THIS ARTICLE
How to export an annotation
Export formats
How to import an annotation
Import formats
Limitations
Export limitations
Import limitations
Licenses: This feature is available to all PIX4Dcloud licenses.
Roles: Only Owners, Managers, and Editors can import/export annotations in a dataset.
Warning: Before exporting or importing annotations, review the supported coordinate systems in Georeferencing of datasets, outputs and annotations on PIX4Dcloud.
Video: The following video tutorial explains step-by-step how to export and import annotations in PIX4Dcloud.
How to export an annotation
Annotations can be exported in two ways:
- Individual layer export
Exports all selected annotations from a single annotation layer.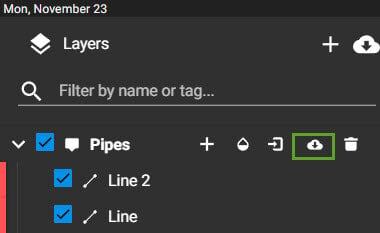
- Global export
Exports all selected annotations from all selected layers in the hierarchy.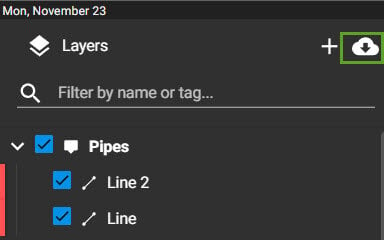
In both cases, multiple export formats are available.
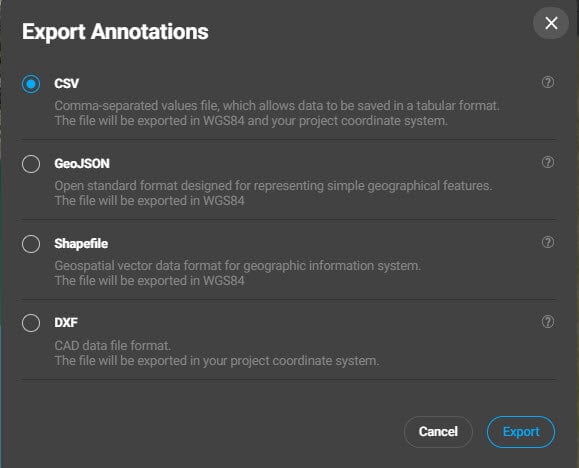
Export formats
CSV (WGS84 and project coordinate system)
CSV export supports both WGS84 and the project coordinate system.
To export:
-
Select CSV.
-
The file is exported with a
.csvextension.
Exported attributes include:
-
Markers: Type, Name, Longitude/Latitude (WGS84), Elevation, Creation date, X/Y (project CRS), Project CRS
-
Lines: Type, Name, Length, Creation date
-
Polygons: Type, Name, Perimeter, Area, Creation date
-
Volumes: Type, Name, Perimeter, Area, Creation date, Volume difference, Cut, Fill
-
Inspections: Type, Name, Longitude/Latitude (WGS84), Elevation, Creation date, X/Y (project CRS), Project CRS
GeoJSON (WGS84)
GeoJSON export is provided in WGS84.
To export:
-
Select GeoJSON.
-
The file is exported in GeoJSON format.
The file includes:
-
Geometry and properties for each annotation
-
Units in correct measurement systems
-
Tags, descriptions, color, creation and modification dates
-
Visibility state
Geometry details:
-
Lines: Vertex coordinates
-
Polygons: Polygon vertices
-
Circles: Exported as polygons
-
Volumes: Boundary vertices
-
Markers and Inspections: Point coordinates
Shapefile (WGS84 and project coordinate system)
Shapefile export supports WGS84 and the project coordinate system.
Supported SHP element types:
-
Points
-
Polylines
-
Polygons
Mapping of PIX4Dcloud annotations:
-
Markers, Inspections → Points
-
Lines → Polylines
-
Polygons, Circles, Volumes → Polygons
Export behavior:
-
Two ZIP files are generated:
-
wgs84_timestamp.shp.zip -
project_srs_timestamp.shp.zip
-
Each ZIP contains, per annotation layer:
-
_points.shp/.shx/.dbf/.prj -
_polylines.shp/.shx/.dbf/.prj -
_polygons.shp/.shx/.dbf/.prj
File contents:
-
.shp: Geometry -
.shx: Geometry index -
.dbf: Attributes -
.prj: Coordinate system
Information (DBF attributes):
-
Volumes: Perimeter, Cut, Cut error, Fill, Fill error, Volume difference, computation type
-
Polygons: Perimeter
-
Circles: Radius, Area
-
Lines: Perimeter
-
Markers and Inspections: No attributes
DXF (project coordinate system):
DXF export is provided in the project coordinate system.
Characteristics:
-
A single DXF file is generated.
-
All selected annotations and layers are included.
-
Colors are preserved.
-
3D information is retained.
-
Compatible with DXF import as Design overlay in PIX4Dcloud.
Export behavior:
-
Each annotation layer becomes a DXF layer.
-
Markers are represented as crosses.
How to import an annotation
To import annotations into a project:
1. On the left sidebar, click the Annotations layer's name.
2. Click  .
.
3. Select the file format and proceed with the import.
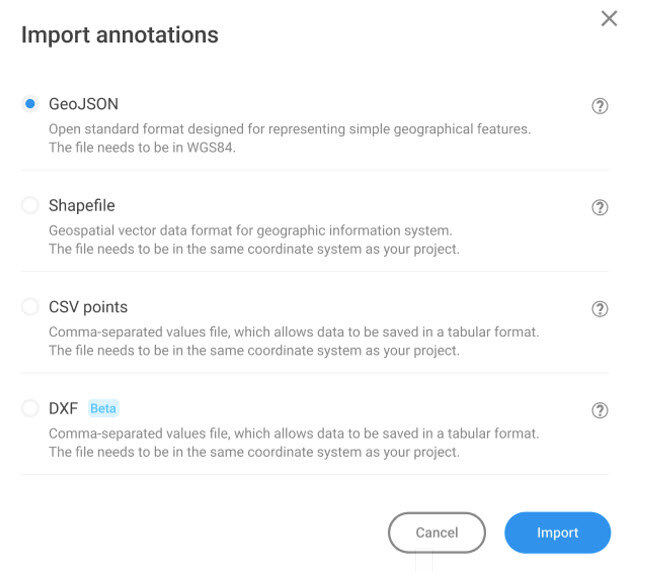
Import formats
CSV points (project coordinate system)
CSV import supports points only in the project coordinate system.
File format:
-
No header
-
Comma-separated values
Required columns:
-
Label (name/ID)
-
Easting
-
Northing
-
Elevation
001_,4392829.089,5386534.037,424.524
002_,4392772.823,5386545.0894,424.582
003_,4392732.981,5386516.197,424.723
004_,4392761.505,5386468.789,422.646
After selection:
-
A preview dialog displays detected markers
-
Click Upload to import the markers
GeoJSON (WGS84)
-
GeoJSON import supports WGS84.
Steps:
-
Select GeoJSON.
-
Choose the file from the local device.
-
The annotations are displayed in the PIX4Dcloud editor.
-
Shapefile (WGS84)
Shapefile import supports WGS84 only.
Requirements:
-
Files must be zipped together:
-
.shp -
.shx -
.dbf -
.prj
-
DXF (project coordinate system)
DXF import supports files georeferenced in the project coordinate system.
Steps:
-
Select DXF.
-
Choose the DXF file from the local device.
Limitations
Export limitations
-
DXF export is not available for shared projects.
-
SHP export is not available for shared projects.
Import limitations
DXF imports:
-
Polyline names are not preserved
-
Polylines are split into individual lines
-
Text elements are not supported
-
Polygons are converted to polylines
-
Elevation is set to 0
-
DXF layers are merged into a single annotation layer
SHP imports:
-
Text is not supported
-
Colors are not preserved
-
Annotation names are auto-generated
-
DBF attributes are not imported
-
Only WGS84 is supported
Warning:
-
Importing files in an unsupported coordinate system results in incorrect positioning.
-
GeoJSON files must follow the same structure as PIX4Dcloud-exported GeoJSON files. To validate the format, export a sample annotation layer and compare the structure.