IN THIS ARTICLE
Accessing the Drive
Credits quota
Drive structure
Dataset
Site
Folder
Organizing content in the Drive
Drive navigation
Licenses: This article is valid for all PIX4Dcloud licenses.
Roles: Owners, Managers, Editors, and Readers can see all resources in Drive that belong to the Organization in PIX4Dcloud.
Video: The following video tutorial explains step-by-step how to organize folders and projects in PIX4Dcloud.
Accessing the Drive
The Drive can be accessed in the following ways:
-
Go to https://cloud.pix4d.com and select Log in.
-
From the 2D/3D view, select PIX4Dcloud Drive in the top-left corner.
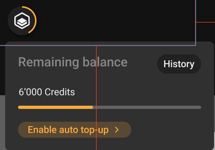
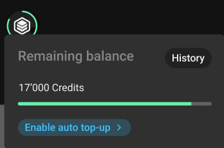
Credits quota
The available processing credits are displayed by hovering over the credits icon in the top-left corner of the Drive. For more information: Credits balance system PIX4Dcloud - FAQ.
Different visual indicators show the current credit balance:
-
Less than 50 credits
-
Between 50 and 100 credits
-
More than 100 credits

Drive structure
The Drive contains three main types of elements:
Dataset
A dataset represents data collected at a specific location and time. It includes:
- Inputs data (for example, images),
- Processing outputs that can be visualized in the 2D/3D view.
More information about how to create a new dataset here.
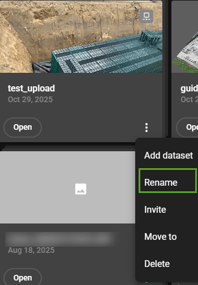
Renaming a dataset
- From the Drive, select the more options (⋮) menu on the dataset and choose Rename, or
- Open the dataset and select the dataset name to edit it directly.
How to change the capture date and time in a dataset
- Open the dataset.
- In the top-right corner, select Change capture date.

-
Define the new date and time.
-
Select Save.
Site (PIX4Dcloud Pro and above license only)
A Site groups multiple datasets acquired at the same location over different time periods. Sites enable timeline-based visualization and comparison of datasets.
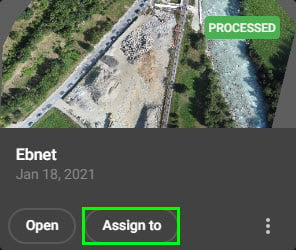
How to assign a dataset to a site.
- On the Drive, on the dataset, click Assign to.
-
Enter the name of an existing site or a new site.
-
Select Assign.
The dataset is moved into the site.
Warning: To assign a dataset to a different site, it must first be removed from its current site.
Removing/Unassigned a dataset from a site.
-
Open the site from the Drive.
-
Use the timeline to navigate to the dataset.
-
Select Remove from site in the top-right corner.
-
Confirm by selecting Remove.
Folder
Folders are used to organize datasets and sites within the Drive. A folder can contain:
-
Other folders
-
Sites
-
Datasets
Creating a folder.
-
In the Drive, select New folder.
-
Enter a folder name.
-
Select Create.
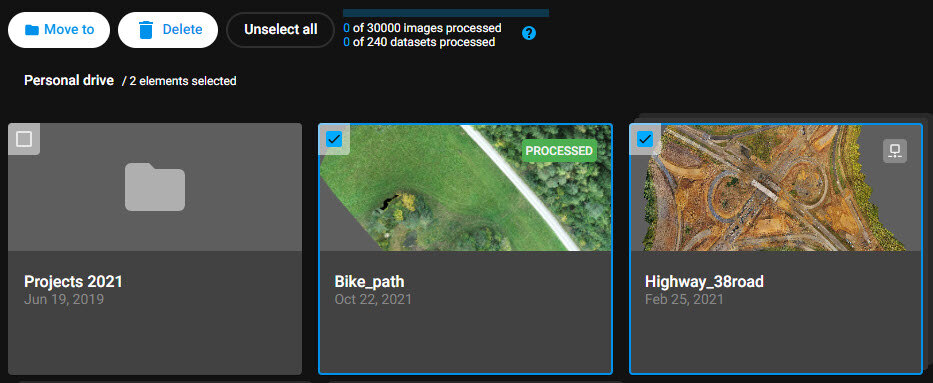
Moving items to a folder
-
Items can be moved individually or in bulk.
Single item:
-
Select the more options (⋮) menu on a dataset, site, or folder.
-
Select Move to a folder.
-
Choose the destination folder or open it and select Move here.
Multiple items:
-
Select the checkboxes of the desired datasets, sites, or folders.
-
Select Move to.
-
Navigate to the destination folder and confirm.
-
Deleting items from the Drive
-
Select one or more datasets, sites, or folders using the checkboxes.
-
Select Delete.
-
Type DELETE (uppercase) to confirm.
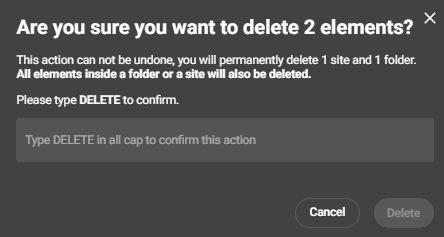
- Deletion is permanent. All contents within a folder or site are also deleted.
- When filters are active, selected items may not be visible even though they remain selected.
Drive navigation views
The Drive content can be displayed using the following views:
Map view (default)
Displays datasets and sites located at the root level on an interactive map. ![]()
-
Items stored in subfolders are not displayed until the folder is opened.
-
Older datasets or sites may not appear if:
-
They use an arbitrary coordinate system
-
They contain only 3D outputs (point cloud, 3D mesh, and/or IFC)
-
Sites contain only such datasets
-
Card view
Displays folders first, followed by datasets and sites sorted by creation date. ![]()
List view
Displays folders, sites, and datasets in a table format, including name, creation date, and status (Uploaded, New, Processed, Error). ![]()
Information: Advanced site-based workflows and timeline functionality are available with the PIX4Dcloud Pro license.