IN THIS ARTICLE
Navigate in the 3D view
Project Settings
Navigate in the original images
To change the display of an individual image
To change the display of all images
Navigate in the 3D view
To pan, rotate, and zoom in the 3D view:
- Left-click to pan the 3D view.
- Right-click to rotate the 3D view.
- Use the scroll wheel to zoom in and out on the 3D view.
To access the predefined views:
- Click View on the Menu bar.
- Click:
- Orthographic view (5) to switch to orthographic view.
- Perspective view (6) to switch to perspective view.
- Zoom to fit all content (Ctrl+1) to zoom out and view the entire scene.
- Zoom to selection (Ctrl+2) to zoom to the selected object.
- Top view (7) to view the scene from the top. The scene is zoomed out to display the entire scene.
Tip: It is also possible to use shortcuts to view the scene in predefined views.
Video: Perspective and orthographic view: Easily navigate the 3D view on #PIX4Dsurvey with shortcuts! Just hit 6 to see your project in perspective or hit 5 to get the orthographic view, with no distortions and a similar experience to looking at an orthomosaic.
Project Settings
Video: In PIX4Dsurvey you can have greater control over your projects with settings that make your work easier, faster, and more effective! Choose from a range of settings to focus on what is important!
Video: In PIX4Dsurvey you can have greater control over your projects with settings that make your work easier, faster, and more effective! Choose from a range of settings to focus on what is important!
Note: PIX4Dsurvey 1.23 and previous versions had these settings in the 3D view settings  at the bottom-left corner of the window.
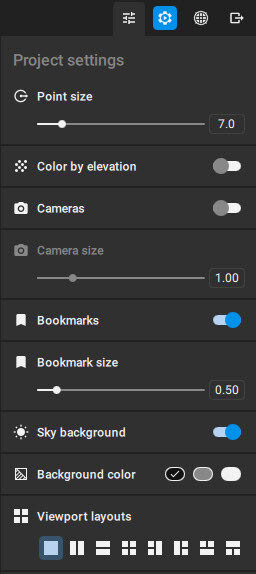
at the bottom-left corner of the window.Click  at the top-right corner of PIX4Dsurvey to open the Project Settings and adjust the following settings in the 3D view:
-
- Point size (13 - default, 0.1 - 200), to change the point size of all project point clouds. The point size of each point cloud can be individually set in the Content - Point clouds panel by accessing the Point cloud properties
 of the individual point cloud.
Note: Projects originated by PIX4Dcatch will have a smaller point size assigned by default in order to increase the visualization experience. This does not have any impact on the content of the data.
of the individual point cloud.
Note: Projects originated by PIX4Dcatch will have a smaller point size assigned by default in order to increase the visualization experience. This does not have any impact on the content of the data. - Color by elevation, by enabling this feature, it is possible to assign a color to each point of a point cloud according to the elevation of the points.
- By default, the color palette is scaled according to the minimum and maximum altitude values of the point cloud. It is possible, however, to manually change the starting and ending point by moving the two sliders. Points outside this range are shown as grey.
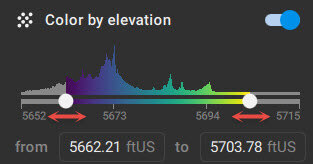
- A selection of different color palettes are available.
Video: PIX4Dsurvey’s latest feature lets you use colors to highlight point cloud elevations. Choose a color palette that best represents your area to find what you need to get the job done! - By default, the color palette is scaled according to the minimum and maximum altitude values of the point cloud. It is possible, however, to manually change the starting and ending point by moving the two sliders. Points outside this range are shown as grey.
- Camera (off - default), to toggle on/off the position and orientation of the cameras in the project (only available for photogrammetry projects).
- Camera Size (1 - default, 0.01 - 5), to change the size of cameras (cameras must be activated in the button above or in Menu View > Cameras.
- Bookmarks (on - default), to toggle on/off the position and orientation of the bookmark cameras in the project view. More information about bookmarks can be found here: Bookmarks in PIX4Dsurvey.
- Bookmarks size (0.50 - default, 0.01 - 5), to change the size of the bookmark cameras.
- Sky background (on - default), to toggle on/off the sky shared.
- Background color (black - default, grey, white), to change the background color.
- Viewport Layouts (one viewport - default), to split the view in different viewports. Eight different layouts are available
 Video: Extend your vision and your vectorizing capabilities with the split view in PIX4Dsurvey. See your project from multiple angles at the same time, vectorize seamlessly between views, and save your prefered layout for next time.
 - Point size (13 - default, 0.1 - 200), to change the point size of all project point clouds. The point size of each point cloud can be individually set in the Content - Point clouds panel by accessing the Point cloud properties
Navigate in the images
Important: Only available for perspective cameras' projects processed in PIX4Dmapper or PIX4Dmatic. For more information see How to import a PIX4Dmapper project into PIX4Dsurvey or How to import a PIX4Dmatic project into PIXDsurvey articles.
To change the display of an individual image:
- Hold Ctrl and left-click to pan on the image.
- Hold Ctrl and rotate the scroll wheel to zoom in and out of the image.
To change the display of all images:

- Click
 to add a marker (must be marked on a minimum of two images).
 - Click + or - to increase or reduce the number of columns of displayed images.
- Use the slider to zoom in and out all the images at once.
Note: In the case of combined projects, the filer icon  becomes active and it is possible to filter the input images depending on the original project belonging by activate/deactivate the specific project. This is useful, for example, in the case of a combined project originated by a drone with images from a drone and a project with images with a terrestrial acquisition. The filter allows the user to show only terrestrial or only drone images.
becomes active and it is possible to filter the input images depending on the original project belonging by activate/deactivate the specific project. This is useful, for example, in the case of a combined project originated by a drone with images from a drone and a project with images with a terrestrial acquisition. The filter allows the user to show only terrestrial or only drone images.