If Tie Points are marked in PIX4Dmatic or PIX4Dmapper project they can be exported and imported into a PIX4Dmatic project. This way it is not needed to mark them in the images again.
IN THIS ARTICLE
Marks file structure
How to export marks in PIX4Dmatic
How to export marks in PIX4Dmapper
How to import marks in PIX4Dmatic
Marks file structure
The text file with Tie Points marks needs to contain the following:
- Image name,
- Tie Point name,
- image coordinate x,
- image coordinate y,
- accuracy (in pixels).
image_name,GCP1,3830.31,123.113,1.22678
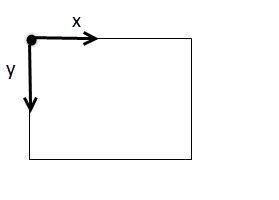
Information: The image coordinate system has as origin the upper left part of the image. Its axes are oriented as shown in the image below:
How to export marks in PIX4Dmatic
To export tie point marks:
- Click
 Tie Points >
  >
>  Export marks...
 - In the Export marks dialog, enter the File name and click Save.
How to export marks in PIX4Dmapper
In order to export marks:
- In PIX4Dmapper, click Project > GCP / MTP Manager...
- In the GCP/MTP Table section, click Export Marks... The pop-up Export Image Marks window opens.
Note: If the project does not have a point marked on at least one image, the option Export Marks... will be grayed out.
- Navigate to the path where the marks file will be saved.
- On File name, type the desired file name.
- (optional) On Save as Type by default Pix4D Marks Files (*.txt, *.csv) is selected. To change to another output format, click Pix4D marks files (*.txt, *.csv) and select the desired format.
- Click Save.
- (optional) If a Pix4D marks files (*.txt, *.csv) was selected, the pop-up Pix4D Marks File Options opens. Select the Optional Data to be exported and the Data Separator and click OK. For more information: Menu Project > GCP / MTP Manager... > GCP / MTP Table > Import / Export Marks....
Important: The following settings need to be applied for a seamless import into PIX4Dmatic:
- File format: PIX4D marks files (*.txt, *.csv).
- Marks' Zoom Level - unselected.
- Image Directory - Selected.
- Data Delimiter - Comma.

How to import marks in PIX4Dmatic
To import tie point marks:
- Click Tie Points > > Import marks... or
- Click Menu bar > File >
 Import marks...
 - In the Import marks dialog, enter the File name and click Open.