IN THIS ARTICLE
Requirements
Generate an Elevation profile
Measure on an Elevation profile
Export an Elevation profile
Licenses: This feature is available to PIX4Dcloud Starter and PIX4Dcloud Pro licenses.
Roles: Only Owners, Managers, and Editors can generate an elevationn profile in a dataset.
Requirements
The Elevation Profile feature is available when one of the following conditions is met:
-
The project is processed in PIX4Dcloud, is georeferenced, and includes a DSM.
-
A DSM has been uploaded to PIX4Dcloud and is georeferenced.
To visualize the elevation profile in the 3D view, at least one of the following outputs must also be available:
-
Point Cloud
-
3D Textured Mesh
Generate an Elevation Profile
Video: The following video tutorial explains step by step how to generate an elevation profile from a polyline in PIX4Dcloud.
To generate an elevation profile:
-
Open an existing PIX4Dcloud project.
-
Select the 2D or 3D view. The 3D view is recommended to ensure accurate selection of the start and end points.
- Add a distance measurement:
- click
 or
or - add an item to the Annotations layer by clicking
 when hovering it and select Measure a distance or elevation.
- click
- Draw a (poly)line. Double-click to end it.
- On the right, on the details panel, click Generate elevation profile.
If the elevation profile does not load, refer to the troubleshooting article: Output is not displayed / feature is missing on PIX4Dcloud.
Measure on an Elevation profile
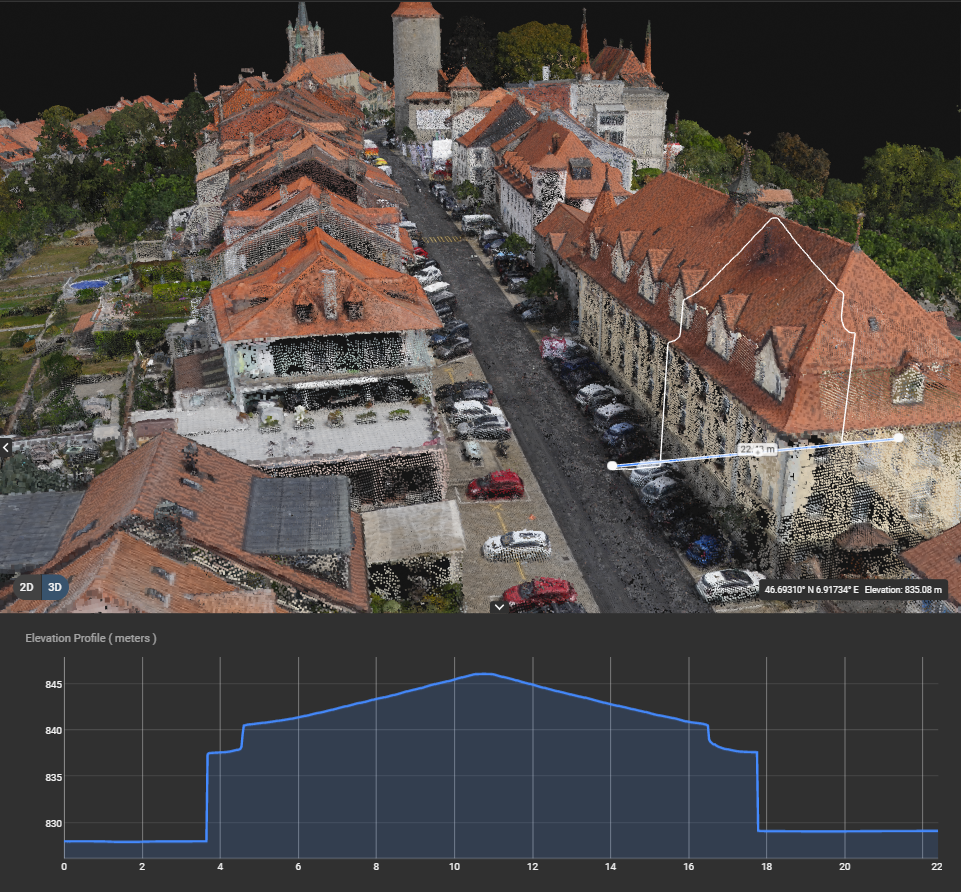
Once generated, the elevation profile is displayed in the bottom panel.
-
Move the mouse along the curve to display the elevation value and its corresponding position on the map or model.
-
Zoom in on the curve for higher measurement precision.
-
Click Reset Zoom in the Elevation Profile panel to return to the default view.
Axis description:
-
The horizontal axis represents the length of the drawn line or polyline. The origin (0) corresponds to the first point selected.
-
The vertical axis represents the elevation of the terrain or surface. More information on coordinate systems is available in Georeferencing of datasets, outputs and annotations on PIX4Dcloud.
The elevation values are computed from the DSM at each pixel intersected by the polyline. By default, the sampling resolution corresponds to the project’s Ground Sampling Distance (GSD).
Export an Elevation profile
To export the elevation profile:
- In the Elevation profile panel, click

- The elevation profile is exported as a CSV file, containing all 3D points along the profile, and saved locally.
The exported CSV file includes the following columns:
-
X, Y: Horizontal coordinates in the output coordinate system or the coordinate system detected in the uploaded DSM.
-
Z: Vertical coordinate in the vertical output coordinate system or the one detected in the DSM, expressed in meters or feet depending on account preferences.
-
Distance: Ground distance from the origin of the profile, expressed in meters or feet depending on account preferences.