How to edit the point cloud in the rayCloud

Follow

Editing the point cloud allows to clean the 3D model by reducing noise and improving the precision as well as the visual rendering. This impacts the outputs of Step 3. DSM, Orthomosaic and Index.

 
Access: Available once step 2. Point Cloud and Mesh has been completed.

In order to edit the point cloud in the rayCloud:

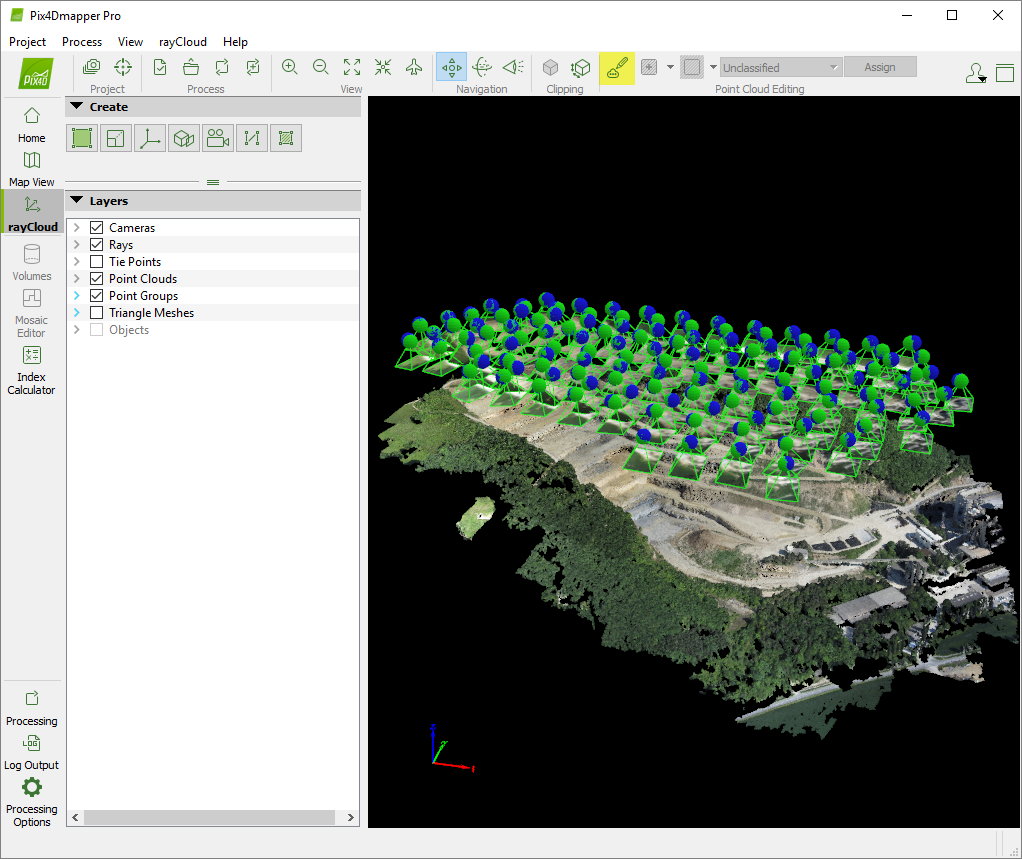
1. On menu bar, click View > rayCloud.
2. If the densified point cloud is not loaded or displayed in the 3D view: In the section Layers on the left sidebar, select Point Clouds.
3. (optional) Visualize / hide the groups of the points to be edited: In the section Layers of the left sidebar, select / unselect the desired Point Groups.

 
Note: By default, all the points are Unclassified. When the point cloud classification has been performed, all the points are assigned in one of the predefined point groups. For more information: How to generate the point cloud classification.

4. In the toolbar, click Edit Densified Point Cloud in order to activate the editing mode.

edit_point_cloud.png

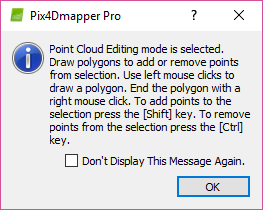
5. The following pop-up message appears. Read it and click OK.

information_pop_up.png

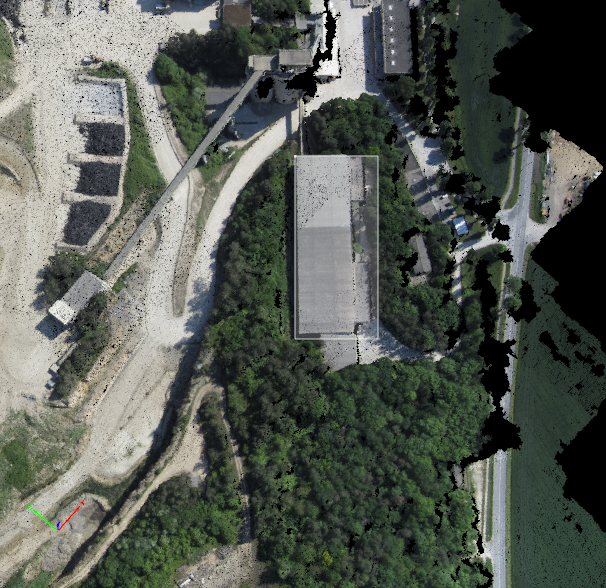
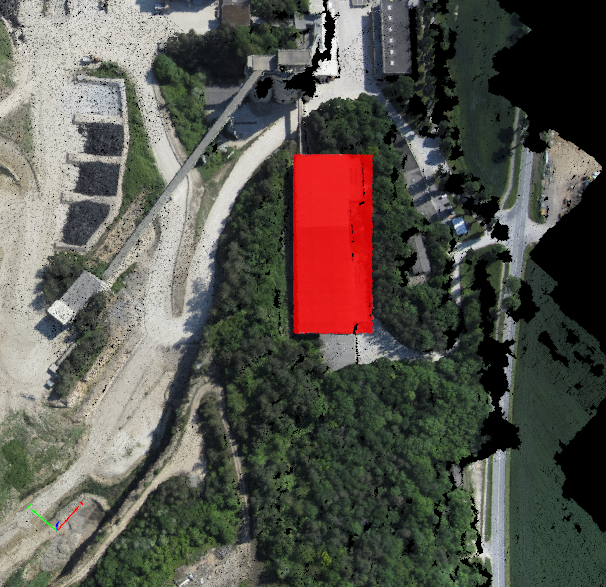
6.  By default  Add Points to Selection is selected. To select points, draw a polygon in the 3D View by using left mouse clicks. End the selection with a right-click. A red polygon highlighting the selected points is visible in the 3D View.


Drawing the rectangle Red rectangle marking the selecting points

7. (optional) To remove points from the selection: In the toolbar, click the arrow beside Add points to selection and select  Remove Points from Selection. In the 3D View, on an area highlighted in red, left-click to draw a polygon around the points that have to be removed from the selection. End the polygon with a right-click. The selected area is not highlighted in red color.
8. (optional) To clear the current selection: In the toolbar, click the arrow beside Select All and select Clear Selection.
9. (optional) To invert the selection (i.e to convert all the non-selected areas to selected areas and vice versa): In the toolbar, click the arrow beside Select All and click Invert Selection.
10. Once the points are selected: In the toolbar, click the arrow beside Unclassified and select the group to which the selected points will be assigned. In order to assign the points to a new group, click New Point Group. A pop-up appears, type the new point group name and click OK. The new group created is selected.
11. Click Assign.

 
Warning:
  • When processing step 3. DSM, Orthomosaic and Index, the points belonging to the group Disabled are not used.
  • If the DSM is generated before assigning points of the point cloud to the disabled point group, step 3. DSM, Orthomosaic and Index needs to be computed again to compute volumes based on the edited point cloud.

12. Exit the editing mode by clicking again the button Edit Densified Point Cloud in the toolbar.
13. In the menu bar, click Project > Save Project.
14. Export the new densified point cloud that was just edited. For more information: How to export the Point Cloud.


Was this article helpful?
19 out of 27 found this helpful

Article feedback (for troubleshooting, post here instead)

41 comments

  • Pedro Olivares

    Hello. Thank you very much for your time. I have the following issue: I already processed 1; Initial Processing and 2; Point Cloud and Mesh, I already generated and loaded the point cloud, but the "Edit Densified Point Cloud" Tool is not accesible, I am not able to click on it and activate it. What could be that Im not doing, or doing wrong?

  • Avatar
    Marco (Pix4D)

    Dear Pedro,


    It might be because you were working on some other feature/functionality (drawing a polyline for example) that impede you to use the Edit Densified Point Cloud function.
    Try to press "Esc" to exit your current activity this should enable the Edit Densified Point Cloud tool.
    If it does not work, could you please provide a screenshot of your issue?

    Thank you,
    Regards,

    Marco

  • Pedro Olivares

    Hello! Is there any way to "undo" an edit in the raycloud if I already assign the points to "disabled" ?

    Thank you

    Regards, 

    Pedro

  • Holden (Pix4D)

    Hi Pedro. There is no undo for pointcloud edits. You can reclassify the points back to the desired group to undo any unintended changes. 

  • Jan Stunt

    I have the same problem.  (tool not available)

    Thanks for the help !

    Screenshot :

  • Zendesk Admin

    Hi Jan,

    Have you followed Marco´s suggestion of clicking the "Esc" button to exit your current activity? This should enable the Edit Densified Point Cloud tool.

  • setia consultora

    MI MOSAICO SALE CON MUCHAS CRETAS ALREDEDOR DE LOS TEJADOS...... TRATARE DE EDITAR PERO CREO QUE TOMARA BASTANTE TIEMPO... DE ACUERDO AL INFORME EXISTE UN BUEN TRASLAPE Y LAS FOTOS ESTÁN BIEN CLARAS... NO SE SI ESTO OCURRE POR USAR UN TRIAL O ALQUILANDO UNA LICENCIA EL PROCESO MEJORA. SALUDOS

    ///////

    MY MOSAIC COMES OUT WITH MANY HOLES AROUND THE ROOFTOPS ...... I WILL TRY TO EDIT BUT I THINK IT WILL TAKE ENOUGH TIME ... ACCORDING TO THE REPORT THERE IS A GOOD TRANSFER AND THE PHOTOS ARE WELL CLEAR ... I DO NOT KNOW IF THIS OCCURS BY USING A TRIAL OR RENTING A LICENSE THE PROCESS IMPROVES. REGARDS

  • Holden (Pix4D)

    Hola Setia,

    Es posible que desee considerar el uso de la herramienta Carve para automatizar parte de la eliminación de puntos. Vea el artículo en el siguiente enlace. De lo contrario, puede abrir una solicitud de soporte para obtener consejos específicos.

    https://support.pix4d.com/hc/en-us/articles/212262883-What-is-Carve-

    /////

    You may want to consider using the carve tool to help automate some of the point removal. See the article at the link below. Otherwise you can open a support request to get specific advice. 

    Edited by Holden (Pix4D)
  • mohan naderi

    Hi 

    can I see the changes in my mesh visualisation after editing point cloud?if yes, I have problem with that. although I classified a group of my point cloud to not be considered  it is still considered in my texture mesh even when I chose to generate a new texture mesh!! 

  • Daniel Moller

    I have photos of a tall frame structure, like a warehouse without roof or walls. The algorithm is really bad for classifying this. And I would like to know what is the best approach to reclassify the points.

    See this picture:

    The highlighted beam is surrounded with points colored like the object that should be on a lower level. Part of these points are classified as building, and other parts of the beams are classified as vegetation. 

    How should I reclassify the points? By texture color? If I reclassify the orange points there with ground, they will go down in the DSM?  Or should I classify everything by elevation?

    How to improve this model?


  • Holden (Pix4D)

    The points around the beam are likely noise which would mean that you want to remove them by assigning them to the "disabled" category. You can also try removing these sorts of point using image annotation.

    Annotation Support Article

    This won't work in all situations but is a tool you should be aware of. Another way to reduce this sort of issue is to have high image overlap and a slightly oblique angle when acquiring the image data. Then when processing step 2 increase the minimum number of matches to 4 or 5. This will reduce the overall number of points in the dense point cloud but will also reduce noise like this. 

  • Tim Kuhn

    @Mohan naderi

    I have the same problem. But i think  it is impossible to edit the point cloud for the mesh visualisation, because both are getting created at the same step. Maybe a Pix4D member can give us an answer.

  • mohan naderi

    @Tim kuhn
    I thought the same but I saw on a trainig video on YouTube on pix4d channel he simply edited that and by reconstructing the mesh , bobbles and noises were gone! I followed exact the same steps but couldn't see the result at all!!

  • Holden (Pix4D)

    Hi all. The dense pointcloud and mesh are both generated during step 2 but you can regenerate the mesh after step 2 by following the instruction below.

    https://support.pix4d.com/hc/en-us/articles/202557899-Menu-Process-Generate-3D-Textured-Mesh

    The basic workflow I usually follow is to disable mesh generation for step 2 and only create the pointcloud. Then after step 2 is complete you can make edits to the pointcloud by disabling points, annotating images, or drawing a processing area. Then set your desired mesh settings in the processing options and generate only the mesh using the instructions in the article above. The mesh should then reflect the changes you made to the pointcloud. 

  • Edgar Teyssier

    Buenas tardes Podrias hacer un ejercicio COMPLETO para clasificar arboles altos y medianos por que no veo un caso real que me puedan compartir en turorial u otra forma pero completo de arboles......una ves que elimine los arboles como genero las curvas de nivel...

  • Holden (Pix4D)

    Holla Edgar,

    El proceso para clasificar árboles sería el mismo que se indicó arriba. Para regenerar las líneas de curva después de haber editado la nube de puntos, primero debe regenerar el DSM o DTM ejecutando el paso 3 o usando el menu y luego generar las líneas de curva. Vea los paginas abajo para más información.


    https://support.pix4d.com/hc/en-us/articles/203204259-Menu-Process-Generate-DTM

    https://support.pix4d.com/hc/en-us/articles/202558469-Menu-Process-Generate-Contour-Lines

  • Paulo Neto

    Hello guys! How are you? Hope fine!

    My Pix4D Mapper is not showing the polygon surface when its on black area. I can see white surface on the point cloud, but on black whole area not possible to see.

    Any idea what could be?


  • Holden (Pix4D)

    Hi Paulo. Does pressing the "Esc" key fix the issue? Also, can you restart the software? Does the issue occur even after you restart?

  • Paulo Neto

    I already tried ESC, update windows 10 system and GPU drivers, etc. My notebook is a DELL G5 i7 9th generation, 16GB RAM, 1660 Ti GPU, 256GB SSD, 1TB HD.
    The option works ok but the surface inicial on black area is not showen.


  • Holden (Pix4D)

    Im not sure I understand the problem. Can you clarify what the issue is?

  • Paulo Neto

    I've found the issue that Pix4D Mapper software was not configured for high performance in the NVIDIA Control Panel. Before when I tried to select areas where the polygon crossed the black area it was not possible to visualize the surface of the polygon. Now i can see it and classify the point cloud better.

  • Holden (Pix4D)

    Interesting. when you say polygon do you mean the display for the selected area?

  • Carmen Martone

    Hello all, 

    I have completed a project successfully from RGB images. I am analyzing an area full of vegetation and trees. The point cloud, DTM and DSM obtained are based on the altitude of all terrains including trees and other vegetation, however, I really need to take out the vegetation since I need to know the exact altitude of the ground for further purposes and the altitude of trees make the ground elevation measurements wrong for me.
    Is it possible to have a point cloud and further DTM without objects affecting the ground elevation?

    Thanks very much for your help.
    Saluti

  • Holden (Pix4D)

    Hi Carmen. The DTM only contains points that are classified as road or ground. If there is enough ground visible through the canopy and the points are classified (may need to manually correct some classification). Make sure the points are correct then generate the DTM. This is the best way to improve the DTM.

  • godwill sagiya

    I edited my point cloud ,and disabled the class but when i do my volumes the disabled class still appears on my volume layer. What should i do.

  • Holden (Pix4D)

    Hi Godwill. Can you send a screenshot of what the point cloud looks like without the volume present? 

  • godwill sagiya

    Thank you finally found the solution. If you edit your point cloud you need to regenerate the DSM because volumes are calculated based on the DSM.

  • Holden (Pix4D)

    Glad to hear the issue was resolved. Thanks for sharing the solution.

  • Meagen Larson

    Hello,

    Can you please walk me through the workflow for generating a DTM from point cloud. I have generated the classified point cloud but it will require a GREAT DEAL of editing. Is there any way to simplify that process? Reduce noise? Am I correct in not including high vegetation when exporting point cloud?

    Thanks!

    Meagen

  • Martin Gryl

    Hi I have been trying for a long time with different angles etc.to delete the points in the area in gray. It is not posibel but maybe im doing something wrong?

Article is closed for comments.