Mount and configure an Emlid Reach RX - PIX4Dcatch
This article describes how to correctly configure and set up the Emlid Rech RX for seamless integration with PIX4Dcatch
To effectively use a Pix4D-supported RTK device with a mobile device, the initial step is configuring the setup correctly. This involves setting the camera offset between the antenna and the mobile device's camera. This offset, whether measured automatically by Pix4Dcatch (SPC+) or manually by the user, is crucial for accurately computing locations captured by Pix4D-adapted RTK devices, ensuring precise measurements for scans or ground control points (GCPs).
IN THIS ARTICLE
Mount the Pix4D-adapted Emlid RTK rover to the Device
Smartphone model
Devices with a Known Camera Offset
Camera Offset Measurements
How to Manually Measure the Camera Offset
Measure the X axis
Measure the Y axis
Measure the Z axis
Enter the Camera Offset Values
Note: To ensure optimal performance and prevent potential issues, update the RTK antenna firmware before use. Follow the instructions provided in the Emlid Reach RX Firmware Update Guide to complete the update process.
Emlid Reach RX has been fully integrated in PIX4Dcatch since version 2.0.0 released on April 30th, 2024.
Mount the Pix4D-supported Emlid RTK rover to the device
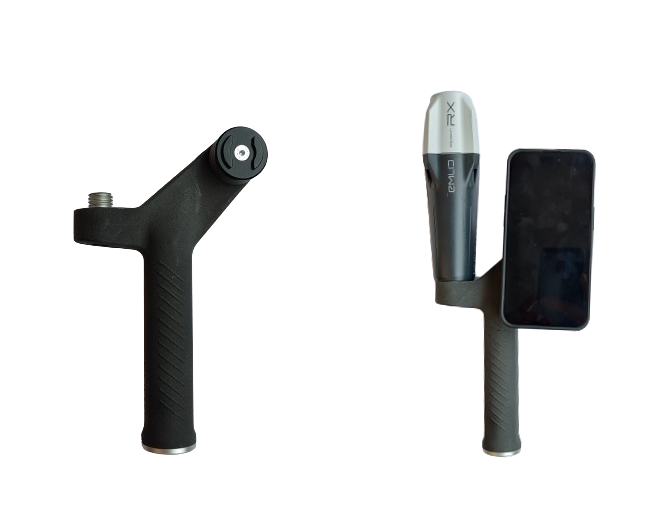
The Pix4D-supported Emlid is a GNSS RTK receiver that allows PIX4Dcatch to geolocate the images acquired by your mobile device with centimeter accuracy. The Pix4D-supported Emlid RTK rover can be coupled with mobile phones (iOS) using the SP connectors (cases or clamps) provided by SP Connect.
Smartphone model
First, insert the phone into its compatible SP-connect case. Then, mount the case to the device by following the instructions provided with the SP-connect case.

Devices with a Known Camera Offset
This list contains the combinations of mobile devices (phones and tablets) with the Pix4D-supported RTK devices where the camera offsets are already measured. PIX4Dcatch will automatically fill in the X, Y, Z fields with the correct camera offset values.
| Smartphone model | Compatibility |
| iPhone | SPC+ |
|
iPhone 17 Pro iPhone 17 Pro Max |
✅ ✅ |
|
iPhone 16 Pro iPhone 16 Pro Max |
✅ ✅ |
|
iPhone 15 Pro iPhone 15 Pro Max |
✅ ✅ |
|
iPhone 14 Pro iPhone 14 Pro Max |
✅ ✅ |
|
iPhone 13 Pro iPhone 13 Pro Max |
✅ ✅ |
|
iPhone 12 Pro iPhone 12 Pro Max |
✅ ✅ |
|
iPhone 11 Pro iPhone 11 Pro Max |
✅ ✅ |
| iPhone XR | ✅ |
| Tablet model | Compatibility |
| iPad | SPC+ |
| iPad 11 inch M4-2024 | iPad case - Pix4D Japan* |
*Only available in Japan.
Note: The solution for iPad Pro 11'' is only available in Japan.
Camera Offset Measurements
When initiating the connection to the Pix4D-supported RTK devices, the dialog RTK Device Settings opens. The section Camera Offset allows the user to set the X, Y, and Z offset values properly. The available options depend on the combination of the Pix4D-supported Emlid RTK device version, the mobile device and the device case. The following options are available: SPC+ and Custom.
The option SPC+ is only available if the combination of the Pix4D-supported Emlid RTK device version, the mobile device and the device case are known. The option Custom is always available and intended to be used by universal or specific cases. This option requires measuring the camera offsets manually and setting them in PIX4Dcatch. The camera offset value selection is saved for the next measurements and modifications are only needed if the setup changes.
-2.png?width=300&height=600&name=Plantilla%20Iphone%20(22)-2.png)
How to Manually Measure the Camera Offset

Mount the device to the Pix4D-supported RTK devices using the appropriate SP-connect case. Phone cases can be purchased separately from the SP-connect website. The SP-connect universal phone mount can be used if the specific model is unavailable. SP-connect cases are also available in most bicycle and motorcycle shops.
Place the device in landscape mode and the display to the front. Notate the orientation of the X, Y, and Z axes and how they relate to the point of origin on the antenna to measure from. The point of origin resides in the middle of the screw mount at the base of the antenna. It will also be necessary to determine which lens to measure from for devices with multiple camera lenses.
Measure the X and Y axis
To measure the X-axis offset, measure the X-axis on the vertical axis from the middle of the antenna to the point where it intersects the Y-axis. Then, measure the distance from the camera lens to the bottom of the mount.


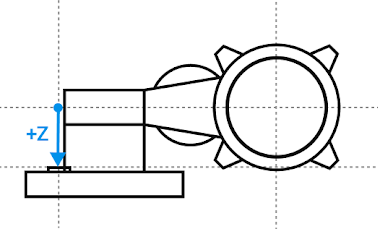
Measure the Z axis
Measure the depth from the center of the handle to the center of the lens for the Z axis offset.

Enter the camera offset values
With the camera offsets properly measured and recorded, they can be included in the appropriate Camera Offset Values field. Depending on the device's geographical region, centimetres or inches will be the displayed measurement unit.
-1.png?width=300&height=600&name=Plantilla%20Iphone%20(23)-1.png)
-1.png?width=300&height=600&name=Plantilla%20Iphone%20(24)-1.png)
The camera offset is now properly set in the Camera Offset Values X, Y, Z fields. Continue with the RTK Device Settings dialog to complete the Pix4D-supported Emlid RTK connection to the device.
