
PIX4Dcatch allows measurements to be taken directly in the app using the device's built-in GPS or a connected RTK device for high-accuracy positioning.
IN THIS ARTICLE
Measure with an RTK device
Measure using the mobile device's GPS
Measure with an RTK device
For higher-accuracy positioning and accurate measurement, connect a supported RTK device to the PIX4Dcatch app.
- Open PIX4Dcatch.
- Connect the supported RTK device to PIX4Dcatch. For more information, visit Connecting PIX4Dcatch to a compatible RTK (GNSS) device.
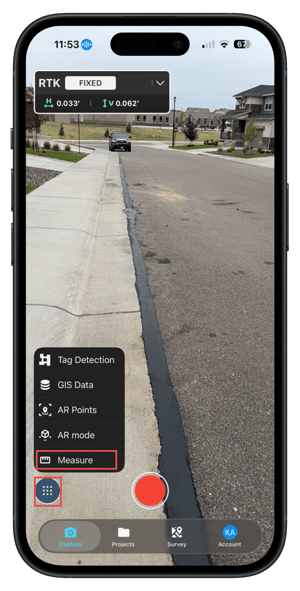
- Go to the Capture view and tap on
 Tools icon located at the lower left of the screen.
 - Tap on Measure.
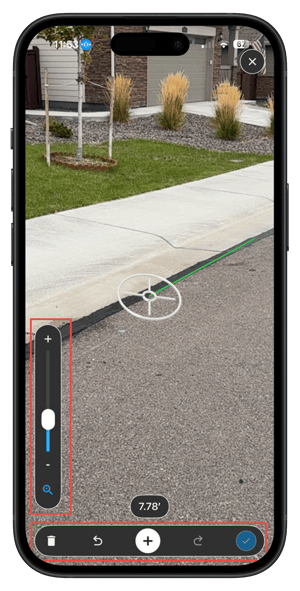
- Position the reticle
 at the starting location and tap
  Add Point icon. Move to the endpoint, position the reticle
  , and tap Add point icon.
 - The zoom tool can be used to zoom in or out to add a point. It is possible to redo, undo, or delete the line or point that has been created.
- Tap on the
.png?width=28&height=28&name=Button%20(2).png) OK icon to complete the measurement. (Option) Add additional points to create a multi-segment measurement if required.
OK icon to complete the measurement. (Option) Add additional points to create a multi-segment measurement if required. - Once the measurement is complete, tap the line to view details such as Name, Description, 2D length, 3D length, Elevation Difference, and slope.
Measure using the mobile device's GPS
When no RTK device is connected, PIX4Dcatch uses the mobile device's built-in GPS for positioning.
- Open PIX4Dcatch.
- Go to the Capture view and tap on
 Tools icon located at the lower left of the screen.
 - Tap on Measure.
- Position the reticle at the starting location and tap Add Point icon. Move to the endpoint, position the reticle , and tap on Add point icon.
- The zoom tool can be used to zoom in or out to add a point. It is possible to redo, undo, or delete the line or point that has been created.
- Tap on the OK icon to complete the measurement. (Option) Add additional points to create a multi-segment measurement if required.
- Once the measurement is complete, tap the line to view details such as Name, Description, 2D length, 3D length, Elevation Difference, and slope.