IN THIS ARTICLE
Introduction
Creating a Targeted Operation
Exporting EAVision Boundary mission
Uploading to the EAVision platform
Exporting EAVision VRA mission
Introduction
EAVision supports the import of prescription files created with PIX4Dfields, which precisely define the treatment area, assign rate to zones and outline obstacles.
This enhances operational safety and efficiency by ensuring that the application is limited to the intended areas, while avoiding obstacles and restricted regions. A single fixed rate or variable rates can be applied across the prescribed area, streamlining workflow and minimizing the risk of accidental application outside the defined boundaries.
EAVision spraying drones support two types of missions:
- EAVision Boundary mission:
- It allows the definition of the field area to be sprayed along with obstacles and no-spraying zones. It only supports one fixed rate.
-
- Exported file: KML.
- EAVision VRA mission:
- It allows a variable rate to be applied to the field area to be sprayed, along with obstacle and no-spraying zones. It supports up to seven different application rates.
-
- Exported files: KML and JSON.
Creating a Targeted Operation
Targeted operations enable users to mark obstacles and variable rate zones directly on the operational map. These zones can be delineated on an orthomosaic generated from drone images.
- After processing the drone images, mark the boundaries, obstacles and holes to be used in the operation.
- Create a Targeted Operation using the previously created elements. To learn more about how to create an Operation, please watch: Spot spraying prescription maps for spraying drones and tractors.
- The following Operation is intented to be exported as Boundary Mission:
- Obstacles included in the operation.
- No-spray zones delimited.
- The red area is designated for application at a rate of 50 Liters per hectare.

Exporting for EAVision Boundary mission
To export the Targeted Operation to EAVision drones:
- Go to the Export menu.
- Click Operations.
- Select the Operation to be exported.
- Select EAVision Boundary mission.
- Upload the KML to the EAVIsion platform.
Uploading boundary mission to the EAVision platform
-
Log in
Navigate to https://web.eavtechus.com/mapCloud/#/login and log in with the account credentials.
-
Open the map page
After logging in, enter the Map page and click Upload Plots on the toolbar.

The Upload Plots menu will appear. -
Configure upload parameters
In the upload menu, set the required parameters such as project name, demand, and associated team.
Then, click Select File to choose the KML file exported from PIX4Dfields.
-
Confirm and upload
Review your settings and click OK.
Once the upload is complete, the system will display a message indicating the upload result. -
Verify the imported file
Return to the map view and verify that the plot boundaries (blue), obstacles (in red), and no-spray zones (in yellow) are displayed correctly.
Exporting EAVision VRA mission
It allows a variable rate to be applied to the field area to be sprayed, along with obstacle and no-spraying zones.
To export the Targeted Operations as EAVision VRA mission:
- Go to the Export menu.
- Click Operations.
- Select the Operation to be exported.
- Select EAVision VRA mission.
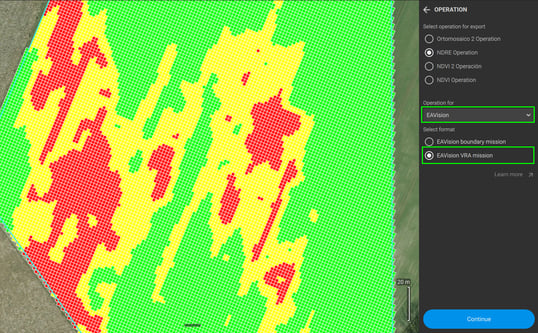
- Upload the files to the EAVIsion platform.