Tie points (Ground control points(GCPs) and Checkpoints (CPs)) can be used to maintain and verify the absolute accuracy of a project. Tie points are imported into PIX4Dmatic using a .txt or .csv file. The format of these files can vary and will be necessary to define this when importing. This article will guide how to successfully import these files into PIX4Dmatic.
For more information on compatible file structures, see: Tie points (GCPs, CPs) import format - PIX4Dmatic.
IN THIS ARTICLE
Import the Tie Point File(.csv/.txt) into PIX4Dmatic
Define the Tie Point Coordinate Reference System and File Format
Select the GCP Coordinate Reference System (CRS)
Define the tie point file format
Import the Tie Point File(.csv/.txt) into PIX4Dmatic
There are three methods to import a tie point .csv/.txt file into PIX4Dmatic. One is accessible through the File tab in the main header, and the others are accessible from the Tie Points panel.
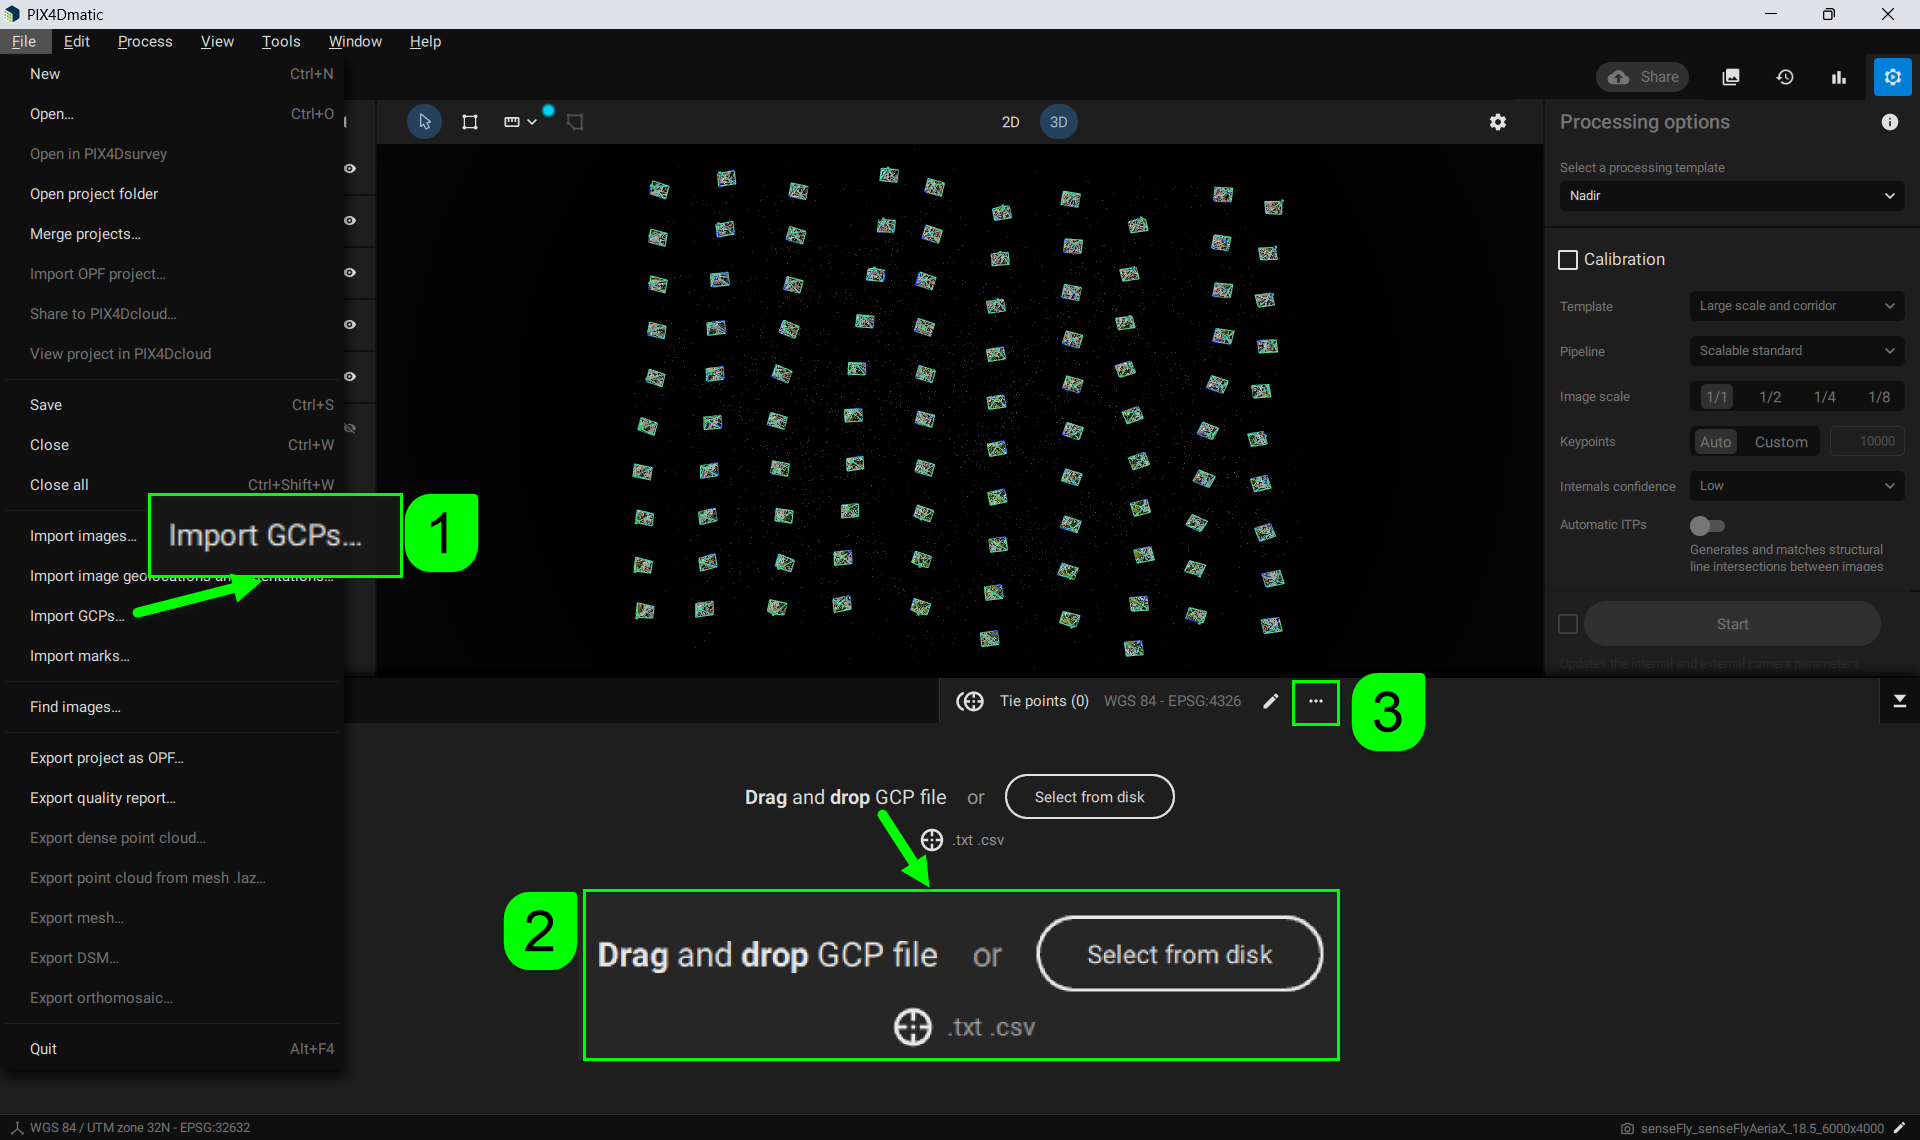
- [1] Go to the Menu bar and select File > Import GCPs... to select the GCP file.
- Click the
 Tie points (0) tab on the lower right of the screen to expand the tab.
 - [2] Drag and drop the GCP file, or Select from disk to specify the GCP file.
- [3]Click the dropdown menu
 and select
  Import GCPs...
 - Select the tie point file.
Tie points can be imported and marked at different stages:
- Before the Calibration step: This requires more manual work as the position of Tie Points on images is not precise as it is determined only based on the initial image geolocation and orientation. However, marking the Tie Points before processing can eliminate the need for reprocessing or reoptimizing the Calibrate step.
- After the Calibration step: The position of Tie Points on images is more precise as external and internal camera parameters are calculated. However, you will need to reprocess or reoptimize the Calibrate step.
Define the Tie Point Coordinate Reference System and File Format
After importing the tie point file into PIX4Dmatic, the GCP coordinate reference system dialog will appear. In the upper portion of the dialog, the coordinate system of the GCPs needs to be selected. The lower portion is used to define the format of the imported file. Warnings are provided to highlight needs to aid in the selection.

Select the GCP Coordinate Reference System (CRS)
After importing the tie point file, select the coordinate reference system associated with the file. There are three types of CRSs to choose from. A known CRS, an Arbitrary, or an imported CRS using a .prj or .wkt file.

- Known CRS(default): Select from a list of available known coordinate reference systems.
- Horizontal coordinate reference system: Enter/Select the horizontal coordinate reference system.
- Vertical coordinate reference system: Enter/Select the vertical coordinate reference system.
- Geoid(optional): Select the proper global or local geoid model from the PIX4Dmatic database.
For more information on available geoids: List of Supported Geoids - PIX4Dmatic.
- Geoid height (optional): When the geoid corresponding to the selected vertical reference frame is not available, select the Geoid height value, which represents the height between the base ellipsoid of the horizontal coordinate reference system and the desired geoid.
- Arbitrary CRS: Select for an Arbitrary CRS.
- Select the unit of measurement: Meters(m), Feet(ft), or US Feet(ftUS).
- Import CRS file: Use this selection to import a custom CRS file in a .prj or .wkt format.
For more information: How to Use Coordinate Systems - PIX4Dmatic, and How to use vertical coordinate systems and geoids - PIX4Dmatic.
With the appropriate CRS selected the format of the tie point file should be defined next.
Define the Tie Point File Format
Depending on the device used to measure the tie points there can be variations in how the tie point data is arranged within the file. In this step, it is necessary to define the separators, starting row, and column arrangement of the file being imported allowing for PIX4Dmatic to read and import the points correctly.

- Column separator: Select the proper separator Comma[ , ], Semicolon [ ; ], Pipe [ | ], Space[ ], Tab [ ] between the different columns of the GCP file.
- Decimal separator: Select the proper decimal mark Period [ . ] or Comma [ , ], to separate the integer part from the fractional part of the coordinates/values written in the file.
- Skipped rows: Select a number between 0 and 11 showing how many rows should be skipped in the file and not take them into account.
- Column format: Select the most representative format of the tie point file from the existing column formats: PENZ, PNEZ, LabelXYZ, LabelYXZ, Label XYZ Accuracy XY Accuracy Z, Label YXZ Accuracy YX Accuracy Z, Label Latitude Longitude Elevation, Label Longitude Latitude Elevation, Label Latitude Longitude Elevation Accuracy Horizontal Accuracy Vertical, Label Longitude Latitude Elevation Accuracy Horizontal Accuracy Vertical.
After selecting the necessary fields from the GCP coordinate reference system window, click the Apply button to save the selections.

GCP coordinate reference system dialog filled, applying the selections.
After the tie points are imported, they are displayed in the ![]() Tie points table. Once tie points are imported or added, they can be marked before processing or after.
Tie points table. Once tie points are imported or added, they can be marked before processing or after.
For more information: Tie Points - Mark Tie Points.