IN THIS ARTICLE
Create a new Point Collection
Measure Points
Measure points using a survey pole/tripod
Import points
Edit points
Reference photos
Delete points
Rename points
View points in AR
Manage Point Collections
List Point Collections
Export Point Collections
Visualize Point Collections in Augmented Reality (AR)
Delete Point Collections
Create a new Point Collection
Before measuring points, it is necessary to first create a new point collection (also defined as GCP collection). This point collection serves as a placeholder for storing measured or imported points.
-
Tap the icon from the main screen to open the Survey tap
 .
.
-
Tap the New Collection
button
-1.png?width=90&height=25&name=Button%20(7)-1.png) to create a new point collection for storing the measured or imported points.
to create a new point collection for storing the measured or imported points. -
Type a name for the new point collection.
In the Point CRS tab, select the desired output coordinate reference system:
-
 Choose the horizontal coordinate reference system.
 Choose the vertical coordinate reference system.
 Select the geoid (if available).
-
- Tap Create.

Important: The Import Coordinate System option allows the use of a Well-Known Text (WKT) file. For more information, click here.
When a local geoid is not available, a constant geoid offset (height above the ellipsoid) can be entered. This offset is applied to all measured points to convert ellipsoidal heights to a uniform orthometric height.
When creating a new point collection, the horizontal and vertical coordinate reference system fields are automatically populated based on the current region and configuration information.
- With GNSS/GPS:
- Horizontal: WGS 84 (EPSG 4326)
- Vertical: Ellipsoidal height
- With a PIX4D supported RTK device:
- Horizontal: depends on the NTRIP CRS entered. Examples: ETRS89 (EPSG 4258), NAD83(2011) (EPSG 6318), JGD2011 (EPSG 6668)
- Vertical: Ellipsoidal height
Measure Points
After creating a point collection, it is possible to measure points.
Measure points using a survey pole/tripod
An important pre-requisite for achieving high-accuracy measurements of GCPs is setting the correct antenna height (Z axis).
- Create or select the desired point collection where the points will be stored.
- Tap the New Point
 button.
 - The point name will be auto-generated based on the point collection name, but it can be modified. If the point collection will be used for Auto Tag Detection, then the point name suffix has to include the same number as the number visible on the tag.
- When using a PIX4D supported RTK device, the antenna height must be measured from the base of the RTK device to the ground, centered on the point.

- When using the GNSS/GPS of the device, the antenna height is measured from the center of the device to the ground centered on the point. To add the correct value measure the antenna height value before starting measuring. The antenna height value can be entered in meters or feet.
- When using a PIX4D supported RTK device, the antenna height must be measured from the base of the RTK device to the ground, centered on the point.
- If applicable, add reference images and write a description.
- Set the measurement duration (5 seconds, 15 seconds, 30 seconds or custom).
- Tap the Measure
 button.
It is recommended to wait for RTK Fixed and optimal HDOP/VDOP values before the measurement starts.-1.png?width=250&height=500&name=Plantilla%20Iphone%20(39)-1.png)
- The button Start measuring will be active once the device is aligned with the ground and the bubble turns green. The green bubble must remain as centered as possible to perform the point measurement correctly.


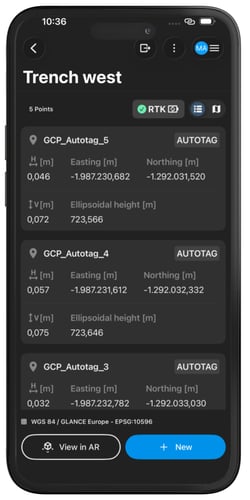
- All points measured will be saved and accessible in their point collection. Continue measuring new points following the same workflow. It is also possible to edit the name and description, add reference photos, and delete points. For more information: Edit points.
Import points
PIX4Dcatch is also capable of importing GCP coordinates into an existing point collection.
- If the desired point collection does not exist yet, it needs to be created first.
- Click on Import Points.
- Select the file with the GCP measurements. Ensure that the coordinates have to be in the same coordinate reference system as the point collection.
- Select the correct unit of measurement (meters, feet, US survey feet).
- Select the axes orientation (Northin/Easting, Easting/Northing). For more information about the GCP formats, please refer to Tie points (GCPs, CPs) import format - PIX4Dmatic
Edit points
Select a point collection and edit the points that were measured or imported. The following editing actions are possible during and after the point measurements:
- Add and edit reference photos
- Rename points/point collections
- Delete points/point collections
Reference photos
For adding more details about the site conditions, capture reference photos for each point. A reference photo can be taken before or after measuring a new point.

- There are two ways to capture reference photos:
- Before measuring the GCP: from the New Point dialog, tap the Camera icon
 in the Reference Photos (Optional) tab.

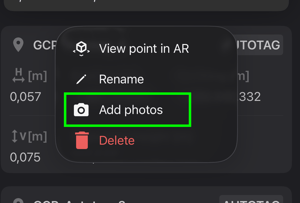
- After measuring the GCP: in the list of saved GCPs, press and hold on the desired point measurement and select Add photos
 from the dropdown menu.
- Before measuring the GCP: from the New Point dialog, tap the Camera icon
- Aim at the point and tap
 to capture a reference photo. Take multiple photos as needed. You can also delete photos by tapping the
  icon.
icon.

- Tap
 to save the photos or tap
  to cancel when finished.
Delete Points
It is possible to delete single points from a point collection or entire point collections.
- Tap and hold the point to be deleted.
- From the menu, Tap Delete
 .
.
- Confirm by tapping Delete

- Abort by tapping Cancel

- Confirm by tapping Delete
Rename Points
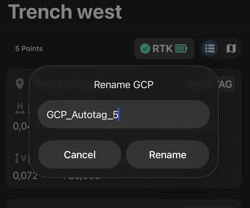
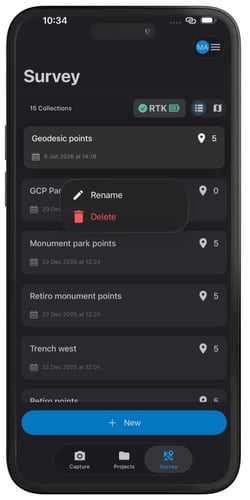
It is possible to rename single points and entire point collections.
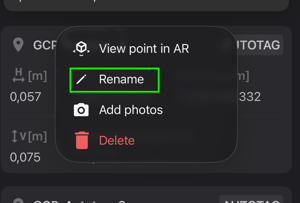
- Tap and hold the point collection or single-point to be renamed.
From the menu, Tap Rename  . Type the new name and select Rename.
View point in AR
It is possible to view the point in Augmented Reality.
Important: It is necessary to be connected to a RTK device to display points in AR.
1. Tap the View point in AR icon 
2. Tap Exit AR to leave the AR mode.![]()


Manage Point Collections
List Point Collections
.png?width=250&height=500&name=Plantilla%20Iphone%20(40).png)
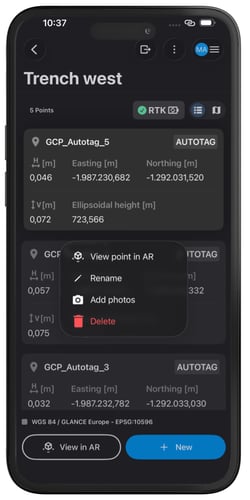
The Point Management window shows the following:
- The number of collections.
 Toggle between list and map views.
- A list with the existing point collections.
 Input coordinate reference system.
 The number of measured points.
- Start a new point collection.
- Map view
 .
.
From the map view is possible to add a new point collection using the new button-1.png?width=89&height=24&name=Button%20(7)-1.png) and also access to a Point Collection when taping its name.
and also access to a Point Collection when taping its name.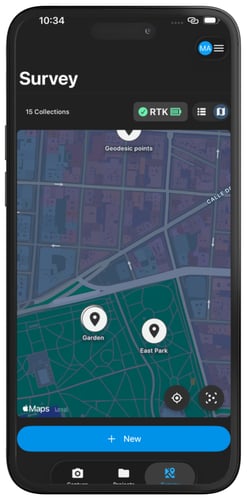
Export Point Collections
Once points have been measured, they can be exported in predefined file formats.
- Select the Point Collection from the Survey tap.
- On the top right corner, tap the icon Export
 .
. - Choose the export method (e.g, email, cloud storage, phone storage)
- A .zip file will be generated containing the Point Collection.
- After the files are exported, they can be copied or shared and used in PIX4Dmatic or other third-party software.
Visualize Point Collections in Augmented Reality (AR)
Point Collections with projected and geographic coordinate reference systems can be visualized in AR. More information can be found in the article AR Points - PIX4Dcatch.
Delete Point Collections
A Point Collection can be deleted from the Point Collection management screen.
- Tap and hold the Point Collection to be deleted.
- From the menu, Tap Delete .
- Confirm by tapping Delete .
- Abort by tapping Cancel
- Confirm by tapping Delete