Licenses: This article is valid for all PIX4Dcloud licenses.
Roles:
- Only Owners and Managers can enable the share link in a dataset in PIX4Dcloud
- If the share link is already enable, then Editors can also access it within the dataset in PIX4Dcloud.
Overview of sharing in PIX4Dcloud
PIX4Dcloud allows project owners to share datasets with collaborators through secure URLs generated directly from the user interface. Shared projects can be visualized and, depending on the permission level, analyzed and edited without requiring collaborators to log in.
Permissions and prerequisites
-
Collaborators do not need a PIX4D account to access shared links.
-
Within Organization Management, only Owners and Managers can enable or disable sharing links.
-
Sharing can be enabled or disabled at any time. Disabling a link immediately revokes access.
Sharing a dataset

To share a dataset:
-
Open the dataset to be shared.
-
Select Share in the top-right corner of the viewer.
-
Choose one of the available tabs:
-
Enable the required link and copy the URL to share it with collaborators.
Link URLs
LINK URLs provide access to interactive 2D and 3D views through a web browser.
Content available through LINK URLs
When a LINK URL is used, collaborators can access:
-
2D and 3D views of the dataset
-
Existing annotations
-
Measurement and analysis tools (depending on permission level)
-
Elevation profile generation
If default 2D or 3D views are defined, they are preserved when opening the dataset through a share link.
PIX4Dcloud Pro behavior
With PIX4Dcloud Pro, sharing a dataset that belongs to a Site grants collaborators access to the entire site. Collaborators can open all datasets within the site and use comparison features, including shared Compare mode views.
LINK permission levels
Two LINK URLs can be generated for each dataset.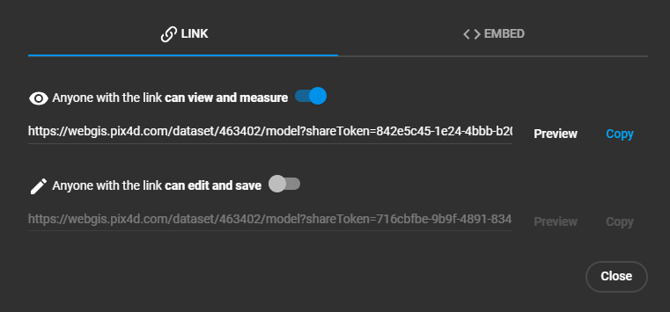
View and measure only
Collaborators with this link can:
-
Open the dataset as anonymous users
-
View 2D and 3D results
-
Create temporary measurements and annotations
-
Modify layer visualization settings (visibility, opacity, background color)
All changes are discarded when the page is refreshed.
Edit and save
Collaborators with this link can:
-
Open the dataset as anonymous users
-
View and analyze data using 2D and 3D tools
-
Create and edit annotations and measurements
-
Modify layer visualization settings
Changes and annotations remain saved after refreshing the page.
LINK URL limitations
The following actions are not supported when accessing a dataset via a LINK URL:
-
Downloading input images or output files
-
Uploading images or files
-
Adding screenshots to PDF reports or attaching images to markers
-
Generating or downloading PDF annotation reports.
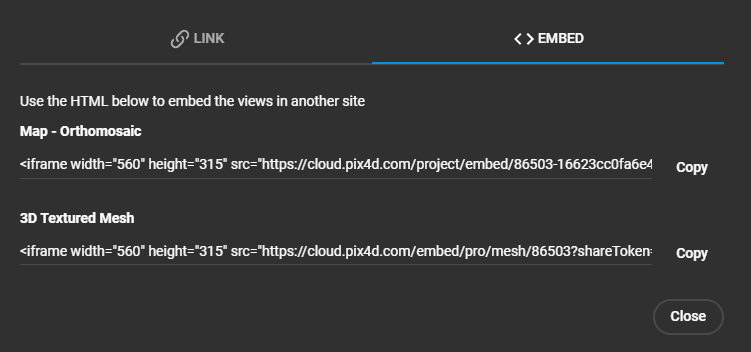
Embed URLs
EMBED URLs allow 2D or 3D results to be embedded into external websites using HTML code copied from the EMBED tab.
Behavior of EMBED URLs
When using an EMBED URL:
-
Only visualization is available
-
Measurements and analysis tools are disabled
-
Annotations are not visible
-
Orthomosaics and 3D models can be viewed interactively
The embedded content is served from a cache with a duration of 24 hours.
Note: PIX4Dcloud Pro enables advanced collaboration workflows at the site level, including dataset comparisons over time.
The final results on the external website are the following.
From top to bottom: Embedded orthomosaic and Embedded 3D view.