IN THIS ARTICLE
General aspects of the dashboard and example datasets
Projects
Resources
Settings menu:
Change units, change the language and basemap
Data storage folder and camera parameters file
Manage account, licenses, log out
Legal and acknowledgment
Organization management
Help and resources:
The actual version of the software
Links to learn more about PIX4Dfields
Organize all projects:
Based on the crop information and project structure
Based on the date, and name
Individual project settings
General aspects of the dashboard
After logging in, the dashboard is the first screen that appears when opening PIX4Dfields, and lists all the projects that have been created.

Example demo datasets are located in these three cards.

Note: These and other examples can also be found in this article: Example use cases - PIX4Dfields.
Projects
This sections lists the projects available on the current device processed with your PIX4D account. Click + New project to create a new project.

Resources
- My first vegetation index map: This article describes the step-by-step process of using drone images to obtain maps.
- Weeds on fallow detection: In this article, we describe how to detect fallow weeds, also known as green-on-brown detection.
- Pasture weeds detection: Follow this article to detect weeds within crop fields efficiently.
- Need help? Ask Pixie: Opens our AI assistant Pixie. You can learn more here: Getting the most out of the Pixie chatbot.
- Community: Opens our Pix4D Community in the PIX4Dfields section.
- Tutorial videos: Opens the PIX4D Agriculture YouTube channel. Other videos can also be accessed from: Video tutorials - PIX4Dfields.
- PIX4Dfields Essentials certification: Direct link to our training page: Benchmark your skills and technical knowledge of drone mapping and photogrammetry in precision agriculture with an industry-recognized certification
Settings menu 
On the dashboard, click the SETTINGS to see the App settings, Data handling, Account, and More options.
App settings

- (optional) The Units of the project can be modified by selecting the Metric or Imperial units.
- (optional) Click on Language to change the language of the application.
Note: For more information: How to set your language.
- (optional) PIX4Dfields defaults to a satellite basemap, however a custom tile service basemap can be added.
Note: For more information: Custom basemaps.
- (optional) Customize PDF report
Note: For more information: Custom basemaps.
Data handling

- Click on the Data storage folder to see where the projects are saved/stored.
- All projects and files generated will be stored in this folder. Several file types will be present
- The default location is typically under C:\Users\Username\Pix4Dfields.
To modify the storage location of your projects, select a different folder in the Data storage folder settings.
- Changing your data storage folder will not move existing projects to the new location. To move projects please read: How to manage projects.
- Click on the Camera parameters file to process cameras that are not in PIX4Dfields database. For more information: Your camera is not supported at this time - PIX4Dfields
- Click Export projects and Import projects to manage projects in batch. For more information: How to manage projects.
Account

- Links to access the Manage licenses page isavailable.
- Click Log out to exit PIX4Dfields.
More
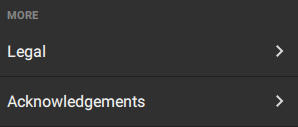
- Click Legal to access the TERMS OF USE and PRIVACY POLICY.
- Click Acknowledgments to check the open-source technologies that PIX4Dfields uses.
Organization management
If the user belongs to more than one organization, the active organization is shown on the Home screen. Click this entry to switch to a different organization.

Help and resources 
What does the help and resources buttons show?
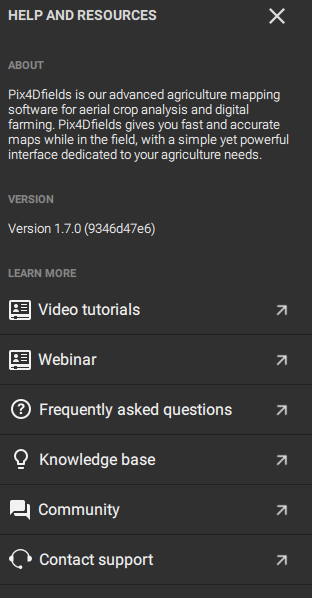
- Click HELP AND RESOURCES at the top right of the window.
- Information about PIX4Dfields appears as well as the used VERSION of the software.
- (optional) On LEARN MORE links to video tutorials, webinars, community, knowledgebase, and contact support are available.
Organize all projects
To organize projects based on crop information or project structure
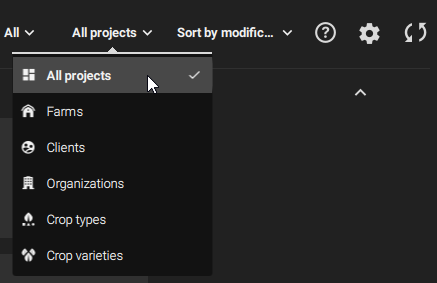
- Select ALL projects at the top right of the window.
- Click Farms, Clients, Organizations, Crop types, or Crop varieties to organize a project.
- The projects will be grouped depending on the category that has been chosen.
To organize projects based on date or name
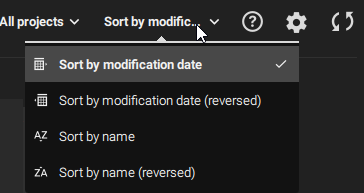
- Click Sort by modification date, Sort by modification date (reversed), Sort by name, or Sort by name (reversed) at the top right of the window.
- The projects will be grouped depending on the category that has been chosen.
Individual project settings
What does the project settings show?
- Click the project menu at the bottom right of the project.
- A sidebar opens, to display information about the project which can be edited to include name, description, crop information, project structure, and data handling.
