Download any of these projects for free* and explore Pix4D’s desktop functionalities with a real dataset.
Using real data demonstrates what Pix4D software can do and will help you understand what’s needed when collecting your own data.
Not sure where to begin? Follow the instructions below each data set to create your first project.
IN THIS ARTICLE
PIX4Dmapper example projects
PIX4Dmatic example projects
PIX4Dfields example projects
PIX4Dreact example projects
Open Photogrammetry Format (OPF) example projects
For more inspiration, check out our Community Hall of Fame.
 PIX4Dmapper example projects
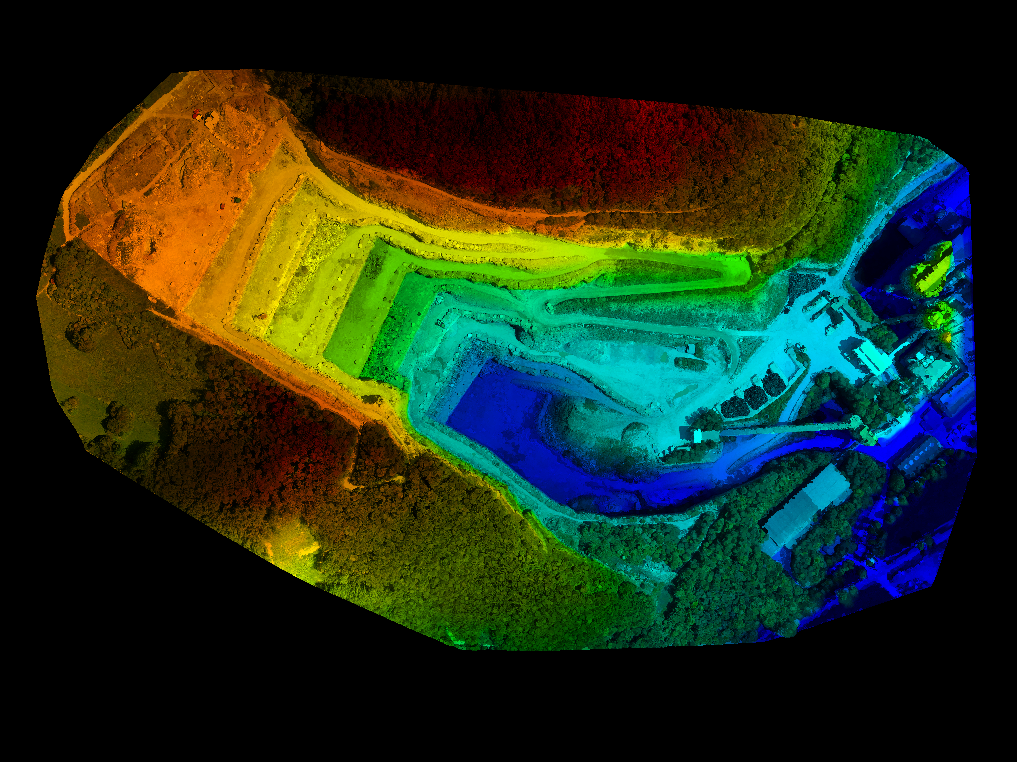
Quarry
Download dataset or view in PIX4Dcloud
| The goal of this project is to generate a DSM and an Orthomosaic of a quarry using an eBee drone with a SenseFly S.O.D.A. |
 |
| General project information | |
|---|---|
| Project | |
| Location | Switzerland |
| Average Ground Sampling Distance (GSD) | 5.40 cm / 2.13 in |
| Area covered | 0.5776 km2 / 57.7565 ha / 0.223 sq. mi. / 142.79 acres |
| Output coordinate system | CH1903 / LV03 Geoid Height Above Bessel 1841. Ellipsoid = 0 meters |
| Image acquisition | |
| UAV | eBee Classic (senseFly) |
| Image acquisition plan | 1 flight, double grid flight plan |
| Camera | senseFly S.O.D.A. |
| Images | |
| Number of images | 347 |
| Image size | 5472x3648 |
| Image geolocation coordinate system | WGS84 |
| GCPs | |
| Number of GCPs | 9 3D GCPs |
| GCPs coordinate system | CH1903 / LV03 |
| Download project files |
|---|
|
The dataset can be downloaded here and can be found processed on PIX4Dcloud here. The downloaded folder contains the following files and folders:
|
| Instructions |
|---|
| Process the dataset using the included .p4d project file |
|
This section describes how to process the dataset in order to generate the DSM and the Orthomosaic of a quarry. 1. Open the project example_quarry_2.p4d. Note: As the goal of this project is to generate the DSM and the Orthomosaic, and as it has been taken using aerial nadir images, the template used for the Processing has been set to 3D Maps. This can be seen in Process > Processing Options....
3. On the Processing bar, click Start to start the processing. |
| Process the dataset creating a new project |
|
This section describes how to create and process a project in order to generate the DSM and the Orthomosaic of a quarry. A) Create a new project: 1. Start PIX4Dmapper. Note: When the project is created, a folder named after the project name typed in the Name field will be created in the selected folder and will store all the results. The .p4d project file will also be stored in this folder.
6. (optional) Select the check box Use As Default Project Location to save all new projects in the selected folder. The New Project wizard displays the Select Images window. 9. Click Add Directories... and select the images folder to add the images to the project. The New Project wizard displays the Image Properties window. The image geolocation is automatically loaded from the image EXIF data and is given in WGS84 (latitude, longitude, altitude) coordinates with vertical coordinate system given by a Geoid Height Above WGS 84 Ellipsoid of 0 meters. The camera model is loaded from the camera model database (S.O.D.A._10.6_5472x3648 (SI002001AA7C00213) (RGB).). 11. Click Next. The New Project wizard displays the Select Output Coordinate System window. By default the last output coordinate system selected in the software is selected. 12. Select Known Coordinate System CH1903 / LV03. The New Project wizard displays the Processing Options Template window. 15. Click 3D Maps to select the template. Note: As the goal of this project is to generate the DSM and the Orthomosaic, and as it has been taken using aerial nadir images, the template to be selected is the 3D Maps.
16. Click Finish to finish the wizard and create the project. The Processing bar opens at the bottom of the main window.
B) Introduce and mark the GCPs: 1. On the Menu bar, click Project > GCP/MTP Manager.... The GCPs and their coordinates are imported and can be visualized in the GCP/MTP Manager window. 11. On the GCP/MTP Manager window click OK. When step 1. Initial Processing is finished the rayCloud opens. 14. Mark the GCPs using the rayCloud following instructions 2. to 11. as described here How to import and mark ground control points (GCPs). The images in the folder inputs/gcp_overview help to identify the GCPs should be marked.
C) Generate the DSM and Orthomosaic When the GCPs are marked and the project is re-optimized. 1. On the Processing bar, deactivate 1. Initial Processing and activate 2. Point Cloud and Mesh and 3. DSM, Orthomosaic and Index. |
Building
Download dataset or view in PIX4Dcloud
| The goal of this project is to generate the 3D model of a building taken by an AscTec Falcon 8 UAV. |
|
|

| General project information | |
|---|---|
| Project | |
| Location | Germany |
| Average Ground Sampling Distance (GSD) | 1.89 cm / 0.7 in |
| Area covered | Undefined |
| Output coordinate system | WGS84 / UTM zone 32N Vertical Coordinate System: MSL egm96 |
| Image acquisition | |
| UAV | AscTec Falcon 8 UAV (Ascending Technologies) |
| Image acquisition plan | 1 flight, circular flight around the building |
| Camera | Sony NEX-5 (RGB) |
| Images | |
| Number of images | 36 |
| Image size | 4592x3056 |
| Image geolocation coordinate system | WGS84 |
| GCPs | |
| Number of GCPs | None |
| GCPs coordinate system | None |
| Download project files |
|---|
|
The dataset can be downloaded here and can be found processed on PIX4Dcloud here. The downloaded folder contains the following files and folders:
|
| Instructions |
|---|
| Process the dataset using the included .p4d project file |
|
To process the dataset in order to generate the 3D model of a building: 1. Open the project example_building.p4d by double clicking it. Note: As the goal of this project is to generate only the 3D model (no DSM and orthomosaic), the template used for the processing has been set to 3D Models. This can be seen in Process > Processing Options... .
3. On the Processing bar, click Start to start the processing. |
| Process the dataset creating a new project |
|
This section describes how to create and process a project in order to generate a 3D model of a building. A) Create a new project: 1. Start PIX4Dmapper. Note: When the project is created, a folder named after the project name typed in the Name field will be created in the selected folder and will store all the results. The .p4d project file will also be stored in this folder.
6. (optional) Select the check box Use As Default Project Location to save all new projects in the selected folder. The New Project wizard displays the Select Images window. 9. Click Add Directories... and select the images folder to add the images to the project. The New Project wizard displays the Image Properties window. The image geolocation is automatically loaded from the image EXIF data and is given in WGS84 (latitude, longitude, altitude) coordinates with vertical coordinate system given by MSL egm96. The camera model is loaded from the camera model database (NEX-5_E16mmF2.8_16.0_4592x3056 (RGB)). 11.Click Next. The New Project wizard displays the Select Output Coordinate System window. By default the last output coordinate system selected in the software is selected. 12. Under Unit, select m. The New Project wizard displays the Processing Options Template window. Note: As the goal of this project is to generate only the 3D model (no DSM and orthomosaic), and as it has been taken using terrestrial images, the template to be select is the 3D Models template.
15. Select the 3D Models template. B) Process the project: 1. On the Processing bar, click Start to start the processing. |
Cadastre
Download dataset or view in PIX4Dcloud
| The goal of this project is to generate the DSM and the Orthomosaic of a village using a Canon IXUS 120IS. |
 |
| General project information | |
|---|---|
| Project | |
| Location | Switzerland |
| Average Ground Sampling Distance (GSD) | 5.1 cm / 2 in |
| Area covered | 0.2128 km2 / 21.2822 ha / 0.0822 sq. mi. / 52.6167 acres |
| Output coordinate system | WGS84 / UTM zone 32N Vertical Coordinate System: Geoid Height Above WGS 84 Ellipsoid = 0 meters |
| Image acquisition | |
| UAV | swinglet CAM (senseFly) |
| Image acquisition plan | 1 flight, grid flight plan |
| Camera | Canon IXUS 120IS (RGB) |
| Images | |
| Number of images | 68 |
| Image size | 4000x3000 |
| Image geolocation coordinate system | WGS84 |
| GCPs | |
| Number of GCPs | None |
| GCPs coordinate system | None |
| Download project files |
|---|
|
The dataset can be downloaded here and can be found processed on PIX4Dcloud here. The downloaded folder contains the following files and folders:
|
| Instructions |
|---|
| Process the dataset using the included .p4d project file |
|
This section describes how to process the dataset in order to generate the DSM and the Orthomosaic of a village. 1. Open the project example_cadastre.p4d. Note: As the goal of this project is to generate the DSM and the Orthomosaic, and as it has been taken using aerial nadir images, the template used for the processing has been set to 3D Maps. This can be seen in Process > Processing Options....
3. On the Processing bar, click Start to start the processing. |
| Process the dataset creating a new project |
|
This section describes how to create and process a project in order to generate the DSM and the Orthomosaic of a village. A) Create a new project: 1. Start PIX4Dmapper. Note: When the project is created, a folder named after the project name typed in the Name field will be created in the selected folder and will store all the results. The .p4d project file will also be stored in this folder.
6. (optional) Select the check box Use As Default Project Location to save all new projects in the selected folder. The New Project wizard displays the Select Images window. 9. Click Add Directories... and select the images folder to add the images to the project. The New Project wizard displays the Image Properties window. The image geolocation is automatically loaded from the image EXIF data. The coordinate system is automatically set to WGS84 with vertical coordinate system given in MSL egm96. As the image geolocation is given in WGS 84 with vertical coordinates system in Geoid Height Above WGS 84 Ellipsoid = 0, the coordinate system has to be changed. 11. On the Image Geolocation > Coodinate System clickEdit.... In the Image Properties window, the camera model is loaded from the camera model database (CanonDIGITALIXUS120IS_5.0_4000x3000 (RGB)). 15. Click Next. The New Project wizard displays the Select Output Coordinate System window. By default the last output coordinate system selected in the software is selected. 16. Select Auto Detected. The New Project wizard displays the Processing Options Template window. 19. Click 3D Maps to select the template. Note: As the goal of this project is to generate the DSM and the Orthomosaic, and as it has been taken using aerial nadir images, the template to be selected is the 3D Maps template.
20. Click Finish to finish the wizard and create the project. The Processing window opens at the bottom of the main window. B) Process the project: 1. On the Processing bar, click Start to start the processing. |
Construction dataset
| The goal of this project is to get an orthomosaic and a 3D point cloud of construction site. |
|
|


| General project information | |
|---|---|
| Project | |
| Location | Switzerland |
| Average Ground Sampling Distance (GSD) | 1.83 cm / 0.72 in |
| Area covered | 0.1326 km2 / 13.2612 ha / 0.0512 sq. mi. / 32.786 acres |
| Output coordinate system | WGS84 / UTM zone 32N Vertical Coordinate System: Geoid Height Above WGS 84 Ellipsoid = 0 meters |
| Image acquisition | |
| UAV | eBee Classic |
| Image acquisition plan | 1 flight, grid flight plan |
| Camera | S.O.D.A 10.2 (RGB) |
| Images | |
| Number of images | 197 |
| Image size | 5472x3648 |
| Image geolocation coordinate system | WGS84 |
| GCPs | |
| Number of GCPs | None |
| GCPs coordinate system | None |
| Download project files |
|---|
|
The dataset can be downloaded here. The downloaded folder contains the following files and folders:
|
| Instructions |
|---|
| Process the dataset using the included .p4d project file |
|
This section describes how to process the dataset in order to generate an orthomosaic. A) Process the project: 1. Open the project bim_dataset.p4d by double clicking on the file. Note: As this project's goal is to generate an orthomosaic for a construction site, the 3D Maps template has been selected.
3. On the Processing window, click Start to start the processing. |
| Process the dataset creating a new project |
|
This section describes how to create and process a project in order to generate an orthomosaic for the whole project. A) Create a new project: 1. Start PIX4Dmapper. Note: When the project is created, a folder with the same name as the project name typed in the Name field will be created in the selected folder and will store all the results. The .p4d project file will also be stored in this folder.
6. (Optional) Activate the check box Use As Default Project Location to save all new projects in the selected folder. The New Project wizard displays the Select Images window. 9. Click Add Directories... and select the images folder to add the images to the project. 10. Click Next. The New Project wizard displays the Image Properties window. The image geolocation it is already set in the Image Properties window under section Image Coordinate System and does not need to be changed. The image geolocation is loaded. The camera model is loaded from the camera model database (S.O.D.A_10.2_5472x3648 (RGB)). 11. Click Next. The New Project wizard displays the Processing Options Template window. 12. On the left of the window, select the 3D Maps template. The New Project wizard displays the Select Output Coordinate System window. By default the last output coordinate system selected in the software is selected. 14. Under Unit, select m. B) Process the project: 1. On the menu bar, click Process > Processing Options... to open the Processing Options window. Once processing is finished, the Orthomosaic can be visualized and modified in the Mosaic Editor. |
Eagle statue – Handheld camera
| The goal of this project is to generate the 3D model of the statue of an eagle by taking images from the ground using a Canon EOS 7D with perspective lens. |
 |
| General project information | |
|---|---|
| Project | |
| Location | Switzerland |
| Average Ground Sampling Distance (GSD) | Undefined |
| Area covered | Undefined |
| Output coordinate system | Arbitrary |
| Image acquisition | |
| UAV | None |
| Image acquisition plan | 2 walks around the statue, each at a different altitude |
| Camera | Canon EOS 7D (RGB) |
| Images | |
| Number of images | 44 |
| Image size | 5184x3456 |
| Image geolocation coordinate system | None |
| GCPs | |
| Number of GCPs | None |
| GCPs coordinate system | None |
| Download project files |
|---|
|
The dataset can be downloaded here. The downloaded folder contains the following files and folders:
|
| Instructions |
|---|
| Process the dataset using the included .p4d project file |
|
This section describes how to process the dataset in order to generate the 3D model of the statue of an eagle. 1. Open the project example_eagle.p4d by double clicking it. Note: As the goal of this project is to generate only the 3D model (no DSM and Orthomosaic), and as it has been taken using terrestrial images, the template used for the Processing has been set to 3D Models. This can be seen in Process > Processing Options...
3. On the Processing bar, click Start to start the processing. |
| Process the dataset creating a new project |
|
This section describes how to create and process a project in order to generate the 3D model of the statue of an eagle. A) Create a new project: 1. Start PIX4Dmapper. Note: When the project is created, a folder named after the project name typed in the Name field will be created in the selected folder and will store all the results. The .p4d project file will also be stored in this folder.
6. (optional) Select the check box Use As Default Project Location to save all new projects in the selected folder. The New Project wizard displays the Select Images window. 9. Click Add Directories... and select the images folder to add the images to the project. The New Project wizard displays the Image Properties window. No image geolocation is detected. The camera model is loaded from the camera model database (CanonEOS7D_EF-S15-85mmf/3.5-5.6ISUSM_15.0_5184x3456 (RGB)). 11. Click Next. The New Project wizard displays the Select Output Coordinate System window. By default the last output coordinate system selected in the software is selected. 12. Select Arbitrary Coordinate System with Unit meters. The New Project wizard displays the Processing Options Template window. Note: As the goal of this project is to generate only the 3D model (no DSM and orthomosaic), and as it has been taken using terrestrial images, the template to be selected is the 3D Models.
14. Select the 3D Models template. B) Process the project: 1. On the Processing bar, select 1. Initial Processing, and deselect 2. Point Cloud and Mesh. Note: The Processing Area used:
4. Edit the Processing Area such that the height adjusts to the height of the statue. For more information about how to edit a Processing Area with the rayCloud: How to edit a processing area in the rayCloud. Note: In the above Processing Area, the Maximum and Minimum Altitude are set to 50.00 [m] and -100.00 [m] respectively.
5. On the Processing bar, deselect 1. Initial Processing, and select 2. Point Cloud and Mesh. |

Forensic
| The goal of this project is to generate the Point Cloud and the 3D Textured Mesh of a forensic scene. |
 |
| General project information | |
|---|---|
| Project | |
| Location | USA |
| Average Ground Sampling Distance (GSD) | 0.24 cm / 0.09 in |
| Output coordinate system | WGS84 / UTM zone 17N |
| Image acquisition | |
| UAV | DJI Phantom 3 Advanced |
| Image acquisition plan | 1 flight, circular flight around the scene |
| Camera | FC300 X (RGB) |
| Images | |
| Number of images | 69 |
| Image size | 4000x3000 |
| Image geolocation coordinate system | WGS84 |
| GCPs | |
| Number of GCPs | None |
| GCPs coordinate system | None |
| Download project files |
|---|
|
The dataset can be downloaded here. The downloaded folder contains the following files and folders:
|
| Instructions |
|---|
| Process the dataset using the included .p4d project file |
|
This section describes how to process the dataset in order to generate the 3D model of a building. 1. Open the project example_forensic.p4d by double clicking it. Note: As the goal of this project is to generate the point cloud and the 3D model (no DSM and orthomosaic) and as it has been taken using oblique images, the template used for the processing has been set to 3D Models. This can be seen in Process > Processing Options... .
3. On the Processing bar, click Start to start the processing. |
| Process the dataset creating a new project |
|
This section describes how to create and process a project in order to generate a 3D model of a building. A) Create a new project: 1. Start PIX4Dmapper. Note: When the project is created, a folder named after the project name typed in the Name field will be created in the selected folder and will store all the results. The .p4d project file will also be stored in this folder.
6. (optional) Select the check box Use As Default Project Location to save all new projects in the selected folder. The New Project wizard displays the Select Images window. 9. Click Add Directories... and select the images folder to add the images to the project. The New Project wizard displays the Image Properties window. The image geolocation is automatically loaded from the image EXIF data and is given in WGS84 (latitude, longitude, altitude) coordinates with vertical coordinate system given at Geoid Above Ellipsoid=0 m. The camera model is loaded from the camera model database (FC300X_3.6_4000x3000 (RGB)). 11.Click Next. The New Project wizard displays the Select Output Coordinate System window. By default the last output coordinate system selected in the software is selected. 12. Under Unit, select m. The New Project wizard displays the Processing Options Template window. Note: As the goal of this project is to generate the point cloud and the 3D model (no DSM and orthomosaic), and as it has been taken using oblique images, the template to be select is the 3D Models template.
15. Select the 3D Models template. B) Process the project: 1. On the Processing bar, click Start to start the processing. |
Indoor mapping – Spherical camera
| The goal of this project is to generate the 3D model of a church taken by an NCTech iSTAR spherical camera. |
 |
| General project information | |
|---|---|
| Project | |
| Location | "The Church of Santiago", located in Betanzos (A Coruña, Spain) |
| Average Ground Sampling Distance (GSD) | Undefined |
| Area covered | Undefined |
| Output coordinate system | Arbitrary Coordinate System |
| Image acquisition | |
| UAV | None |
| Image acquisition plan | 2 walks in the church |
| Camera | NCTech iSTAR |
| Images | |
| Number of images | 8 |
| Image size | 10000x5000 |
| Image geolocation coordinate system | Arbitrary Coordinate System |
| GCPs | |
| Number of GCPs | None |
| GCPs coordinate system | None |
| Download project files |
|---|
|
The dataset can be downloaded here. The downloaded folder contains the following files and folders:
|
| Instructions |
|---|
| Process the dataset using the included .p4d project file |
|
This section describes how to process the dataset in order to generate the 3D model of a building. 1. Open the project example_spherical.p4d by double clicking it. Note: As the goal of this project is to generate only the 3D model (no DSM or Orthomosaic), the template selected for processing is 3D Models. This can be seen in Process > Processing Options... .
3. On the Processing bar, click Start to start the processing. |
| Process the dataset creating a new project |
|
This section describes how to create and process a project in order to generate a 3D model of a building. A) Create a new project: 1. Start PIX4Dmapper. Note: When the project is created, a folder named after the project name typed in the Name field will be created in the selected folder and will store all the results. The .p4d project file will also be stored in this folder.
6. (optional) Select the check box Use As Default Project Location to save all new projects in the selected folder. The New Project wizard displays the Select Images window. 9. Click Add Directories... and select the images folder to add the images to the project. The New Project wizard displays the Image Properties window. No image geolocation is detected. The camera model is loaded from the camera model database (iSTAR_2.7_10000X5000(RGB)). 11.Click Next. The New Project wizard displays the Select Output Coordinate System window. By default the last output coordinate system selected in the software is selected. 12. Select Arbitrary Coordinate System with Unit meters. The New Project wizard displays the Processing Options Template window. Note: As the goal of this project is to generate only a 3D model (no DSM or orthomosaic), the template selected for processing is 3D Models.
14. Select the 3D Models template. B) Process the project: 1. On the Processing bar, click Start to start the processing. C) Improve the project: To improve the results of the Densified Point Cloud and the 3D Textured mesh, the following Processing Options can be selected:
1. On the Menu bar click Process > Processing Options... Note: This selection allows to extract the keypoints using the original image size.
5. In the Processing Options window click 2. Point Cloud and Mesh. Note: The original image size is used to compute additional 3D points. More points are computed especially in areas where features can be easily matched. By selecting High Point Density, a 3D point will be computed for every Image Scale pixel. For more information about the Processing Options: Menu Process > Processing Options... > 2. Point Cloud and Mesh > Point Cloud.
8. Click OK. |
Industrial building – Parrot Bebop 2
Download dataset or view in PIX4Dcloud
| The goal of this project is to get a 3D model of industrial building. Images were acquired with Parrot Bebop 2 using PIX4Dcapture. |
 |
| General project information | |
|---|---|
| Project | |
| Location | Nantes, France |
| Average Ground Sampling Distance (GSD) | 9.25 cm / 3.64 in |
| Area covered | 0.0113 km2 / 1.13 ha / 0.0043 sq. mi. / 2.79 acres |
| Output coordinate system | WGS84 / UTM zone 30N Vertical Coordinate System: MSL egm96 |
| Image acquisition | |
| UAV | Parrot Bebop 2 |
| Image acquisition software | PIX4Dcapture |
| Image acquisition plan | Grid Mission and Circular Mission |
| Camera | Bebop 2 camera |
| Images | |
| Number of images | 138 |
| Image size | 4096x3320 |
| Image geolocation coordinate system | WGS84 |
| Download project files |
|---|
|
The dataset can be downloaded here and can be found processed on PIX4Dcloud here. The downloaded folder contains the following files and folders:
|
| Instructions |
|---|
| Process the dataset using the included .p4d project file |
|
This section describes how to process the dataset in order to generate a 3D textured mesh of the building using Parrot Bebop 2. 1. Open the project example_bebop2_industrial_building.p4d. Note: As the goal of this project is to generate the 3D textured mesh (no DSM and orthomosaic), the template used for the processing has been set to 3D Models. This can be seen in Process > Processing Options...
3. On the Processing bar, click Start to start processing. |
| Process the dataset creating a new project |
|
This section describes how to create and process a project in order to generate a 3D mesh of a house. A) Create a new project: 1. Start PIX4D Desktop. Note: When the project is created, a folder with the same name as the project name typed in the Name field will be created in the selected folder and will store all the results. The .p4d project file will also be stored in this folder.
6. (optional) Select the check box Use As Default Project Location to save all new projects in the selected folder. The New Project wizard displays the Select Images window. 9. Click Add Directories... and select the images folder to add the images to the project. The folder contains the images of the grid mission and circular flight. Click Choose. The New Project wizard displays the Image Properties window. The image geolocation is automatically loaded from the image EXIF data and is given in WGS84 (latitude, longitude, altitude) coordinates with vertical coordinate system given by MSL = egm96. The camera model is loaded from the camera model database (Bebop2_1.8_4096x3320 (RGB)). 11. Click Next. The New Project wizard displays the Select Output Coordinate System window. By default the last output coordinate system selected in the software is selected. 12. Select Known Coordinate System and Advanced Coordinate Options. Click From List... button, select World Geodetic System 1984 datum and WGS 84 / UTM zone 30N coordinate system, click OK. The New Project wizard displays the Processing Options Template window. 15. Click 3D Models to select the template. Click Finish to finish the wizard. The Processing bar opens at the bottom of the main window. B) Process the project: 16. On the Processing bar select 1. Initial Processing and deselect 2. Point Cloud and Mesh. Note: PIX4Dmapper automatically detects the sky in the images of Bebop2 and improves the Densified Point Cloud.
For more information about the Processing Options: Menu Process > Processing Options... > 1. Initial Processing > Calibration.
When Initial Processing finishes, the rayCloud opens. 18. Use the rayCloud to define a Processing Area to remove noisy points from the background and to keep only points of the building. For more information about how to draw a Processing Area with the rayCloud: How to use a processing area in PIX4Dmapper Desktop. Note: The Processing Area used:
19. Edit the Processing Area to focus on the area of interest. For more information about how to edit a Processing Area with the rayCloud: How to edit a processing area in the rayCloud. Note: In the above Processing Area, the Maximum and Minimum Altitude are set to 50.00 [m] and -10.00 [m] respectively.
20. On the Processing bar, deselect 1. Initial Processing, and select 2. Point Cloud and Mesh. |

Office building – DJI
Download dataset or view in PIX4Dcloud
| The goal of this project is to get a 3D model of buildings using a DJI Phantom 4 and acquiring the images with PIX4Dcapture. |
 |
| General project information | |
|---|---|
| Project | |
| Location | Switzerland |
| Average Ground Sampling Distance (GSD) | 1.67 cm / 0.65 in |
| Output coordinate system | WGS84 / UTM zone 32N Vertical Coordinate System: MSL egm96 |
| Image acquisition | |
| UAV | DJI Phantom 4 |
| Image acquisition software | PIX4Dcapture |
| Image acquisition plan | Circular mission, 4° angle between images, 30m above ground. |
| Camera | Phantom Vision FC330 |
| Images | |
| Number of images | 85 |
| Image size | 4000x3000 |
| Image geolocation coordinate system | WGS84 |
| Download project files |
|---|
|
The dataset can be downloaded here and can be found processed on PIX4Dcloud here. The downloaded folder contains the following files and folders:
|
| Instructions |
|---|
|
This section describes how to process the dataset using the included .p4d project file in order to generate a 3D mesh of buildings. 1. Open the project dji_demo.p4d. Note: As the goal of this project is to get a 3D Model, the template used for the processing has been set to 3D Model. This can be seen in Process > Processing Options.... .
|
Thermal
| The goal of this project is to generate a thermal map using a FLIR Zenmuse XT thermal camera. |
 |
| General project information | |
|---|---|
| Project | |
| Location | Switzerland |
| Average Ground Sampling Distance (GSD) | 9.24 cm / 3.64 in |
| Area covered | 0.035 km2 / 3.4685 ha / 0.01 sq. mi. / 8.5753 acres |
| Output coordinate system | WGS84 / UTM zone 32N Vertical Coordinate System: Geoid Height Above WGS 84 Ellipsoid = 0 meters |
| Image acquisition | |
| UAV | DJI Inspire 1 |
| Image acquisition plan | 2 flights, grid flight plan (90%-90% overlap) |
| Camera | FLIR Zenmuse XT (Thermal) |
| Images | |
| Number of images | 152 |
| Image size | 640x512 |
| Image geolocation coordinate system | WGS84 |
| GCPs | |
| Number of GCPs | No GCPs |
| GCPs coordinate system |
| Download project files |
|---|
|
The dataset can be downloaded here. The downloaded folder contains the following files and folders:
Note: Information on how to process thermal images can be found: here
|
| Instructions |
|---|
| Process the dataset using the included .p4d project file |
|
This section describes how to process the dataset in order to generate the thermal map of the area. 1. Open the project thermal.p4d Note: As the goal of this project is to generate the thermal map, the template used for the Processing has been set to Thermal Camera. This can be seen in Process > Processing Options....
Please make sure you also check the thermal_ir index:
 3. On the Processing bar, click Start to start the processing.
|
| Process the dataset creating a new project |
|
This section describes how to create and process a project in order to generate the thermal map. A) Create a new project: 1. Start PIX4Dmapper. Note: When the project is created, a folder named after the project name typed in the Name field will be created in the selected folder and will store all the results. The .p4d project file will also be stored in this folder.
6. (optional) Select the check box Use As Default Project Location to save all new projects in the selected folder. The New Project wizard displays the Select Images window. 9. Click Add Directories... and select the images folder to add the images to the project. As the images are RJPG, the software will automatically convert them to thermal TIFF images and they will be stored in a folder called Converted. Those are the images that the software will use for processing. The New Project wizard displays the Image Properties window. The image geolocation is automatically loaded from the image EXIF data and is given in WGS84 (latitude, longitude, altitude) coordinates with vertical coordinate system given by a Geoid Height Above WGS 84 Ellipsoid of 0 meters. The camera model is loaded from the camera model database (FLIR Zenmuse XT (Thermal)). 11. Click Next. The New Project wizard displays the Select Output Coordinate System window. By default the last output coordinate system selected in the software is selected. 12. Select Auto Detected. The New Project wizard displays the Processing Options Template window. 15. Click Thermal camera to select the template and check the thermal_ir index to be generated.
16. Click Finish to finish the wizard and create the project. The Processing bar opens at the bottom of the main window. 17. Run Step1, Step2 and Step3 18. Check/Visualize the thermal map. We recommend using Equal Spacing and 24 number of classes:
|


 PIX4Dmatic example projects
Industrial zone and agriculture area
|
The goal of this project is to:
|
|
This dataset with 1469 images (senseFly, AeriaX) and 8 GCPs contains an industrial zone, suburban houses, and the surrounding agriculture area. The dense point cloud, images, and GCPs are displayed in the 3D view. |

Information: The example project of 1469 images is a subset of a larger dataset of 10615 images. The image acquisition of the whole dataset was done using 4 eBee X - senseFly drones flying simultaneously. The flight planning software eMotion was used.
To download the whole dataset contact the Pix4D Support team (a valid license of a Pix4D product is required, a trial license is considered valid).
| General project information | |
|---|---|
| Project | |
| Location | Switzerland |
| Average Ground Sampling Distance (GSD) | 2.28 cm / 0.9 in |
| Area covered | 1.154 km2 / 115.4 ha / 0.446 sq. mi. / 285.3 acres |
| Output coordinate system | WGS 84 / UTM zone 32N - EPSG 32632, WGS 84 ellipsoid |
| Image acquisition | |
| UAV | eBee X (senseFly) |
| Image acquisition plan | 4 flights, single grid flight plan |
| Camera | senseFly AeriaX |
| Images | |
| Number of images | 1469 |
| Image size | 6000 x 4000 pixels |
| Image geolocation coordinate system | WGS84 - EPSG 4326, WGS 840 ellipsoid |
| Ground control points (GCPs) | |
| Number of GCPs | 8 |
| GCPs coordinate system | WGS84 - EPSG 4326, WGS 84 ellipsoid |
| Download project files |
|---|
|
The dataset can be downloaded here (14.7 GB). The downloaded compressed .zip file contains the following files and folders:
|
| Instructions |
|---|
| Open the .p4m PIX4Dmatic project file |
|
This section describes how to open the .p4m project.
Once the project is successfully imported, the images and GCPs appear in the 3D view. |
| Download processed results |
|
A zipped folder containing the processed results can be downloaded here (16GB). Trial licenses are prevented from exporting outputs. Download the processed results to import into third-party software. |
Urban area
|
The goal of this project is:
|
|
The dataset with 100 images (senseFly, AeriaX) and 3 GCPs was flown over a town. The dense point cloud, images, and GCPs are displayed in the 3D view. |

Information: The example project of 100 images is a subset of a larger dataset of 10615 images. The image acquisition of the whole dataset was done using 4 eBee X - senseFly drones flying simultaneously. The flight planning software eMotion was used.
To download the whole dataset contact the Pix4D Support team (a valid license of a Pix4D product is required, a trial license is considered valid).
| General project information | |
|---|---|
| Project | |
| Location | Switzerland |
| Average Ground Sampling Distance (GSD) | 2.41 cm / 0.95 in |
| Area covered | 0.0214 km2 / 2.14 ha / 0.008 sq. mi. / 5.3 acres |
| Output coordinate system | WGS 84 / UTM zone 32N - EPSG 32632, WGS 84 ellipsoid |
| Image acquisition | |
| UAV | eBee X (senseFly) |
| Image acquisition plan | 1 flight, single grid flight plan |
| Camera | senseFly AeriaX |
| Images | |
| Number of images | 100 |
| Image size | 6000 x 4000 pixels |
| Image geolocation coordinate system | WGS84 - EPSG 4326, WGS 84 ellipsoid |
| Ground control points (GCPs) | |
| Number of GCPs | 3 |
| GCPs coordinate system | WGS84 - EPSG 4326, WGS 84 ellipsoid |
| Type of GCPs |
|

| Download project files |
|---|
|
The dataset can be downloaded here (0.99 GB). The downloaded compressed .zip file contains the following files and folders:
|
| Instructions |
|---|
| Open the .p4m PIX4Dmatic project file |
|
This section describes how to open the .p4m project.
Once the project is successfully imported, the images and GCPs appear in the 3D view. |
| Download processed results |
|
A zipped folder containing the processed results can be downloaded here (4.6GB). Trial licenses are prevented from exporting outputs. Download the processed results to import into third-party software. |
PIX4Dcatch project
|
The goal of this project is:
|
|
The dataset contains 300 image files, plus LiDAR depth data (Confidence.tiff and DepthMap.tiff files) capturing a rainwater harvesting installation. The Dense/Depth/Depth & dense fusion point clouds and camera positions are displayed in the 3D view. |
| General project information | |
|---|---|
| Project | |
| Location | Switzerland |
| Average Ground Sampling Distance (GSD) | 0.3 cm / 0.13 in |
| Area covered | 175 m2 / 0.0175 ha / 0.043 acres |
| Output coordinate system | WGS 84 / UTM zone 32N - EPSG 32632, WGS 84 ellipsoid |
| Image acquisition | |
| Device | iPad Pro 11" |
| Image acquisition plan | Terrestrial, circular |
| Camera | iPad Pro w/LiDAR |
| Images | |
| Number of images | 300 |
| Image size | 1920 x 1440 pixels |
| Image geolocation coordinate system | WGS84 - EPSG 4326, WGS 84 ellipsoid |
| Download project files |
|---|
|
The dataset can be downloaded here (367 MB). The downloaded compressed .zip file contains the following files and folders:
|
| Instructions |
|---|
| Open the .p4m Pix4Dmatic project file |
|
This section describes how to open the .p4m project. Access: To download PIX4Dmatic click here.
To process the project, it is necessary to Find images... first:
For more information: How to process PIX4Dcatch datasets in PIX4Dmatic. |
| Download processed results |
|
A zipped folder containing the processed results can be downloaded here (902MB). Trial licenses are prevented from exporting outputs. Download the processed results to import into third-party software. |
PIX4Dmatic project with terrestrial laser scans
|
The goal of this project is:
|
 |
| General project information | |
|---|---|
| Project | |
| Location | Switzerland |
| Average Ground Sampling Distance (GSD) | 2.39 cm / 0.94 in |
| Area covered | 0.0441 km2 / 4.41 ha / 0.017 sq. mi. / 10.90 acres |
| Output coordinate system | CH1903+ / LV95 Vertical Coordinate System: Geoid Height Above Bessel 1841 Ellipsoid = 0 meters |
| Image acquisition | |
| UAV | eBee X (senseFly) |
| Image acquisition plan | 2 flight, single grid flight plan |
| Camera | senseFly S.O.D.A. |
| Images | |
| Number of images | 101 |
| Image size | 5472x3648 |
| Image geolocation coordinate system | WGS84 |
| Terrestrial laser scans | |
| Laser scanner | Leica RTC360 3D Laser Scanner |
| Number of scans¹ | 2 |
| Number of points² | 3,549,517 - Bridge 5,327,201 - Village |
| Laser point cloud coordinate system | CH1903+ / LV95, Bessel 1841 Ellipsoid |
¹ In total 12 laser scan stations were used to fully capture 2 scenes and to generate 2 final point clouds.
² The number of points after cleaning the point cloud and reducing the resolution of the point cloud.
| Download project files |
|---|
|
The dataset can be downloaded here (1.6 GB). The downloaded compressed .zip file contains the following files and folders:
|
| Instructions |
|---|
| Open the .p4m PIX4Dmatic project file |
|
This section describes how to open the .p4m project to set it up for vectorization. Access: To download PIX4Dmatic click here.
Once the import is completed both the point clouds and calibrated images will be displayed. You are ready to start vectorizing the project. |
Suburban area
|
The goal of this project is:
|
 |
| General project information | |
|---|---|
| Project | |
| Location | Denver, Colorado, US |
| Average Ground Sampling Distance (GSD) | 1.13 cm / 0.44 in |
| Area covered | 0.041 km2 / 4.1 ha / 0.02 sq. mi. / 10.17 acres |
| Output coordinate system | NAD 1983 StatePlane Colorado Central FIPS 0502 Feet Vertical Coordinate System: EGM 96 |
| Image acquisition | |
| UAV | DJI Phantom 4 Pro |
| Image acquisition plan | 1 flight, double grid flight plan |
| Camera | DJI Phantom 4 Pro |
| Images | |
| Number of images | 188 |
| Image size | 5472x3648 |
| Image geolocation coordinate system | WGS84 |
| Download project files |
|---|
|
The dataset can be downloaded here (1.6 GB) The downloaded compressed .zip file contains the following files and folders:
|
| Instructions |
|---|
| Open the .p4m PIX4Dmatic project file |
|
This section describes how to open the .p4s project to set it up for vectorization. Access: To download PIX4Dmatic click here.
Once the import is completed both the point clouds and calibrated images will be displayed. You are ready to start vectorizing the project. |
| Download processed results |
|
A zipped folder containing the processed results can be downloaded here (472MB). Trial licenses are prevented from exporting outputs. Download the processed results to import into third-party software. |
 PIX4Dfields example projects
Rostock Sequoia multispectral
| The goal of this project is to get an NDVI index map of a field using the Sequoia camera that captures Green, Red, Red edge and NIR wavelengths. |
 |
| General project information | |
|---|---|
| Project | |
| Location | Germany |
| Average Ground Sampling Distance (GSD) | 10.0 cm / 3.94 in |
| Area covered | 0.449 km2 / 44.9 ha / 0.173 sq. mi. / 110.95 acres |
| Output coordinate system | WGS84 / local Transverse Mercator |
| Image acquisition | |
| UAV | eBee (senseFly) |
| Image acquisition plan | 1 flight, grid flight plan, 106 meters flight height |
| Camera | Sequoia (Green, Red, Red edge, NIR) |
| Images | |
| Number of images | 1804 |
| Image size | 1280x960 |
| Image geolocation coordinate system | WGS84 |
| Download project files |
|---|
|
The dataset can be downloaded here. The downloaded folder contains the following files and folders:
|
|
Start a new project in PIX4Dfields |
| To begin processing the dataset, follow the guide My first vegetation index map - PIX4Dfields |
Rostock S.O.D.A. RGB camera
| The goal of this project is to get an VARI index map of a field using the S.O.D.A camera that captures Red, Green, Blue wavelengths. |
 |
| General project information | |
|---|---|
| Project | |
| Location | Germany |
| Average Ground Sampling Distance (GSD) | 2.80 cm / 1.10 in |
| Area covered | 0.483 km2 / 48.3 ha / 0.186 sq. mi. / 119.35 acres |
| Output coordinate system | WGS84 / local Transverse Mercator |
| Image acquisition | |
| UAV | eBee (senseFly) |
| Image acquisition plan | 1 flight, grid flight plan, 119 meters flight height |
| Camera | S.O.D.A. (Red, Green, Blue) |
| Images | |
| Number of images | 374 |
| Image size | 5472x3648 |
| Image geolocation coordinate system | WGS84 |
| Download project files |
|---|
|
The dataset can be downloaded here. The downloaded folder contains the following files and folders:
|
|
Start a new project in PIX4Dfields |
| To begin processing the dataset, follow the guide My first vegetation index map - PIX4Dfields |
 PIX4Dreact example projects
Bahamas hurricane damage
| This project aims to generate a fast mapping after a disaster using PIX4Dreact |
 |
| General project information | |
| Project | |
| Location | Bahamas |
| Average Ground Sampling Distance (GSD) | 2 cm |
| Area covered | 20 ha |
| Image acquisition | |
| Image acquisition plan | Grid flight plan |
| Camera | Zenmuse X5S |
| Images | |
| Dataset size | 1.62 GB |
| Number of images | 181 |
| Image geolocation coordinate system | WGS84 |
| Download the example project |
|
The example project can be downloaded here. After downloading the zip archive, this needs to be unzipped. The folder contains images in JPG format |
Belleview Avenue
| The goal of this project is to generate a map of a residential area using the Parrot Anafi drone. |
 |
| General project information | |
|---|---|
| Project | |
| Location | Colorado (USA) |
| Average Ground Sampling Distance (GSD) | 2.64 cm / 1.04 in |
| Area covered | 0.12 km2 / 11.86 ha / 0.05 sq mi |
| Output coordinate system | WGS84 / Universal Transverse Mercator zone 13N |
| Image acquisition | |
| UAV | Parrot Anafi |
| Image acquisition plan | 1 flight, grid flight plan |
| Camera | Anafi 4K 1.5.6 |
| Images | |
| Dataset size | 208 MB |
| Number of images | 38 |
| Image width | 5344 pixels |
| Image height | 4016 pixels |
| Image geolocation coordinate system | WGS84 |
| Download the example project |
|---|
|
The example project can be downloaded here. After downloading the zip archive, this needs to be unzipped. The folder contains images in JPG format. |
Dominica hurricane damage
| This project aims to generate a fast -mapping after a disaster using Pix4Dreact |
 |
| General project information | |
|---|---|
| Project | |
| Location | Loubiere (Dominica) |
| Average Ground Sampling Distance (GSD) | 13,23 cm / 5,21 in |
| Area covered | 45,22 ha |
| Output coordinate system | WGS84 / Universal Transverse Mercator zone 20N |
| Image acquisition | |
| Image acquisition plan | grid flight plan |
| Camera | Zenmuse X4S |
| Images | |
| Dataset size | 1.2 GB |
| Number of images | 155 |
| Image width | 9234 pixels |
| Image height | 5414 pixels |
| Image geolocation coordinate system | WGS84 |
| Download the example project |
|---|
|
The example project can be downloaded here. After downloading the zip archive, this needs to be unzipped. The folder contains images in JPG format. |
Open Photogrammetry Format (OPF) example projects
Nadir drone project
 |
| General project information | |
|---|---|
| Project | |
| Location | Switzerland |
| Average Ground Sampling Distance (GSD) | 2.39 cm / 0.94 in |
| Area covered | 0.0441 km2 / 4.41 ha / 0.017 sq. mi. / 10.90 acres |
| Output coordinate system | CH1903+ / LV95 Vertical Coordinate System: Geoid Height Above Bessel 1841 Ellipsoid = 0 meters |
| Image acquisition | |
| UAV | eBee X (senseFly) |
| Image acquisition plan | 2 flight, single grid flight plan |
| Camera | senseFly S.O.D.A. |
| Images | |
| Number of images | 101 |
| Image size | 5472x3648 |
| Image geolocation coordinate system | WGS84 |
| Download project files |
|---|
|
The dataset can be downloaded here (1.74 GB). The downloaded compressed .zip file contains the following files and folders:
|
| Instructions |
|---|
| Import the OPF project into PIX4Dmatic |
|
This section describes how to import the OPF project.
|
Tip: You can work with OPF files also in Python, for more details check pyopf package https://github.com/Pix4D/pyopf.
Terrestrial scan with lidar data - PIX4Dcatch
 |
| General project information | |
|---|---|
| Project | |
| Location | Switzerland |
| Average Ground Sampling Distance (GSD) | 0.3 cm / 0.13 in |
| Area covered | 175 m2 / 0.0175 ha / 0.043 acres |
| Output coordinate system | WGS 84 / UTM zone 32N - EPSG 32632, WGS 84 ellipsoid |
| Image acquisition | |
| Device | iPad Pro 11" |
| Image acquisition plan | Terrestrial, circular |
| Camera | iPad Pro w/LiDAR |
| Images | |
| Number of images | 300 |
| Image size | 1920 x 1440 pixels |
| Image geolocation coordinate system | WGS84 - EPSG 4326, WGS 84 ellipsoid |
| Download project files |
|---|
|
The dataset can be downloaded here (689 MB). The downloaded compressed .zip file contains the following files and folders:
|
| Instructions |
|---|
| Import the OPF project into PIX4Dmatic |
|
his section describes how to import the OPF project.
|
Tip: You can work with OPF files also in Python, for more details check pyopf package https://github.com/Pix4D/pyopf.
Terrestrial scan - PIX4Dcatch
 |
| General project information | |
|---|---|
| Project | |
| Location | Switzerland |
| Average Ground Sampling Distance (GSD) | 0.2 cm / 0.08 in |
| Area covered | 82 m2 / 0.0082 ha / 0.020 acres |
| Output coordinate system | ETRS89 / UTM zone 32N - EPSG:25832, Ellipsoidal height over the GRS 1980 ellipsoid |
| Image acquisition | |
| Device | iPhone 13 |
| Image acquisition plan | Terrestrial, circular |
| Camera | iPhone 13 |
| Images | |
| Number of images | 117 |
| Image size | 1440 x 1920 pixels |
| Image geolocation coordinate system | ETRS89 - EPSG:4258, Ellipsoidal height over the GRS 1980 ellipsoid |
| Download project files |
|---|
|
The dataset can be downloaded here (208 MB) The downloaded compressed .zip file contains the following files and folders:
|
| Instructions |
|---|
| Import the OPF project into PIX4Dmatic |
|
his section describes how to import the OPF project. Access: To download PIX4Dmatic click here.
|
Industrial zone and agriculture area - OPF
The goal of this project is to:
|
 |
Information: The example project of 135 images is a subset of a larger dataset of 10615 images. The image acquisition of the whole dataset was done using 4 eBee X - senseFly drones flying simultaneously. The flight planning software eMotion was used.
To download the whole dataset contact the Pix4D Support team (a valid license of a Pix4D product is required, a trial license is considered valid).
| General project information | |
|---|---|
| Project | |
| Location | Switzerland |
| Average Ground Sampling Distance (GSD) | 2.28 cm / 0.9 in |
| Area covered | 0.131 km2 / 13.1 ha / 0.05 sq. mi. / 32.37 acres |
| Output coordinate system | WGS 84 / UTM zone 32N - EPSG 32632, WGS 84 ellipsoid |
| Image acquisition | |
| Device | eBee X (senseFly) |
| Image acquisition plan | 4 flights, single grid flight plan |
| Camera | senseFly AeriaX |
| Images | |
| Number of images | 135 |
| Image size | 6000 x 4000 pixels |
| Image geolocation coordinate system | WGS84 - EPSG 4326, WGS 840 ellipsoid |
| Ground control points (GCPs) | |
| Number of GCPs | 3 |
| GCPs coordinate system | WGS84 - EPSG 4326, WGS 84 ellipsoid |
| Download project files |
|
The dataset can be downloaded here (2.41 GB). The downloaded compressed .zip file contains the following files and folders:
|
| Instructions |
| Open the OPF project file |
|
Access: To download PIX4Dmatic click here.
Once the project is successfully imported, the images and GCPs appear in the 3D view. |
Tip: You can work with OPF files also in Python, for more details check pyopf package https://github.com/Pix4D/pyopf.