This article explains the workflow of the Mosaic Editor in PIX4Dmapper once an orthomosaic is generated: Open the Mosaic Editor → Draw a region → Select a region to edit → Save and Export (optional).
For step-by-step instructions about how to improve the visual aspect of the orthomosaic:
How to improve the Visual Aspect of Buildings in the Orthomosaic with the Mosaic Editor - PIX4Dmapper (for buildings).
How to improve the Visual Aspect of Bridges in the Orthomosaic with the Mosaic Editor - PIX4Dmapper (for bridges).
When opening the Mosaic Editor for the first time:
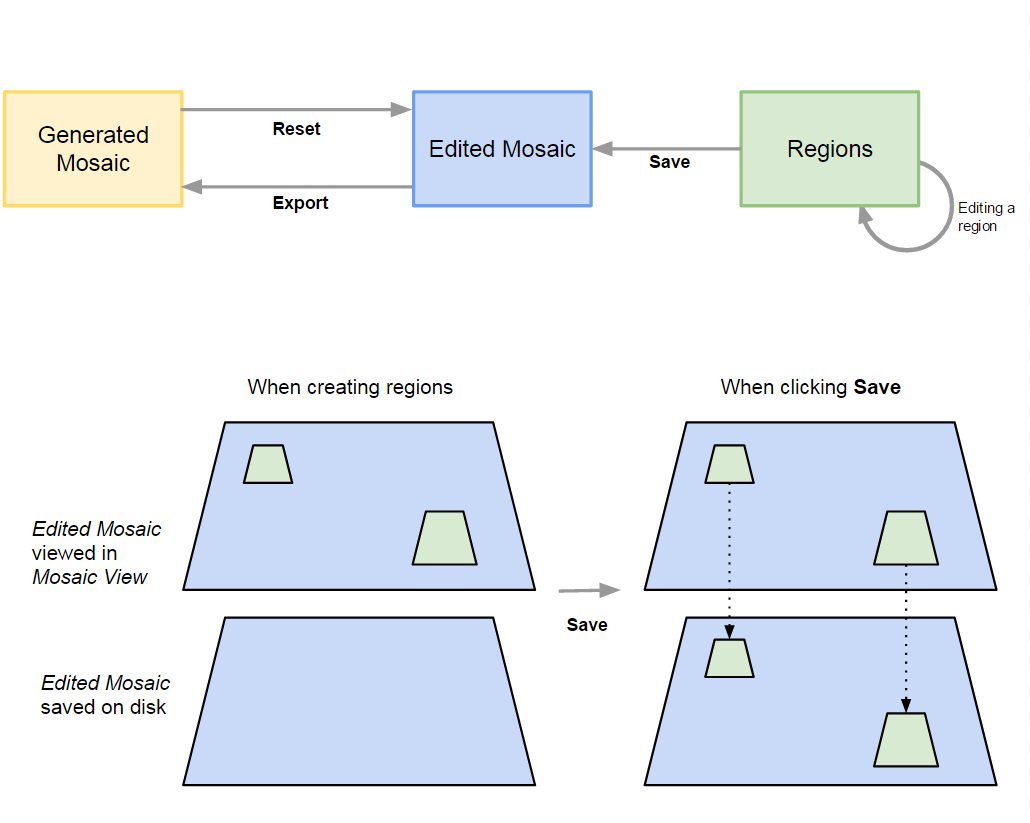
The Orthomosaic that was generated in step 3. DSM, Orthomosaic and Index (Generated Mosaic) is copied in order to be edited (Edited Mosaic).
The DSM that was generated in step 3. DSM, Orthomosaic and Index is loaded and can be visualized.
The DTM that was generated in step 3. DSM, Orthomosaic and Index is loaded and can be visualized.
The Edited Mosaic is loaded in the Mosaic View and can be edited.
When drawing a new Region:
The region is displayed in the Mosaic View and can be edited by using the Mosaic Editing right sidebar.
When selecting a Region:
The Mosaic Editing sidebar allows users to edit the Mosaics for the selected Region.
It is possible to edit the area of the region and the projection used for the region:
- Editing the area: By clicking in the vertices of the region and dragging the mouse to a new position.
- Editing the projection: There are two different ways to edit a region using the Images section of the right sidebar:
1. Select an image in Planar Projection.
2. Select one or multiple images in Ortho Projection. If multiple images are selected, they will be blended together.
When clicking Save:
Saves the changes of the selected Edited Mosaic to a temporary local drive (Overwrites only the areas corresponding to the existing regions using the selected projections).
The saved Edited Mosaic will be used when exporting and when opening the Mosaic Editor again.
When clicking Reset:
Reset the Edited Mosaic with the Generated Mosaic (which is stored in the results folder).
When clicking Export:
The Edited Mosaic overwrites the Generated Mosaic that is stored in the results folder.
- Ensure that all changes to be exported are saved.
- Exporting the edited mosaic will overwrite the mosaic that was generated at step 3. DSM, Orthomosaic and Index.
When opening the Mosaic Editor:
The last saved Edited Mosaic is loaded in the Mosaic View.
If any region was drawn, it is loaded and displayed together with the selected projection in the Mosaic View as Region layer.