IN THIS ARTICLE
Accessing the Annotation Report
Content of the Report
Modififying annotations screenshots
Including inspections in the report
PDF report configuration
PDF report structure
Licenses: This article is only valid for PIX4Dcloud Pro licenses (formerly PIX4Dcloud Advanced).
Roles: Only Owners, Managers, and Editors can generate and access annotation reports in a dataset in PIX4Dcloud.
Video: The following video tutorial explains step-by-step how to generate an Annotation report in PIX4Dcloud Advanced.
Accessing the Annotations Report
-
Click the Annotations Report icon in the project header:
Files & Export > Files & Reports > Results

Content of the Report
PIX4Dcloud Pro generates a PDF report containing:
-
Project details (name, site, creation date).
-
Full catalog of annotations: markers, circles, lines, areas, volumes, and imported annotations.
-
Automatic screenshots: Captured from the 2D/3D viewer as soon as the annotations are drawn, showing the current visualization and framing.
-
Annotation properties alongside screenshots.
Note: Screenshots are generated automatically; if they are not satisfactory, they can be manually modified.
Modifying Annotation Screenshots
-
Select the desired view in the 2D or 3D viewer.
-
Click the camera icon to replace the screenshot:
-
Right panel or hierarchy under the annotation layer.
-
- Confirm the changes.
 |
 |

Including Inspections in the Report
-
Click the Virtual Inspector icon to create an inspection.
-
Save the inspection from the left panel.
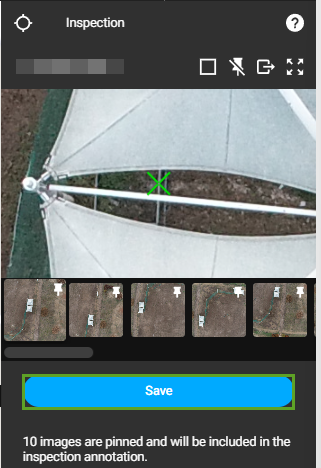
Notes:
- The image shown in the annotations report corresponds to the first image selected by the Virtual Inspector.
- Existing or imported annotations are included in the PDF report but may not have associated screenshots.
PDF report configuration
Before generating the PDF report, users can configure:
-
User email
-
Remarks
-
Inclusion of all annotations or only the visible ones

PDF report structure
The PDF report is structured as follows:
Front Page
-
Site name (if the project belongs to a site)
-
Information about the user generating the report
-
Date and time of report generation
-
Table of contents
Overview Section
-
Project snapshot
-
Output coordinate system
-
Project name
-
Project creation date and time
-
Remarks
Annotations Section
-
Full list of annotations with type, attributes, and links to detailed view
-
Enhanced cut-outs of annotation areas with properties (type, attributes, description)
-
Screenshots of annotations from the 2D/3D viewer
-
Optionally, attached images from PIX4Dcatch below the properties and automatic screenshot.
