Annotations report - PIX4Dcloud Pro
The Annotations Report in PIX4Dcloud Pro allows users to generate a PDF report containing all annotations—both manually created and imported—after a project has been processed. The report provides a comprehensive overview of annotations with screenshots, properties, and inspection details, enabling better project documentation and review.
IN THIS ARTICLE
Accessing the Annotation Report
Content of the Report
Modififying annotations screenshots
Including inspections in the report
PDF report configuration
PDF report structure
Licenses: This article is only valid for PIX4Dcloud Pro licenses (formerly PIX4Dcloud Advanced).
Roles: Only Owners, Managers, and Editors can generate and access annotation reports in a dataset in PIX4Dcloud.
Video: The following video tutorial explains step-by-step how to generate an Annotation report in PIX4Dcloud Advanced.
Accessing the Annotations Report
-
Click the Annotations Report icon in the project header:
Files & Export > Files & Reports > Results

Content of the Report
PIX4Dcloud Pro generates a PDF report containing:
-
Project details (name, site, creation date).
-
Full catalog of annotations: markers, circles, lines, areas, volumes, and imported annotations.
-
Automatic screenshots: Captured from the 2D/3D viewer as soon as the annotations are drawn, showing the current visualization and framing.
-
Annotation properties alongside screenshots.
Note: Screenshots are generated automatically; if they are not satisfactory, they can be manually modified.
Modifying Annotation Screenshots
-
Select the desired view in the 2D or 3D viewer.
-
Click the camera icon to replace the screenshot:
-
Right panel or hierarchy under the annotation layer.
-
- Confirm the changes.
 |
 |

Including Inspections in the Report
-
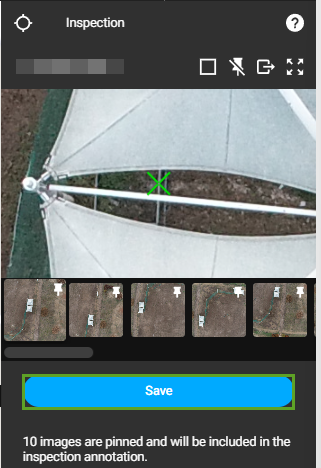
Click the Virtual Inspector icon to create an inspection.
-
Save the inspection from the left panel.

Notes:
- The image shown in the annotations report corresponds to the first image selected by the Virtual Inspector.
- Existing or imported annotations are included in the PDF report but may not have associated screenshots.
PDF report configuration
Before generating the PDF report, users can configure:
-
User email
-
Remarks
-
Inclusion of all annotations or only the visible ones

PDF report structure
The PDF report is structured as follows:
Front Page
-
Site name (if the project belongs to a site)
-
Information about the user generating the report
-
Date and time of report generation
-
Table of contents
Overview Section
-
Project snapshot
-
Output coordinate system
-
Project name
-
Project creation date and time
-
Remarks
Annotations Section
-
Full list of annotations with type, attributes, and links to detailed view
-
Enhanced cut-outs of annotation areas with properties (type, attributes, description)
-
Screenshots of annotations from the 2D/3D viewer
-
Optionally, attached images from PIX4Dcatch below the properties and automatic screenshot.

