
Licenses: This feature is available to all PIX4Dcloud licenses.
Roles:
-
Owners, Managers, and Editors can permanently import/export annotations in a dataset.
-
Readers can temporarily import annotations in a dataset. Once the Reader refreshes or abandons the dataset, the annotations will be deleted.
How to access the Virtual Inspector
Availability Conditions
The Virtual Inspector is available when the following conditions are met:
Dataset requirements
-
The PIX4Dcloud dataset includes the original images.
-
A DSM is available. The DSM is required for the Virtual Inspector to work as expected in the 2D viewer.
-
The images were captured using a perspective lens camera. The Virtual Inspector does not support datasets with images captured using a fisheye lens camera.
Dataset creation methods
The PIX4Dcloud dataset must have been created using one of the following workflows:
-
Images uploaded directly to https://cloud.pix4d.com to generate reconstructions.
-
Images and reconstructions uploaded from PIX4Dmatic to PIX4Dcloud using Share to Cloud.
-
Images uploaded from PIX4Dmapper or PIX4Dmatic to PIX4Dcloud to generate reconstructions.
Processing requirement
Ensure that the processing option Camera Internals and Externals, AAT, BBA is enabled under:
Process > Processing Options… > 1. Initial Processing > Calibration.
Accessing the Virtual Inspector
To open the Virtual Inspector:
- Open a project.
- Select the 3D view.
- On the right side of the view, click
 .
. -
Navigate, zoom, and orient the 3D model to locate an area of interest.
-
Click on a point in the model (displayed as a gray cross) to identify the images that contain this point.
The Virtual Inspector opens in the right-hand panel.
How to use the Virtual Inspector
The Virtual Inspector allows detailed inspection and annotation of a selected project area.
To inspect an area:
-
(Optional) In the right panel, add a Name, Description, and Tags to describe the inspection.
-
Scroll through the list of images containing the selected point. Images are ordered based on distance to the point and image positioning.
-
Click
 to display images in full-screen mode.
-
-
Use the available inspection tools:
-

Draw a rectangular box (annotation) to highlight a specific feature on an image. Once created, the box cannot be moved. -

Pin relevant images to the inspection. Unpinned images are greyed out and become inaccessible after saving. Images containing boxes are pinned automatically.-
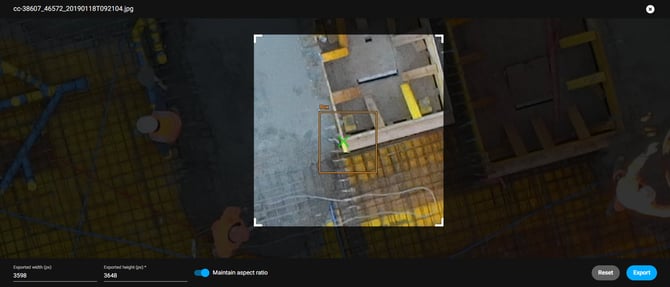
Adjust the crop area by moving corners or repositioning the selection.
-
Unlock the aspect ratio for additional flexibility.
-
If a box annotation exists, the crop area is automatically adjusted to match it.
-
Click Export to save the image section.

-
-
- Click Save inspection as annotation to store the inspection.
- Alternatively, click
 to discard changes and close the Virtual Inspector.
- Alternatively, click
-
If the gray cross or annotation boxes appear too small, lock the aspect ratio and reduce the resolution.
-
Click RESET to revert the crop area to the full image size and resolution.
Saved Inspections
Saved inspections are added automatically to the Annotations layer, where they can be managed, shared, or exported according to the user’s role and license.