PIX4Dsurvey can import external vector files independently by the source, assuming these files are using a compatible file format (Inputs - PIX4Dsurvey). This article provides step-by-step guidance on importing vector files into PIX4Dsurvey, including how to handle coordinate systems.
Tip: It is possible to import existing plans and measurements to combine them with the PIX4Dsurvey project. Imported objects can be used as a starting point for further vectorization.
It is possible to import 2D and 3D vector files that are generated in PIX4Dsurvey or in a third-party software. The supported formats are .dxf, .shp and GeoJSON. To import a vector file. proceed as follows:
- Drag and drop the input file on the screen.
- (Optional) If the coordinate system of the file is unknown or is different from the project's coordinate system:
- Click Import anyway to import the file.
- Click Do not import to cancel the import.
Or
- Click File on the menu bar.
- Click Import...
- Locate and specify the File name of the file.
- Click Open.
- (Optional) If the coordinate system of the file is unknown or is different from the project's coordinate system:
- Click Import anyway to import the file.
- Click Do not import to cancel the import
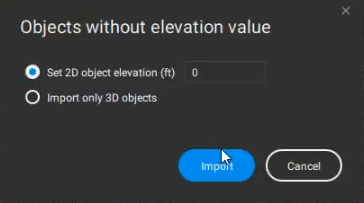
If there are 2D objects in the file:
- Click Set 2D object elevation (unit) and enter the elevation, or
- Click Import only 3D object to discard the 2D objects.
After the vector file is imported, the objects are loaded into the Layers panel and displayed in the 3D view and on images. By default the imported layers are locked and can be unlocked in the Layers panel.