
This article provides step-by-step instructions on how to process using videos in PIX4Dmatic:
Supported video formats
The formats that can be used for videos are the following:
-
MP4. Codec H.264, H.265 (HEVC)
- MOV. Codec H.264, H.265 (HEVC)
How to process a video
1. Import the video and start a project
- Open PIX4Dmatic and drag and drop your video file onto the homepage, or select the file from File > Import > Video
- In the project creation dialog, set the project name and location. The coordinate reference system is set to Arbitrary CRS [m] because the extracted frames are not geolocated
- Enter the name and the path where the project will be located, and click Start.
A video can also be imported into an existing project by selecting File > Import > Video or dragging and dropping the video file into the open project. Both methods open the image extraction dialog directly.
2. Configure image extraction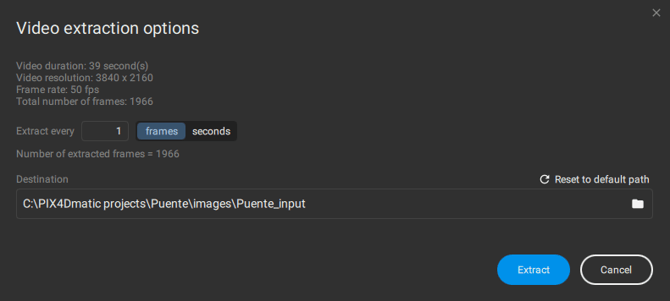
- Choose the rate at which images will be extracted, based on frames or time in seconds. The total number of extracted frames is updated accordingly.
- Destination. The folder where the extracted images are saved. By default, the images are saved in a new subfolder of the project's images folder, named after the video and the extraction frame rate. It is possible to specify the folder where the extracted images will be saved. If the default folder is changed, the
 Reset to default path option appears in the menu to recover the default path where the images will be located.
If a folder outside the project directory is selected, the extracted images remain in the selected folder when the project is deleted. - Click Import to start the extraction. The dialog closes and the progress is shown in the status center, where the import can also be canceled.
Note: Video frames can be combined with other data sources, including drone imagery and PIX4Dcatch data.
- Enable Calibration
- Select the appropriate processing template for your dataset. As the extracted images don't contain any information related to geolocation and orientation, select the No GPS template for calibration.
- Click Start
Once calibration is complete, review the results to determine whether manual tie points (MTPs) or ground control points (GCPs) are needed to improve calibration. If the results are satisfactory, processing can continue to generate the remaining outputs, such as the dense point cloud, digital surface model (DSM), and orthomosaic.