IN THIS ARTICLE
Outputs and formats that can be transferred
Connect to ArcGIS Online from PIX4Dcloud
Transfer outputs from a dataset to ArcGIS Online
Disconnect from ArcGIS Online
Transfer file size limitations
Licenses: This article is only valid for PIX4Dcloud Pro licenses (formerly PIX4Dcloud Advanced).
Roles: Only Owners, Managers, and Editors can transfer outputs from a dataset in PIX4Dcloud.
Warning: Esri credentials are required to transfer files. Free public ArcGIS Online accounts are not supported. Only paid ArcGIS Online or ArcGIS Enterprise accounts are compatible.
Outputs and formats that can be transferred
-
Outputs
-
Orthomosaic:
.tiff -
DSM:
.tiff -
Point cloud:
.slpk -
3D mesh:
.slpk
Reports
-
Quality report:
.pdf
-
Connect to ArcGIS from PIX4Dcloud
To connect PIX4Dcloud to ArcGIS Online:
-
Log in with PIX4D credentials at cloud.pix4d.com.
-
In PIX4Dcloud Drive, click the user icon in the top-right corner.
-
Click Integrations.
-
Under 3rd party integrations > Esri integration, click Connect.
-
On the Esri login page, enter the ArcGIS credentials and sign in.
-
After successful authentication, the Integrations page confirms the connection to ArcGIS.
-
Return to PIX4Dcloud Drive, click the user icon, and verify that the account is connected.

Information: Once established, the ArcGIS connection remains valid for 14 days from the last transfer action. After this inactivity period, the connection must be re-established.
Transfer outputs from a dataset to ArcGIS Online
To transfer outputs to ArcGIS Online:
-
Open the desired dataset in PIX4Dcloud.
-
On the top bar, click Transfer.
-
In the Export dialog, select the outputs to transfer to ArcGIS Online.
The number of selected files is displayed. -
Click # Transfers, where the number corresponds to the selected outputs.
-
Select the destination folder in ArcGIS.
-
Click Send to start the transfer.


The transfer duration depends on the number and size of the selected files.
Information: In the case of a 3D mesh, it is possible to export the .slpk file georeferenced in the Web Mercator coordinate system (WKID: 3857). This file is compatible with the default ArcGIS Online Scene coordinate system.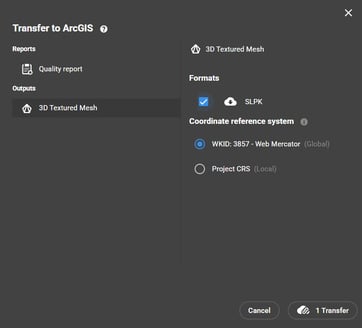
Note: If both ArcGIS and Trimble integrations are connected, outputs from the same dataset can be transferred to either platform. Use the Transfer switcher to select the destination platform.
Disconnect from ArcGIS Online
To disconnect the ArcGIS Online integration:
-
Log in at cloud.pix4d.com.
-
In PIX4Dcloud Drive, click the user icon.
-
Click Integrations.
-
Select Disconnect under the Esri integration.
Transfer file size limitations
Transfers exceeding the following limits may not be supported:
-
Point cloud (
.slpk): 4 GB -
DSM (
.tiff): 1.7 GB -
Orthomosaic (
.tiff): 4.7 GB