IN THIS ARTICLE
Description
How to create a new volume
How to compute
Cut/ fill visualization
How to export
Volumes in Custom report
Description
PIX4Dmatic provides a powerful volume calculation feature, enabling quick and accurate measurement of stockpile volumes, excavation sites, and other 3D objects directly from the project data. This streamlined process enhances applications in industries like construction, mining, and agriculture.
How to create a new volume
To create a new volume:
- On the tools bar, select the Volume measurement tool by clicking
 or using the keyboard shortcut V.
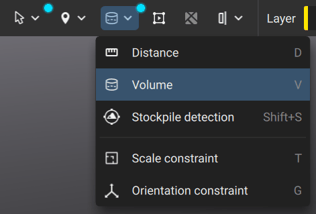
- To draw a volume, left-click on points in the 3D view. Right-click or press enter to complete the volume base polygon.
- (Optional) To accurately mark the vertices, select the volume using the simple selection tool
 . The position of each vertex can be corrected in the 3D view or on the images.
 - (Optional) To assign a common elevation to the vertices of the volume base surface, first select the volume using the simple selection tool . Then, in the Properties panel
 , click align vertices
  to choose how to align the vertices.
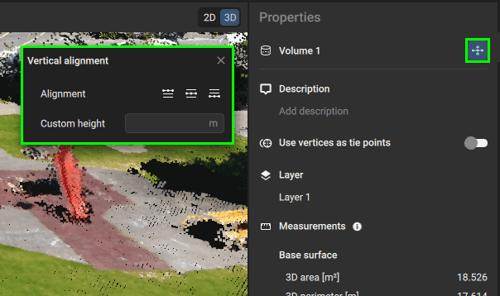
Tip: Aligning the vertices to the lowest base elevation simplifies the volume measurement for stockpiles leaning on walls or in a bay.
- In the toolbar, open the Settings tab and select the configuration for volume computation.
To import a base surface as LandXML
- Navigate to the File > Import > Volume base surface...
- Or drag and drop the file into the project
Note: Importing LandXML has been removed in PIX4Dmatic 2.4.0 and later.
After drawing or importing the volume surface, details about the volume measurement are displayed in the Properties panel ![]() . More specifically:
. More specifically:
| Property | Description |
| Name | Name of the Volume that can be edited |
| Description | (Optional) A short description textbox to describe a specific volume |
| Use vertices as tie points | When this option is enabled, all vertices for this specific volume will be used as Vertex tie points and will be added to the Tie points table of the project (Available from the 1.69.0 version or newer) |
| Settings |
Settings selected to compute the volume |
| Layer | The layer this volume belongs to |
|
Imported volume (only in LandXML surfaces) |
Read-only (Removed from version 2.4.0) |
|
Measurements (Before Compute) |
Basic measurements of this volume include:
|
|
Volume |
|
How to compute
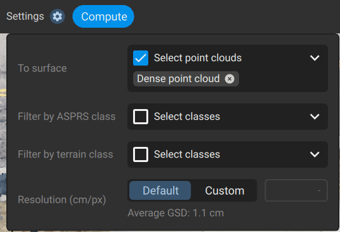
Once the volume is drawn, the computation is the next step. Before clicking on Compute, it is necessary to configure how the volume should be calculated.

- To surface. Volume will be computed from the volume geometry to the selected point cloud.
- Filter by ASPRS class. It is possible to filter the point cloud by one or more selected ASPRS classes for the volume computation.
- Filter by terrain class. It is possible to filter the point cloud by terrain class for the volume computation (Only available for PIX4Dmatic Analyst and PIX4Dmatic Pro licenses).
- Resolution:
- Default. Average GSD
- Custom. Since imported point clouds do not have original camera metadata, a 'Synthetic GSD' is calculated. This is based on the Point Cloud Scale, which is the average distance between neighboring points. To ensure the highest level of detail is preserved without creating artificial gaps, the system uses the average point spacing from the most dense point cloud as the project's base resolution.
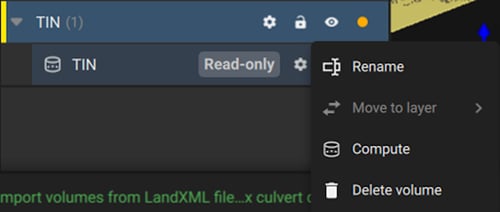
To compute each volume separately, there are two options:
| Option A | Option B | Option C |
|
|
|
To compute all volumes together, there are three options:
| Option A | Option B | Option C |
|
|
|
After completing the volume measurements, the cut/fill volumes and errors are displayed.
|
|
|


More specifically:
- Cut volume [units3]: Volume above the volume base. The volume is measured between the volume base and the surface.
- Fill volume [units3]: Volume below the volume base. The volume is measured between the volume base and the surface.
- Net volume [units3]: The absolute difference between Cut and Fill volume (Cut - Fill volume)
- Total volume [units3]: The total volume (Cut + Fill volume).

The volume must be recomputed to account for changes made to the volume polygon in the volume measurement.
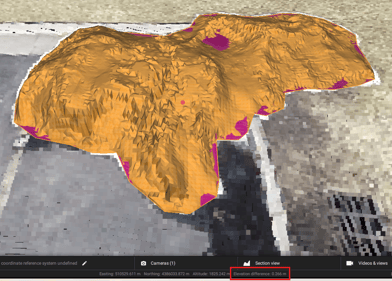
Note: Once the volume is computed, the elevation difference between the base surface and the point cloud is shown in the status bar by hovering over a volume in the 3D viewer
Cut and fill colorization
Once the volume is computed, the cut and fill values will be represented in the surface with two different colors:
- Cut (red). The area highlighted in red represents the volume below the surface used as the volume base
- Fill (blue). The area highlighted in blue represents the volume below the surface used as the volume base
The visualization can be changed in Settings > Volume and select between two different modes:
- Binary. Solid red and blue colors indicate where the cut and fill result in the surface.
- Gradient: Indicate the distance between the reference surface and the point cloud using a gradient of color where the gradient between red and white indicates the cut volume, and the gradient between white and blue indicates the fill volume.
|
Binary
|
Gradient
|


Export
The Volumes created within a PIX4Dmatic can be exported from the Layer export window

To export the Volumes:
- Select the Volume geometry type in the Geometry section
- Select the Layers that contain the desired volumes to be exported in the Layers section
- Select the desired file format from the drop-down list. The available formats are:
- DXF
- DXF (For Autodesk)
- ZIP SHP
- SHP
- GeoJSON
- CSV
- LandXML
- (Optional) Select Export vertices as markers
- Select the desired Destination to save the exported file
- Click Export
Important: The exported volume files will only contain the base polygon outline or surface, and not the computation results.
Volumes in Custom Report
The calculated volumes can be added to the Custom report in PIX4Dmatic. To include the volumes in the Custom report:
- Access the Custom Report window
- Enable the Overview plan and select the Layers that include volumes
- Enable the Inventory and select the Layers that include volumes
- Select the desired destination path for the export of the Custom Report
- Click Export
An example Custom report that includes volumes looks like this:
