IN THIS ARTICLE
How to access the Magic tool
[1] Layer selection
[2] Grid creation
[3] Describe selection
[4] Labeling
[5] Cleanup
[6] Convert
How to utilize the outputs from the Magic Tool?
Troubleshooting
How to access the Magic Tool
Access the tool by clicking the ![]() Magic icon next to the
Magic icon next to the ![]() Index icon.
Index icon.

[1] Layer selection
The Magic tool can't be used without a Boundary, make sure to create a Boundary otherwise Continue button will be greyed out.
- Hide or show annotations that may help when using this tool.
- Select the Source layer where Magic Tool will run on top.
- Select a Boundary of the area from the Source layer where the Magic Tool will work.
- Select Obstacles if needed. These zones will be discarded by the Magic Tool.

[2] Grid creation
A grid needs to be created for classification purposes when using the Magic Tool. The definition of the grid is based on the following aspects:
- Cell size: Select a cell size that roughly represents the structures that need to be detected on the map. When planning a herbicide spot-spraying mission, the cell size could match the implement section or working width.
The minimum allowed cell size is 32 times the ground sampling distance (GSD); for example, with an orthomosaic resolution of 1 cm/pixel, the smallest cell size available is 32 cm. - Rotation: The rotation slider allows you to adjust the grid’s orientation. For optimal results, align the grid with the direction of the crop rows or the primary driving path.
- Horizontal offset: The grid can be shifted horizontally if needed. The mouse wheel can be used to fine-tune each value in smaller steps.
- Vertical offset: The grid can be shifted vertically if needed. The mouse wheel can be used to fine-tune each value in smaller steps.
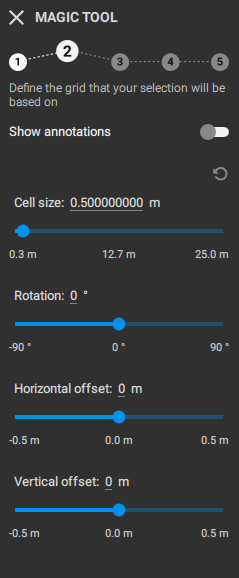
Once finished with setting the appropriate values for the grid generation, click Start Magic. It usually takes just a few seconds while the AI learns about the structure of the data.
[3] Opcional: Describe selection
- Describe what is intended to be selected *e.g., "thistles in sugarcane", "stones", etc.
This can help to improve the performance of the tool.
- Click Start magic.
[4] Labeling
In this step, Wanted and Not wanted cells are labeled in order for the AI to start working.
- At least three Wanted cells need to be marked.
- After selecting the Wanted cells, continue with marking the Not wanted cells, as this is a necessary step. They can be selected via the sidebar or by holding the Shift key to invert the mode temporarily.
- With three labels for each type of cell (Wanted, Not wanted) the Magic Tool will start tracking down similar areas on the whole field instantly.
- More labels can be introduced to train the Magic Tool further and improve its detection performance.
- If, by mistake, a cell is marked/selected, clicking on it again will delete/de-select it.
- Once finished with this step, continue with the Cleanup step.

To unmark/delete a cell, click again on it, and it will be deselected.
[5] Cleanup
Corrections to the results are made during the Cleanup step:
- Select from the Brush section to Add or Delete cells from the selection and adjust the brush size.
- Hold Crtl key, click and drag the cursor to paint multiple cells in a row.
- Hold Shift to invert the mode.
- The Buffer function allows to add or subtract from the selection systematically.
- There is also the option to click on the revert button, on the top-right side of the menu, to return to the initial selection.

[6] Output settings
The detections can be converted to:
- Area annotation: The detections will be saved as area annotations. This is useful when detecting weed nests, crop damage, measuring areas, etc.
- Operation: The detections will be used to create a Targeted Operation, which will fast-track the process of creating a prescription map.
- Boundary: The detections will be saved as a boundary. This is useful when trying to mark the field boundary by using the Magic tool.
- Obstacle: The detections will be saved as obstacles. This is useful when using the Magic Tool to detect trees that should be avoided in the mission, for example.
- It is recommended that one subpolygon per grid cell be toggled off. Cells will be merged, resulting in simpler geometry.
- Give a descriptive Operation layer name.
- Toggle on Learn based on my data to give the Magic Tool the option to learn from your data. This data will be anonymized training data for more magic in the future!
- Click Convert.

How to utilize the outputs from the Magic Tool?
Magic tool outputs can be exported from the Export menu.
When doing spot spraying or variable-rate applications, it is recommended to create a Targeted Operation directly in Step 6, selecting Operation.
Once Magic Tool outputs have been used in Targeted Operations, the files are ready for use in tractors, ground sprayers, spraying drones, and other equipment.
Example use cases:
- Pasture weeds detection (Green on Green)
- Sorghum in peanuts (Green on Green)

- Rice Infested with Sedges (Cyperaceae family

Troubleshooting
- R0017: Can't create grid.
- Ensure there are no spaces in the user’s name. For example, change “User 1” to “User1”.
- R00018: The annotations have an invalid format. This error could be caused by special characters in the user's name (accent mark, middle dash)