Important: PIX4Dcatch offers site localization only for Android devices. iOS devices do not support Site Localization.
PIX4Dcatch's Site localization function enables working in a local coordinate system and transforming points between the local and global coordinate reference systems. Existing points can be imported, and new points measured on-site. Points can be acquired using PIX4Dcatch with the PIX4D-supported RTK device or from any third-party device.
IN THIS ARTICLE
Create a New Point Collection
Add Local Points
Import Local Points
Define Local Points
Add Global Points
Measure Global Points
Import Global Points
Link Points
Compute Site Localization
Residuals
Computed Site Localization Options and Outputs
Export WKT File
Edit Site Localization
Export Localized File
See Results
Process Site Localized Projects
Upload and Process Localized Project to PIX4Dcloud Starter / PIX4Dcloud Pro
Process Locally with PIX4Dmatic Standard / PIXDmatic Pro
Create a New Point Collection
- From the main screen, tap the New Point collection button
 to open the Point management dialog.
 - Tap the
 button to create a new Point Collection where the points will be stored.

- Tap Site Localization.
- Enter a name for the Point Collection and tap Create.
A new point collection has now been created and is ready for points.
Site localization utilizes two coordinate reference systems (CRS): global and local. The global CRS is a geographic reference defined by known parameters, where measurements are always in degrees, as it can only use a geographic CRS. The local CRS is a user-defined custom system with arbitrary origin, orientation, and scale, using units such as meters, feet, or US survey feet.
The global CRS will be defined when importing or measuring points. For this step, the coordinate reference system will be Undefined.
Add Local Points
With a new Point Collection, begin by adding points. Local points should be added first, then the points are measured and linked globally. New local points can be imported or added manually. Global points can be measured with a PIX4D-supported RTK device when the linked point collection is defined to the local points. Once a point has been measured, the coordinate reference system for the point collection will be defined.

Local points can be imported from a .csv file or entered manually to define a Local point.
Import Local Points
- 6 Columns: Point Label, Easting, Northing, Height, Horz accuracy, Vert accuracy
- 4 Columns: Point Label, Easting, Northing, Height
- Tap the
 button.

- Select the Arbitrary CRS tab.
- Select the Unit of measurement.
- Meters (m)
- US feet (USft)
- International feet (ft)

- Select Axes Orientation.
Select the axes orientation for the imported points. Select the orientation that describes the file structure. i.e., in which columns are the Easting coordinates and the Northing coordinates.
Tip: European countries usually use Easting and Northing coordinates, while North America uses Northing and Easting.
- Select Import.
The imported points will be listed in the Point collection.

Each newly imported local point contains the following:
- Point label name.
- Imported and Local tags.
- Horizontal and Vertical accuracy(when included in the file).
- Coordinates with the unit of measurement.
- Import date.
- Linked icon - this icon is greyed out when there are no global points in the collection.
- Measure icon - Measure the point with the PIX4D-supported RTK device.
With local points imported, global points can now be added.
Define Local Points
Without a .csv with local coordinates, it is possible to manually enter known local coordinates to add a local point in the Point Collection.
- From the Point Collection, tap the
 button.

- Select the Local Position tab.
- Enter:
- Local Point Name(optional).
- Easting, Northing, and Height(ellipsoidal) coordinates.
- Horizontal and Vertical Accuracy(optional).
- Tap Save Local Coordinates.

- Select Unit of Measurement. (This selection is available for the first point entered and defines the unit of measurement for the following points entered in the collection.)
- The local position is successfully entered.
With local points added to the Point Collection, Global points can now be added and linked.
Add Global Points
With local points in the Point Collection, it is possible to measure a global point using a PIX4D-supported RTK device or import a .csv file to link a local point to a global reference. A transformation can be computed between your local and global points using at least 3 known points in both coordinate systems. It is advisable to measure more points with adequate distribution and spacing whenever possible.
The collection's global coordinate reference system will be defined by the first imported or measured global point. All subsequent measurements will have to be made with this reference.
Measure Global Points
- From the Point Collection, choose a local point to measure globally and tap the Measure icon
 .
.

- The Global Position tab(default) should be selected.

- Enter:
- Global Point Name(optional).
- Antenna Height / Altitude Correction(optional): Input value when measuring without the laser.
- Reference Photos(optional).
- Description(optional).
- Measurement Duration. >30 seconds is recommended
- Tap Measure.

Once measured, the point will be linked with a global and local reference. With at least three linked points, a computation can be run. It is recommended to use more than three linked points to have the ability to remove any linked points with residuals outside the desired accuracy.
With three or more linked points, it is possible to compute the site localization.
Import Global Points
It is possible to import global points the same way as importing local points.
- 6 Columns: Point Label, Easting, Northing, Height, Horz accuracy, Vert accuracy
- 4 Columns: Point Label, Easting, Northing, Height
From the Point Collection:
- Select the dropdown menu
 and tap the Import file icon
 .
.

- Select the .csv file containing the global points.

- Select the Known CRS tab.
- Specify the coordinate reference system for the imported points.
- Select Axes Orientation.
Select the axes orientation for the imported points. Select the orientation that describes the file structure. i.e., in which columns are the Easting coordinates and the Northing coordinates?
- Press Import.
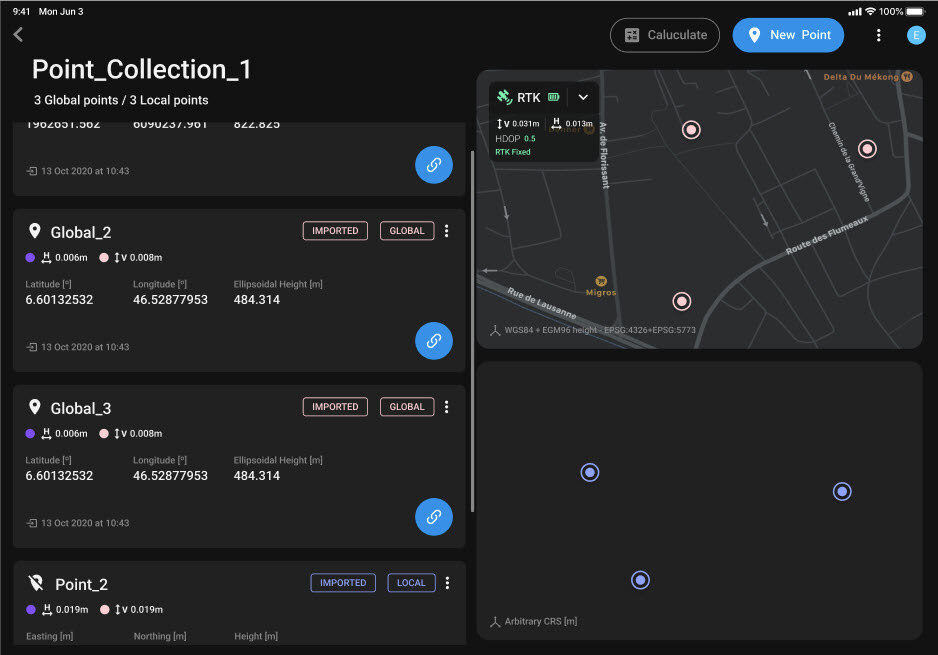
The global points will be saved in the point collection with their respective tags and displayed on the map. When global and local points are included in the site localization point collection, two maps are displayed. The top map shows the global points, while the bottom map shows the local points. Clicking on any point to get the label name. With global and local points, they can now be linked to compute the site localization.
Link Points
With local and global points in the point collection, they are ready to be linked. Once more than three points have been linked, the transformation between the global and local coordinate systems can be computed. It is recommended to use more than three linked points to have the ability to remove any linked points with residuals outside the desired accuracy.
- Choose a point in the collection with a global and local reference and tap the link
 button.
- If a global point is selected, the list of local points will be displayed. Select the correct local point to link it with the global point.
- If a local point is selected, the list of global points will be displayed. Select the correct global point to link it with the local point.
Once a point is linked, the linked points will turn green in the map view. The link button will be replaced with the unlink
 button.
 - Link a minimum of 3 points. An alert will appear, allowing for immediate calculation. It can be canceled to allow more points to be linked.

Compute Site Localization
With three or more linked points, it is possible to calculate the transformation. It is recommended to link more than three points if there are any outliers. Once the additional points have been linked, compute the transformation and check the resulting residuals and RMS computed for the points.

 Tap the Calculate button.
For more information on creating a site localization file: Site localization calculator.
Residuals
For each point, the residuals in East, North, and Height are displayed. The residuals are computed from the reference local coordinates of the points and the transformed coordinates according to the transformation from global to local coordinates.

To remove an outlier:
 Tap the toggle button to remove any points considered outliers.
 Tap Recalculate after all outliers have been toggled off.
- Select confirm.
Edit the tolerance settings:
It is possible to customize the tolerances for the residuals.
 Tap the settings button.
- Enter the desired tolerance settings. (The default value will be displayed in the collection's unit of measurement)

- Enter the Point Outliers value.
- Enter the RMS Error value.
- Tap Done.
For more information on how the RMS error is calculated: How are tie point errors defined - RMS.
Computed Site Localization Options and Outputs
With a calculated site localization, several options are available.
Export WKT File
Tap  to export and save the site localization WKT file for processing the localized project locally.
Tap the drop-down menu![]() at the upper right corner of the screen for more options.
at the upper right corner of the screen for more options.

 Edit Site Localization
It is possible to edit the collection after calculating. With this action, the previous transformation definition will be erased. The collection will revert to its previous state before computation. Additional points can be measured, imported, linked, and unlinked as before.
 Export Localized File
Export the zip file containing the global and local points on two separate .csv files, along with the transformation file with the .wkt extension.
 See Results
A summary of the results obtained for the site localization:
- The RMS Error.
- The Residuals per points and axes.
For more information on how the RMS error is calculated: How are tie point errors defined - RMS.
Process a Site-Localized Project
With a calculated site localization point collection, it is possible to process a project with it. Projects can be uploaded and processed in PIX4Dcloud / PIX4Dcloud Advanced or exported and processed in PIX4Dmatic.
Upload and Process Localized Projects to PIX4Dcloud Starter / PIX4Dcloud Pro.
With a calculated site localization collection on PIX4Dcatch, it can be selected for processing when uploading to PIX4Dcloud Starter / PIX4Dcloud Pro.

To assign a site localization point collection to a project when uploading to PIX4Dcloud Starter / PIX4Dcloud Pro:
 Tap the Site Localization arrow
 .
.- Select the appropriate site localization point collection.

- Tap Upload.
For more information: How to visualize a site localization project on PIX4Dcloud.
Process Locally with PIX4Dmatic Standard / PIX4Dmatic Pro
With an exported project and a point_collection_name.wkt file, a site-localized project is ready to be imported and processed in PIX4Dmatic.
- Export the project from the mobile device. This export will contain the image files. (plus DepthMap.tiff and Confidence.tiff files from LiDAR-capable Apple devices)
- Tap the dropdown menu.
- Tap Export all data.
- Export and save.
For more information: How to export PIX4Dcatch projects (iOS/Android).
- Tap the dropdown menu.
- Tap to export and save the point_collection_name.wkt file.

- Open PIX4Dmatic.
- Create a new project and import image files/folders.

- Import the WKT file.

- Tap the
 in the
  Tie points tab.
 - Select Import CRS file .
- Select the site-localized point_collection_name.wkt file for import.
- Tap

- Tap the
- Calibrate.
Once the WKT file has been successfully imported, the PIX4Dmatic project will display the localized point collection name as the project's ![]() coordinate reference system in the lower-left corner of the PIX4Dmatic window. The project is successfully site-localized and can be processed as needed.
coordinate reference system in the lower-left corner of the PIX4Dmatic window. The project is successfully site-localized and can be processed as needed.
For more information: How to process PIX4Dcatch datasets in PIX4Dmatic.