- These step-by-step instructions are part of the whole procedure of how to include GCPs in the project. For more information about how to include GCPs in the project: How to include GCPs in the project.
- All GCPs must have the same coordinate system.
- GCPs can be marked on rayCloud after the step 1. Initial Processing has been completed.
Adding / Importing GCPs:
1. On the Menu bar, click Project > GCP/MTP Manager...
2. Select the GCP Coordinate System: How to select / change the Image / GCP / Output Coordinate System.
3. Open the rayCloud: From the Menu bar, click View > rayCloud. The rayCloud opens and the Automatic Tie Points appear.
4. On the 3D View, click on one point that approaches the GCP position.
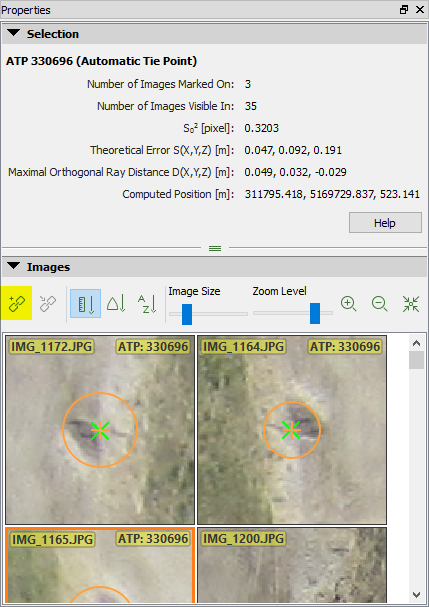
- On the right sidebar, the Images section displays all the images on which the clicked (selected) point is visible.
- On all the images the following appear:
- Green cross: Reprojection of the 3D point on the images.
- Orange cross: Position where the associated 2D keypoints have been automatically detected.
- Orange circle: The radius of the orange circle indicates the size of the area that has been taken into account to detect the keypoint.
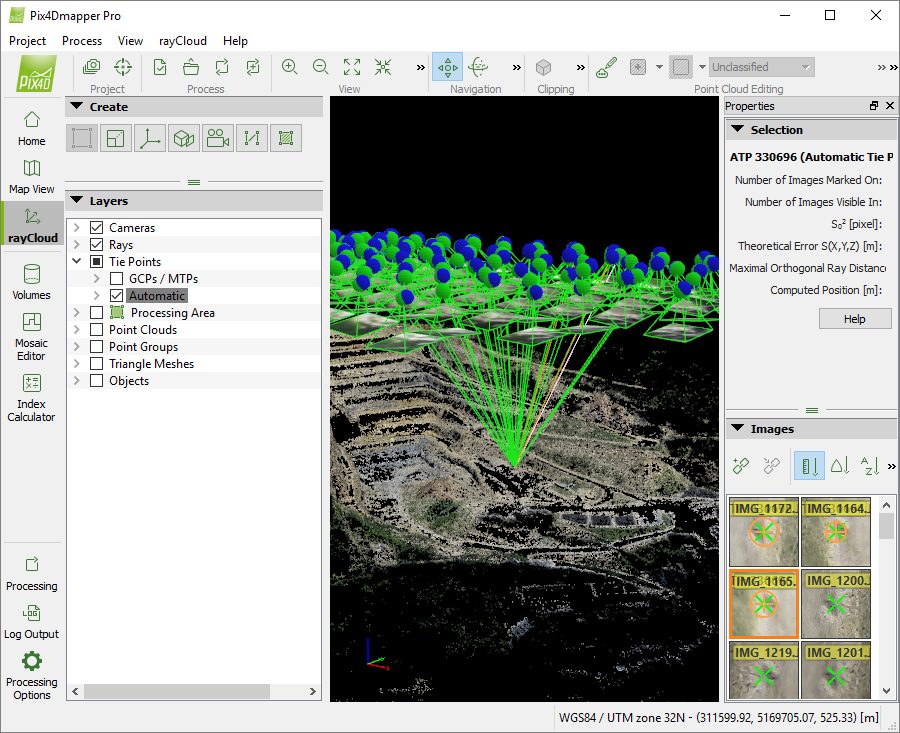
5. On the right sidebar, in the Images section, the GCP area should appear in the displayed images. If not, click another point on the 3D View that approaches better the GCP area.
6. Click  New Tie Point.
The Selection section in the right sidebar displays information about the New Tie Point:
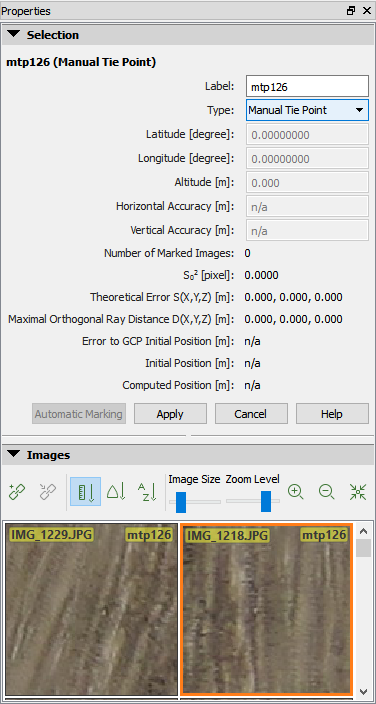
7. Edit the point's properties:
- (optional) Change the Label of the GCP:
1. Click the Label cell of the point.
2. Type the desired name.
- Change the Type of the point:
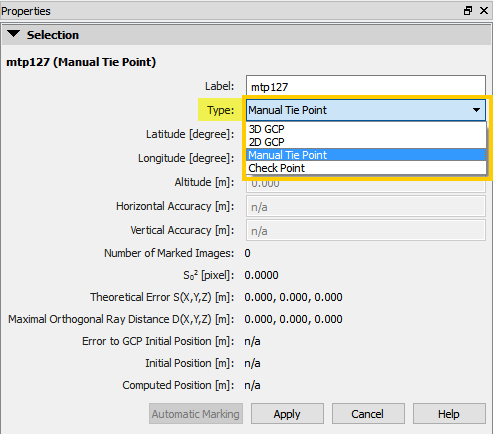
1. From the drop down list select:
- 2D GCP: If only the X,Y or Latitude,Longitude coordinates of the GCP are known.
- 3D GCP: If the X,Y,Z or Latitude, Longitude, Altitude coordinates of the GCP are known.
- Check Point: If the X,Y,Z or Latitude, Longitude, Altitude coordinates of the GCP are known. A Check point is not taken into account during processing and indicates the accuracy around the areas where it is defined.
- Insert the coordinates of the GCP (for 2D GCPs and 3D GCPs):
1. Click the coordinates cells of the point (Latitude, Longitude, Altitude or X,Y,Z).
2. Type the corresponding coordinates.
- (optional) Insert the Accuracy (for 2D GCP Horizontal Accuracy, and for 3D GCP Horizontal Accuracy and/or Vertical Accuracy):
Warning: The default value is 0.020 m, DO NOT modify the accuracy unless you have read: GCP / Manual Tie Point Table.
1. Click the Horizontal Accuracy / Vertical Accuracy cell of the point.
2. Type the Accuracy of the point:
- For very accurate GCP, insert a low accuracy value.
- For non accurate GCP, insert a high accuracy value.
For more information about the GCP table properties: GCP / Manual Tie Point Table.
8. Click Apply.
9. Repeat steps 4 to 8 for other GCPs.
Marking GCPs:
Follow the steps 4 to 11 of this article (Mark GCPs -> using the rayCloud): How to import and mark ground control points (GCPs).