This article provides step-by-step instructions on how to add or import GCPs in GCP/MTP Manager in PIX4Dmapper.
- These step-by-step instructions are part of the whole procedure of how to include GCPs in the project. For more information about how to include GCPs in the project: How to include GCPs in the project
- All GCPs must have the same coordinate system.
To add GCPs using the GCP/MTP Manager, follow:
1. On the Menu bar, click Project > GCP/MTP Manager...
2. Select the GCP coordinate system: By default, the GCP coordinate system will be the same as the Output/GCP Coordinate System selected when creating the project: Step 2. Creating a Project. If the GCPs have a different coordinate system, select the correct coordinate system: How to select / change the Image / GCP / Output Coordinate System.
3. Import the GCPs coordinates. The GCP coordinates can be imported:
In order to import the GCPs one by one:
1. On the GCP/MTP Manager, click Add Point.
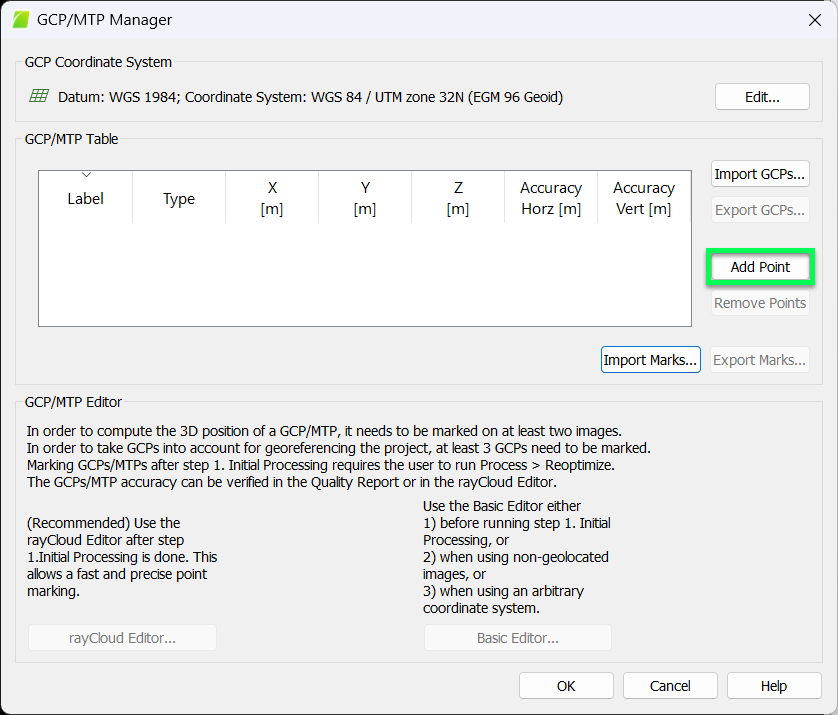
A new point is added to the GCP/MTP Table. This point is defined by default as Manual Tie Point (Type column) and is named by default mtp1 (Label column). When adding more Manual Tie Points, they will be named mtp2, mtp3, etc.
2. Edit the GCP properties:
- (Optional) Change the Label of the GCP:
1. Double-click the Label cell of the point.
2. Type the desired name.
- Change the Type of the GCP:
1. Double-click the Type cell of the point.
2. From the drop-down list select:
- 2D GCP: if only the Y,X or Latitude, Longitude coordinates of the GCP are known.
- 3D GCP: if the Y,X,Z or Latitude, Longitude, and Altitude coordinates of the GCP are known.
- Check Point: if the Y,X,Z or Latitude, Longitude, and Altitude coordinates of the GCP are known. A Check Point is not used in the reconstruction and indicates the accuracy around the areas where it is defined.
- Insert the GCP coordinates:
1. Double-click the coordinates cells of the point (Y,X,Z or Latitude, Longitude, Altitude).
2. Type the corresponding coordinates.
- (optional) Insert the Accuracy (for 2D GCP Accuracy Horz, and for 3D GCP Accuracy Horz and/or Accuracy Vert):
Warning: The default value is 0.020 m, DO NOT modify the accuracy, unless the following article is read: GCP / Manual Tie Point Table.
1. Double-click the Accuracy Horz/Vert cell of the point.
2. Type the Accuracy of the point:
- For very accurate GCP, insert a low Accuracy value.
- For non-accurate GCP, insert a high Accuracy value.
For more information about the GCP table properties: GCP / Manual Tie Point Table.
3. Repeat steps 1 and 2 for the rest of the GCPs.
4. On the GCP/MTP Manager window, click OK.
- To mark GCPs with the GCP/MTP Manager: How to import and mark ground control points (GCPs).
- To mark GCPs in the rayCloud Editor: How to import and mark ground control points (GCPs).
To import the coordinates from the GCP file:
1. Ensure the GCP file has the correct input file format. For more information about the file format: Input files.
2. On the GCP/MTP Manager window, on the GCP/MTP Table, click Import GCPs...
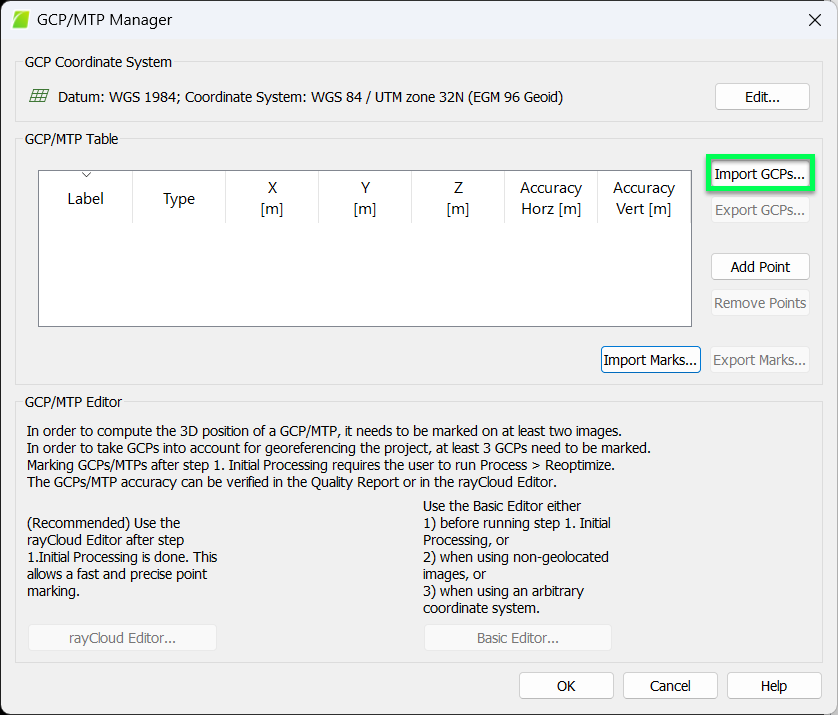
The Import Ground Control Points pop-up appears.
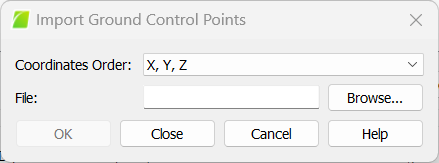
3. (optional) Select the Coordinates Order: By default, X, Y, Z (Longitude, Latitude, Altitude) is selected. It is possible to change to Y ,X, Z (Latitude, Longitude, Altitude). For more information: Input files.
4. Click Browse... to navigate to the GCP file.
5. Select the GCP file.
6. Click Open.
7. (optional) Insert the Accuracy (for 2D GCP Accuracy Horz, and for 3D GCP Accuracy Horz and/or Accuracy Vert):
1. Double-click on the Accuracy Horz/Vert cell of the point.
2. Type the Accuracy of the point:
- For very accurate GCP, insert a low Accuracy value.
- For non-accurate GCP, insert a high Accuracy value.
For more information about the GCP table properties: GCP / Manual Tie Point Table.
9. On the GCP/MTP Manager window, click OK.
- To mark GCPs with the GCP/MTP Manager: How to import and mark ground control points (GCPs).
- To mark GCPs in the rayCloud Editor: How to import and mark ground control points (GCPs).