- Images: On the Menu bar, click Project > Image Properties Editor..., in the section Image Geolocation, on Coordinate System, click Edit...
- GCPs: On the Menu bar, click Project > GCP/MTP Manager..., in the section GCP Coordinate System, click Edit...
- Outputs:
- On the Menu bar, click Project > Select Output Coordinate System...
- When creating a new project, the Select Output Coordinate System window is displayed after Image Properties.
- The output coordinate system does not need to be the same as the images' coordinate system or as the GCPs' coordinate system. It is recommended, though, that the output coordinate system is the same as the GCPs' coordinate system.
- For GCPs: All GCPs must have the same coordinate system.
- For the images: WGS84 (egm96).
- For the GCPs: The coordinate system that is selected when creating a new project under the Output / GCP Coordinate System section: Step 2. Creating a Project.
- For the Outputs:
- Arbitrary: If the project has neither image geolocation nor GCPs.
- The corresponding UTM zone: If the project has image geolocation.
- The coordinate system that is selected for the GCPs: If the project has GCPs.
In order to select/change the coordinate system of the images, GCPs, or outputs, follow the instructions below depending on the coordinate system desired:
- For local / arbitrary coordinate system.
- For global, continental or national coordinate system defined from list.
- For global, continental or national coordinate system defined from EPSG.
- For global, continental or national coordinate system defined from .prj.
- For auto detected coordinate system (only for the Output Coordinate System).
For local/arbitrary coordinate system
1. Open the Select Image / GCP / Output Coordinate System window for:
- Images: On the Menu bar, click Project > Image Properties Editor..., in the section Image Geolocation, on Coordinate System, click Edit...
- GCPs: On the Menu bar, click Project > GCP/MTP Manager..., on GCP Coordinate System, click Edit...
- Outputs: On the Menu bar, click Project > Select Output Coordinate System...
2. In the Select Image / GCP / Output Coordinate System window, on the Coordinate System Definition section, click the Unit dropdown list to set the units of the coordinate system (meter [m] or international foot [ft]).
3. Select Arbitrary Coordinate System [unit].
4. (optional) Only for the Output Coordinate System: If a site calibration exists, select the Advanced Coordinate Options check box. Then:
1. Click Site Calibration... For more information about the Site Calibration, Select Image / GCP / Output Coordinate System.
2. Set the site calibration parameters.
5. Click OK.
The coordinate system has now been chosen.

For global, continental, or national coordinate systems defined from a list
1. Open the Select Image / GCP /Output Coordinate System window for:
- Images: On the Menu bar, click Project > Image Properties Editor..., on Coordinate System, click Edit...
- GCPs: On the Menu bar, click Project > GCP/MTP Manager..., on GCP Coordinate System, click Edit...
- Outputs: On the Menu bar, click Project > Select Output Coordinate System...
2. In the Select Image / GCP /Output Coordinate System window, on the Coordinate System Definition section, click the Unit dropdown list to set the units of the coordinate system (meter [m] or international foot [ft]).
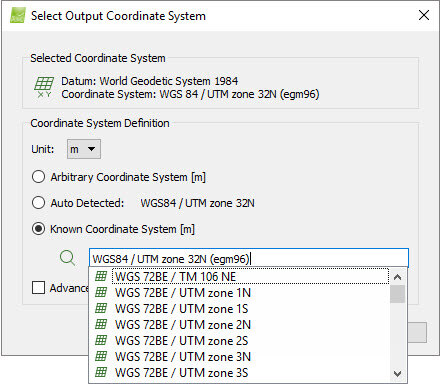
3.In the Select Image / GCP /Output Coordinate System window, on the Coordinate System Definition section, select Known Coordinate System [unit].
4. (optional) In the search text box, type the desired coordinate system. The search text box allows to find the coordinate system in auto-complete mode from the PIX4Dmapper's database (a coordinate systems list and EPSG codes).
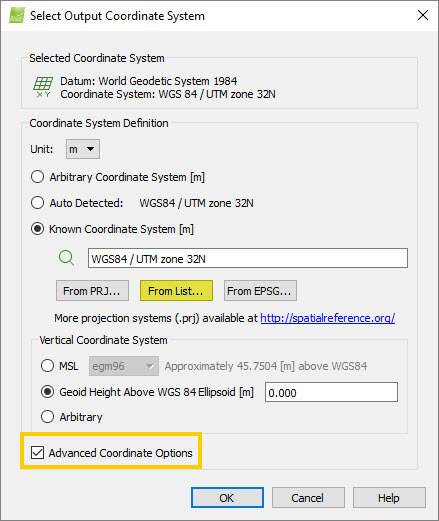
5. Select the Advanced Coordinate Options check box.
6. Click From List...
7. The Coordinate System pop-up window appears:
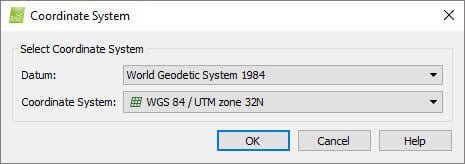
8. On Datum, click on the drop-down list and select the datum.
9. On Coordinate System, click on the drop-down list and select the coordinate system.
10. Click OK.
11. On the Select Image / GCP /Output Coordinate System window, click OK.
The coordinate system has now been chosen.
For global, continental, or national coordinate system defined by EPSG
1. Open the Select Image / GCP /Output Coordinate System window for:
- Images: On the Menu bar, click Project > Image Properties Editor..., in the section Image Geolocation, on Coordinate System, click Edit...
- GCPs: On the Menu bar, click Project > GCP/MTP Manager..., on GCP Coordinate System, click Edit...
- Outputs: On the Menu bar, click Project > Select Output Coordinate System...
2. In the Select Image / GCP /Output Coordinate System window, on the Coordinate System Definition section, click the Unit dropdown list to set the units of the coordinate system (meter [m] or international foot [ft]).
3. In the Select Image / GCP /Output Coordinate System window, on the Coordinate System Definition section, select Known Coordinate System [unit].
4. (optional) In the search text box, type the desired coordinate system. The search text box allows to find the coordinate system in auto-complete mode from the PIX4Dmapper's database (a coordinate systems list and EPSG codes).
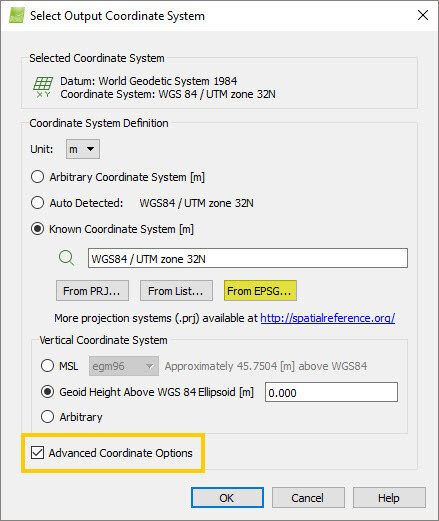
5. Select the Advanced Coordinate Options check box.
6. Click From EPSG...
7. In the Coordinate System pop-up window, under Choose EPSG Number, click on the drop-down list and select the desired EPSG code.

8. Click OK.
9. In the Select Image / GCP /Output Coordinate System window, click OK.
The coordinate system has now been chosen.
For global, continental, or national coordinate systems defined from .prj
1. Open the Select Image / GCP /Output Coordinate System window for:
- Images: On the Menu bar, click Project > Image Properties Editor..., in the section Image Geolocation, on Coordinate System, click Edit...
- GCPs: On the Menu bar, click Project > GCP/MTP Manager..., on GCP Coordinate System, click Edit...
- Outputs: On the Menu bar, click Project > Select Output Coordinate System...
2. On the Select Image / GCP /Output Coordinate System window, on the Coordinate System Definition section, click the Unit dropdown list to set the units of the coordinate system (meter [m] or international foot [ft]).
3. On the Select Image / GCP /Output Coordinate System window, on the Coordinate System Definition section, select Known Coordinate System [unit].
4. (optional) In the search text box, type the desired coordinate system. The search text box allows to find the coordinate system in auto-complete mode from the PIX4Dmapper's database (a coordinate systems list and EPSG codes).
5. Select the Advanced Coordinate Options check box.
6. Click From .prj...

7. On the Import .prj File pop-up window, navigate to the .prj file.
8. Select the .prj file.
9. Click Open.
10. On the Select Image / GCP /Output Coordinate System window, click OK.
The coordinate system has now been chosen.
For auto-detected coordinate system (only for the output Coordinate System)
1. Open the Select Output Coordinate System window: On the Menu bar, click Project > Select Output Coordinate System...
2. In the Select Output Coordinate System window, on the Coordinate System Definition section, click the Unit dropdown list to set the units of the coordinate system (meter [m] or international foot [ft]).
3. In the Select Output Coordinate System window, on the Coordinate System Definition section, select Auto Detected. Based on the coordinates of the images and the selected unit, PIX4Dmapper will auto-detect a coordinate system.
4. On the Select Output Coordinate System window, click OK.
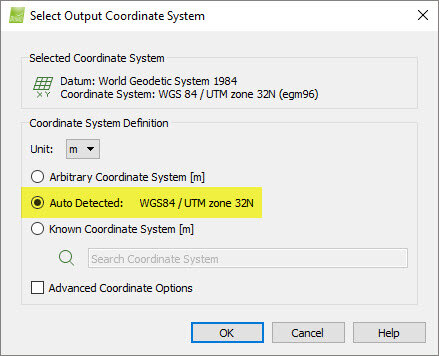
The coordinate system has now been chosen.