Access: On the Menu bar, click Project > Image Properties Editor. The window Image Properties Editor appears.
PIX4Dmapper can process images with or without geolocation.
If at least 3 images are geolocated, a green check  is displayed in the window Image Properties Editor, in the section Image Geolocation, under Geolocation and Orientation. The number of geolocated images is also displayed in that section.

- Add GCPs. For more information: Step 1. Before Starting a Project > 4. Getting GCPs on the field or through other sources (optional but recommended).
- Set Scale and Orientation Constraints. For more information: New Scale Constraint, New Orientation Constraint.
It is possible to:
- Delete the coordinates that are already imported.
- Load the image geolocation from the EXIF data.
- Import the image geolocation and orientation file:
For more information about the image geolocation file formats: Input files.
Delete the coordinates that are already imported
In the section Image Geolocation, under Geolocation and Orientation, click Clear.
Load the image geolocation from the EXIF data
If the image geolocation is written in the EXIF data of the image file, it is automatically loaded by PIX4Dmapper when importing the images. To reload the image geolocation from the EXIF data click From EXIF, on the section Image Geolocation, under Geolocation and Orientation.

Import the image geolocation and orientation from a general image geolocation file
-
Ensure the image geolocation file has the adequate format as described in: Input files.
-
In the Image Geolocation section, under Geolocation and Orientation, click From File...

- The pop-up Select Geolocation File appears.
- On the drop-down list File Format, select the file format according to the file and the selected coordinate system (Latitude, Longitude, Altitude or Longitude, Latitude, Altitude or X,Y,Z or Y,X,Z). For more information about the content and the format of these files: Input files.

- Click Browse...
- On the pop-up Select Geolocation File, navigate to the image geolocation file, select it and click Open.
- On the pop-up Select Geolocation File, click OK.
The image geolocation and orientation information have been imported.
Note: The orientation angles are not required for processing in PIX4Dmapper.
Tip: It is possible to use several files with the general image geolocation file format to import the image geolocation.
Warning: Each image must have a different geolocation (i.e. there cannot be several images with the same geolocation).
Import the image geolocation and orientation from a flight log delivered by 3D Robotics UAVs
-
In the section Image Geolocation, under Geolocation and Orientation, click From File...

- The pop-up Select Geolocation File appears.
- On the pop-up Select Geolocation File, on the drop-down list File Format, select 3D Robotics Flight Log.

- Click Browse...
- On the pop-up Select Geolocation File, navigate to the geolocation file, select it and click Open.
- On the pop-up Select Geolocation File, click OK.
The image geolocation and orientation information have been imported.
Import the image geolocation from a flight log delivered by CropCam UAVs
-
In the section Image Geolocation, under Geolocation and Orientation, click From File...

- The pop-up Select Geolocation File appears.
- On the pop-up Select Geolocation File, on the drop-down list File Format, select CropCam Flight Log.

- (optional) On the window Select Geolocation File, on the drop-down list Camera Servo, select the Servo motor on which the camera is attached (in general, Servo8 is used).
- (optional) Type the Camera Trigger Value (in general, the default value 32256 is used). This value corresponds to the value that the camera servo takes when an image is taken.
- Click Browse.
- On the pop-up window Select Geolocation File, navigate to the geolocation file, select the file and click Open.
Once the file is selected, the fields below are automatically filled:- First Image Date, corresponds to the date and time the first image is taken. It is filled automatically but can be edited using the arrows on the right side.
- First Geolocation Date, corresponds to the date and time of the first geotag. It is filled automatically but can be edited using the arrows on the right side.
- Image-Geolocation offset [ms], it is computed automatically using the above values, in order to match correctly a geolocation with each image.
- On the window Select Geolocation File, click OK.
The image geolocation and orientation information have been imported.
Import the image geolocation and orientation a the flight log delivered by QuestUAV UAVs
-
In the section Image Geolocation, under Geolocation and Orientation, click From File...

- The window Select Geolocation File appears.
- On the pop-up Select Geolocation File, on the drop-down list File Format, select QuestUAV Flight Log.

- Click Browse.
- On the pop-up Select Geolocation File, navigate to the geolocation file, select the file and click Open.
- On the pop-up Select Geolocation File, click OK.
The image geolocation and orientation information have been imported.
Import the image geolocation and orientation from a flight log delivered by Tetracam
-
In the section Image Geolocation, under Geolocation and Orientation, click From File...
- The window Select Geolocation File appears.
- On the Select Geolocation File pop-up , on the File Format drop down list, select Tetracam Flight Log.

- Click Browse.
- On the pop-up Select Geolocation File, navigate to the geolocation file, select the file and click Open.
- On the pop-up Select Geolocation File, click OK.
The image geolocation and orientation information are imported.
Export the image geolocation and orientation to a file
-
In the section Image Geolocation, under Geolocation and Orientation, click From File...

- The pop-up Export Image Geolocation appears.
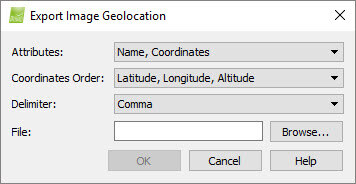
- On the pop-up Export Image Geolocation, on the drop-down list Attributes, select the attributes per image that the exported file will have:
- Coordinates.
- Name Coordinates.
- Name, Coordinates, Orientation, Accuracy.
- On the window Export Image Geolocation, on the drop-down list Coordinates Order, select the order of the coordinates that the exported file will have:
- Latitude, Longitude, Altitude.
- Longitude, Latitude, Altitude.
- X,Y,Z.
- Y,X,Z.
- On the window Export Image Geolocation, on the drop-down list Delimeter, select the delimiter character of the exported file:
- Comma.
- Space.
- Tab.
- Semicolon.
- Click Browse.
- On the pop-up Select Image Geolocation Export File, navigate to the path where the file will be stored.
- Type the name of the file in File name and click Open.
- On the pop-up Select Image Geolocation Export File, click OK.
The image geolocation file is exported and saved in the path selected.