This article explains the three sections displayed in the Mosaic Editing sidebar in PIX4Dmapper: Regions, Images, and Exports.
Access: On the Menu bar, click View > Mosaic Editor, on the Menu bar click Mosaic Editor > Mosaic Editing ( available only if step 3. DSM, Orthomosaic and Index has been completed and both the GeoTIFF DSM and the GeoTIFF orthomosaic have been generated).
For information about the sidebar's display possibilities: Displaying bars.

The Mosaic Editing sidebar contains the following sections:
- Regions: Allows the user to select, draw or delete regions.
- Images: Allows the user to select which projection and which image can be used for each region.
- Export: Allows the user to:
- Save the changes locally (saves changes in the Mosaic View in internal temporary files).
- Reset the displayed mosaic.
- Export an edited mosaic by exporting the internal temporary files.
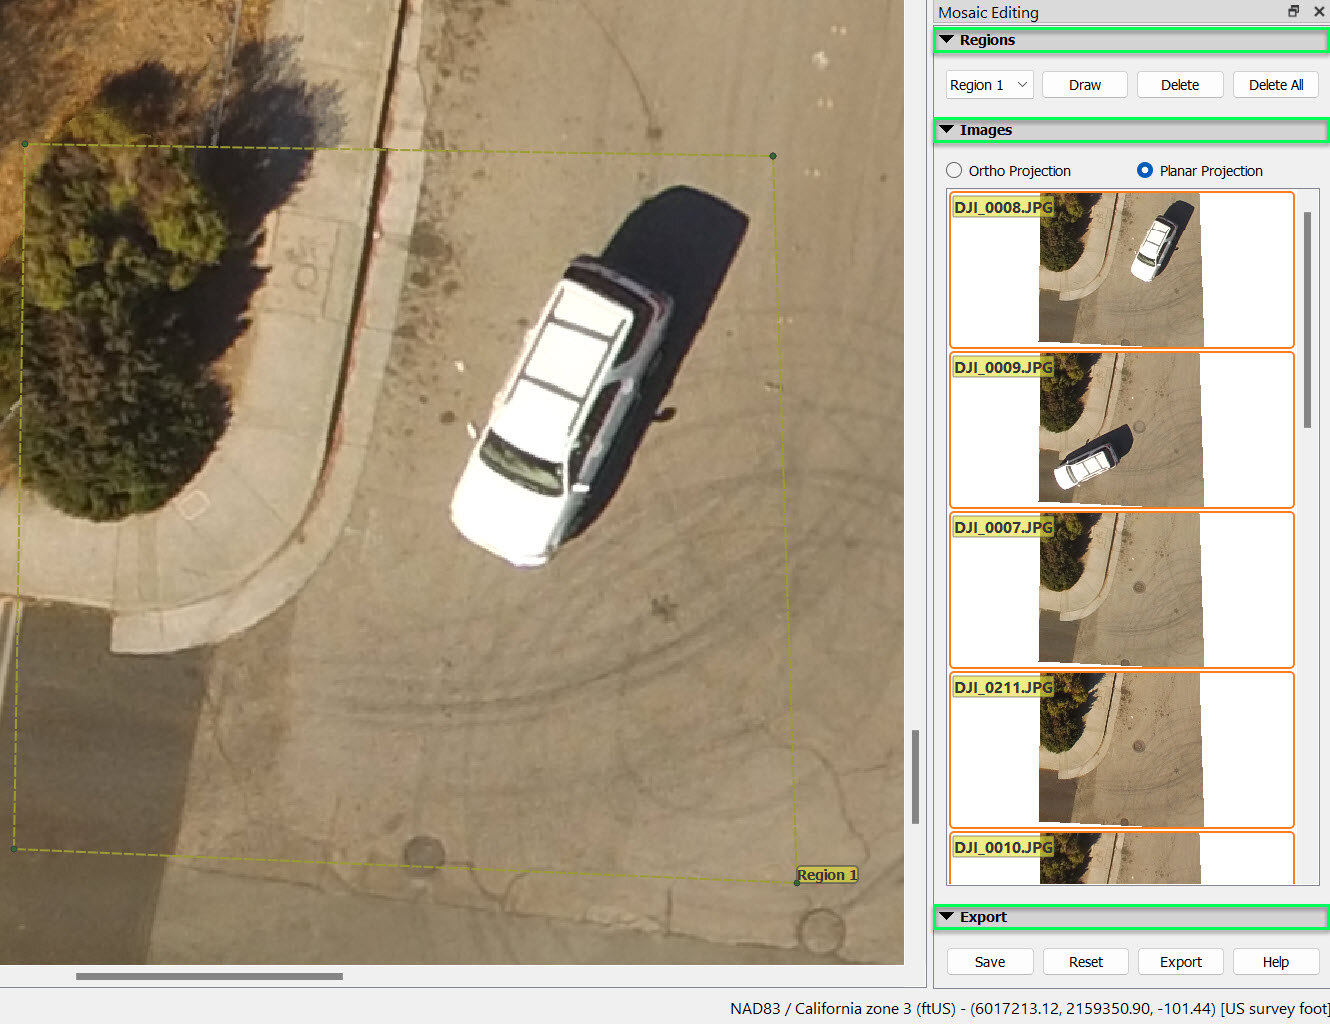
Regions
Allows the user to select, draw or delete regions.
Contains the following buttons:
- Region[number]: Available once one region has been drawn. Allows the user to select a region.
- Draw: Allows the user to draw a region. For step by step instructions: How to edit the Orthomosaic.
- Delete: Allows the user to delete the selected region.
- Delete All: Allows the user to delete all the existing regions.
Images
This section:
- Displays the different projections available for the selected region.
Note: The first projection that is displayed uses the most perpendicular image to the selected region.
- Displays the selected projection type and image for the selected region.
- Allows the user to change the projection type and image to be used for the selected region.
It is possible to select:
- Ortho Projection: displays a list of original images in ortho projection.
- Planar Projection: displays a list of original images in a planar projection.
Note:
- Ortho Projection: The ortho projection preserves distances and can be used for mosaics dedicated to measurement applications.
- Planar Projection: The planar projection does not preserve distances but has fewer distortions than the ortho projection on sharp transitions such as building edges. Therefore, using planar images for mosaics dedicated to measurement applications is not recommended. Its basic use is to improve the visual aspect of the orthomosaic.
Export
Warning:
- The Mosaic Editor can be used to manually correct artifacts in the Orthomosaic resulting from Step 3. DSM, Orthomosaic and Index and in order to improve its visual aspect.
- The changes applied in the Mosaic Editor affect a local copy, not the mosaic resulting from Step 3. DSM, Orthomosaic and Index.
- In order to obtain the edited mosaic, the mosaic needs to be exported: How to edit the Orthomosaic. The orthomosaic resulting from Step 3. DSM, Orthomosaic and Index will then be overwritten.
- For more information about the Mosaic Editor processes workflow: Mosaic Editor Workflow.
Allows the user to:
- Save the changes locally (saves changes in the Mosaic View in internal temporary files).
- Reset the displayed mosaic.
- Export an edited mosaic by exporting the internal temporary files saved.
Contains the following buttons:
- Save: Saves the changes in the mosaic: Overwrites only the areas corresponding to the existing regions using the selected projections.
The saved Edited Mosaic will be loaded when opening the project again and when exporting it.
- Reset: Resets the Edited Mosaic with the Generated Mosaic (which is stored in the results folder).
Note: When resetting all edits that have not been exported will get lost.
- Export: The selected Edited Mosaic overwrites the Mosaic generated at step 3. DSM, Orthomosaic and Index.
- Help: Opens PIX4Dmapper help.