This workflow is explained in our PIX4Dfields tutorial video 📺🌱
IN THIS ARTICLE
Download example imagery and process
Detecting weeds
Creating and exporting prescription
Download example imagery and process
|
Dataset size
|
3.5 GB |
| Average Ground Sampling Distance (GSD) | 1 cm / 0.39 in |
| Area covered | 6.54 ha / 21.25 acres |
| Image acquisition plan | 1 flight, grid flight plan. |
| Drone and camera | Mavic 3 Multispectral, RGB. |
| Reflectance panel/target | Not applicable |
| Download example images | |
Download example imagery and unzip the folder:
- Right-click on the "GreenOnBrown.zip" file.
- Click Extract all

- Click Extract.
- Create a new project and start processing.
- For most applications, Fast processing provides a good balance between the accuracy and speed of the results.
- Generate a TGI index. Please follow My first map and vegetation index - PIX4Dfields.
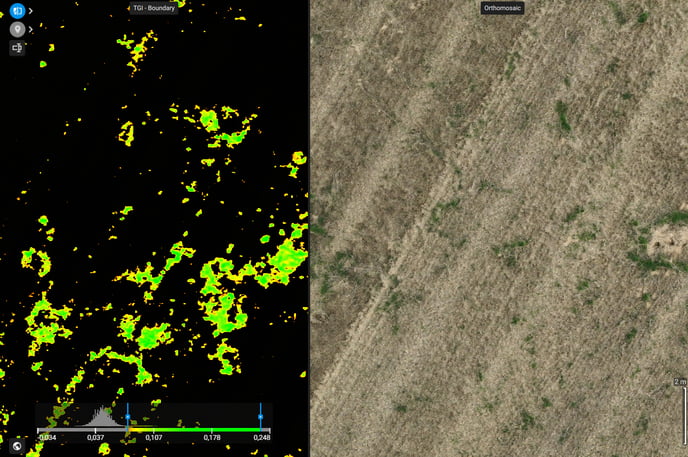
Detecting weeds with the zonation tool
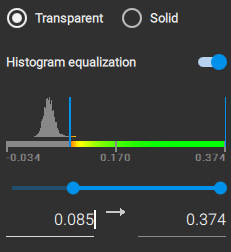
- Use the histogram handles to threshold the index.
- Click Transparent.
- Turn Histogram equalization ON.
- Set the min to 0.085 and max to 0.374.
- Use the comparison tool to fine-tune the threshold, ensuring it's sensitive enough to capture weeds accurately. Make sure not much ground is present. This part may be hard when the stubble of the previous crop is very high or dense.
Each pixel you see might be converted into an application area.

- After the histogram is set, access the Targeted Operation zonation:
- Click
 Operations icon located next to the
  Magic icon.
 - [1] Select Zonation (pre-fill grid with an index layer).
- [2] Select the TGI index as the base layer.
- Select the Boundaries of the zonation. You can adapt this boundary later.
- Select the Obstacles (Trees, poles, etc.) that will be present in the mission, if any.
- [3] The unit can be determined in this step and changed later on the Operation menu. Re-name the Operation layer. Click continue.
- [4] The Zonation is based on a grid. Select a cell size roughly representing the structures that must be differentiated on the map, in this case, set it to 0.5 meters.
It is recommended to use the same orientation as the crop row or the main driving direction (A-B line), set rotation to around 38o. Click continue. - [5] Adjust the histogram again if needed. In this case, leave it as it is.
- [6] Exclude cells by dragging the selector to the right. Set it to 2%.
- [7] Zonation configuration:
- Set Number of zones to 1
- The rest of the settings do not affect in this case.
- Click Create operation layer.

- Click
Creating and exporting prescription
Set the rate to be applied under the rate columns.
Optional: Create a new zone by clicking Fill all empty cells, and select New rate. This will create a new area/zone that can be set to 0. Otherwise, it will be done automatically when exporting.

The detection where weeds are present is 0.30 hectares; applying 3 liters/hectare, and for the rest of the area, which is 2.14 hectares, no product will be applied.
At the bottom, some statistics are provided, like the Total amount to be applied, in this case 0.89L.
This means around 85% savings! In reality, it will be less as the machinery may over-apply due to bigger sections, but these savings are impressive.
To export the weed detection, go to Export, Operation.
There are several machines you can export to:

For more information: How to export a targeted spraying map - PIX4Dfields