IN THIS ARTICLE
Scale constraints in the 3D viewer
Deleting a Scale constraint
Properties panel
How to scale a project
Important: There are two primary concepts for incorporating scale constraints.
- A Scale constraint is a line defined by two Tie points.
- A Scale constraint has a length.
Scale constraints in the 3D viewer
Scale constraints are symbolized in the 3D viewer as a magenta line.

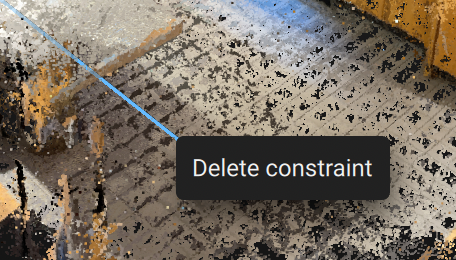
Deleting a Scale constraint
The Scale constraint can be deleted by right-clicking on the constraint while in the 3D viewer.
Properties panel
The Properties panel displays the length of the Scale constraint along with the accuracy of the line. When a new Scale constraint is created, the correct length must be entered in the Properties panel.

How to scale a project
A Scale constraint is defined by two MTPs.
- Select the Scale constraint
 icon or use the keyboard shortcut T.
 - Scale constraint works using Tie points (Tie Points (GCPs, MTPs, and CPs) - PIX4Dmatic). To generate them:
- Left-click on a point in the point cloud to set the starting point of the constraint, then left-click on another point in the point cloud to set the endpoint. Each selected point will create an MTP.
- Create MTPs marked in the images and then left-click on these Tie points to define the start and end points of the constraint.
- Enter the length of the constraint in the Properties panel.
- After drawing the Scale constraint, either Reoptimize or run Calibration (if not previously calibrated).
- Click Save...